I’ve been looking for cloud data storing for a long time during last years: it is interesting to monitor data from any kind of sensor, but it is more interesting if these data are available everywhere without any storage difficulty such as using SD cards or similar, in local storing.
I used to local store on SD cards wind speed data years ago, before IoT and cloud services begun to be simple to use: now one step beyond is possible with particular difficulties, even if you aren’t an IoT expert or a developer.
In this instructable I will describe how I’m monitoring my air quality inside home, expecially referring to dust and particulate concentration near my 3D printer, trying to understand if 3D printing process is dangerous in terms of PM2.5, and how I’m using Google Sheets to store data, without any third part service needed.
Step 1: General Goal
I want to know if living in presence of a 3D printer can be dangerous.
To do this I need data, and data have to be stored in the cloud.
I want to use Google Sheets since it is simple and effective.
I want privacy, too: so sharing data with Google is not my first choice but it is better than using third party services, as many bloggers use to do.
Using Google Sheets is a step toward uploading data to a personal local storage such as Nextcloud on a simple NAS: this will be described in a future instructable.
Step 2: First Step: Sensors
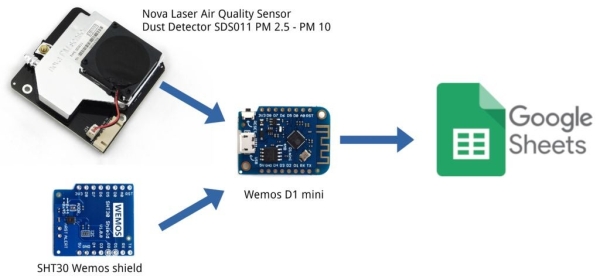
I use 2 sensors to monitor my home air quality:
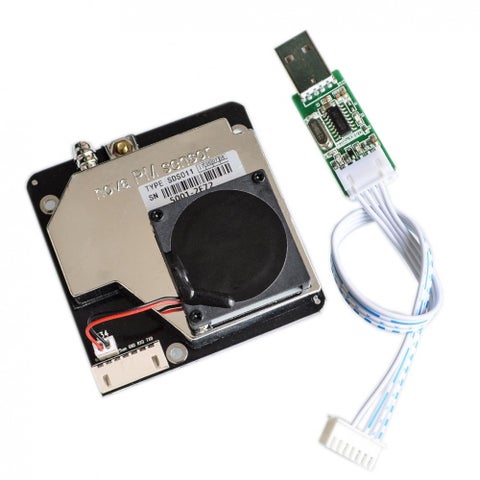
- a Nova PM Sensor SDS011 Air Quality Detection Sensor Module, a great piece of hardware, relatively simple to use with Arduino and similar boards.
You can use it with its own software (windows only! 🙁 ) and USB adapter, or connecting to Arduino with libraries. Many info can be found here: - an SHT30 shield from Wemos, for Wemos D1 mini: I used a v1.0.0 version, current version is v2.1.0 but they have same footprint, same functionalities
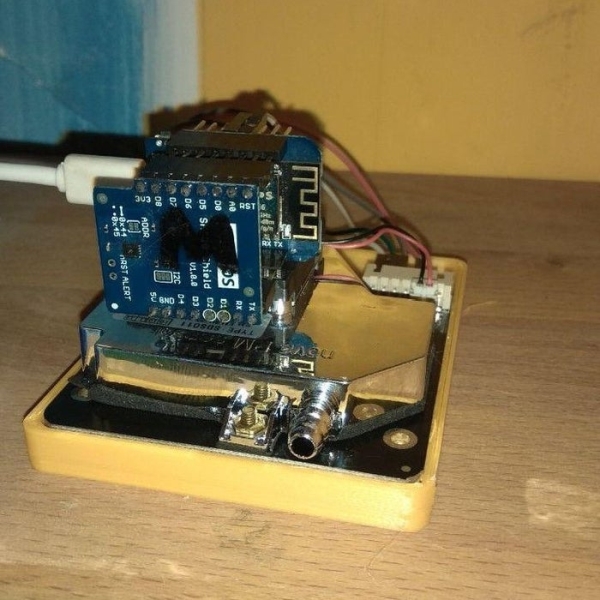
Step 3: Second Step: Connecting to Microcontroller
Wemos D1 mini is probably the best way to prototype around ESP8266: microUSB connector, onboard led, nice shields ready to use available.
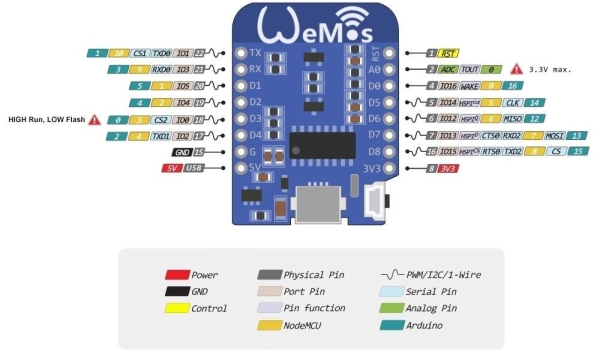
I connected SHT30 shield on Wemos D1 mini directly (take care of orientation!), then I connected Nova Air Sensor to Wemos D1 mini as follow:
Wemos GND pin –> Nova Air sensor GND
Wemos 5V pin –> Nova Air sensor 5V
Wemos D5 pin (RX pin) –> Nova Air sensor TX
Wemos D6 pin (TX pin) –> Nova Air sensor RX
You can have a look here for more info:
https://www.hackair.eu/docs/sds011/
https://www.zerozone.it/tecnologia-e-sicurezza/nov…
https://www.instructables.com/id/Make-one-PM25-mon…
Step 4: Third Step: Building a Sketch
Now you need to build a sketch: we are lucky, some guys developed specific libraries for Nova Air Sensor so you can write down easily your software.
Mine uses SHT30 library too, to measure and upload temperature and humidity data.
I remixed some sketch I found online, expecially the one from nishant_sahay7, whose tutorial is complete and full of info. You can find it here.
I used this library: https://github.com/lewapek/sds-dust-sensors-ardui…
I will comment only a few lines in the sketch I generated:
- line 76-77: waking up the dust sensor for a while, then it will go to sleep again, since datasheets states it is intended to work for around 8000 hours, which is more than enough, but not infinite
sds.wakeup();
delay(30000); // working 30 seconds
- line 121: data sent are temperature, humidity, PM2.5 and PM10
sendData(t, h, pm2_5, pm10);
- line 122-123: I don’t use ESP.deepSleep, I will try in the future; by now a simple delay(90000) will be enough to have data sending every 30s + 90s = 2 minutes, more or less
//ESP.deepSleep(dataPostDelay);
delay(90000);
- line 143:
this is the most important line, the order you create the String_url to upload data have to be the same you will use in Google Script (see next steps)
Read more: CloudyData – ESP8266 to Google Sheets Made Simple