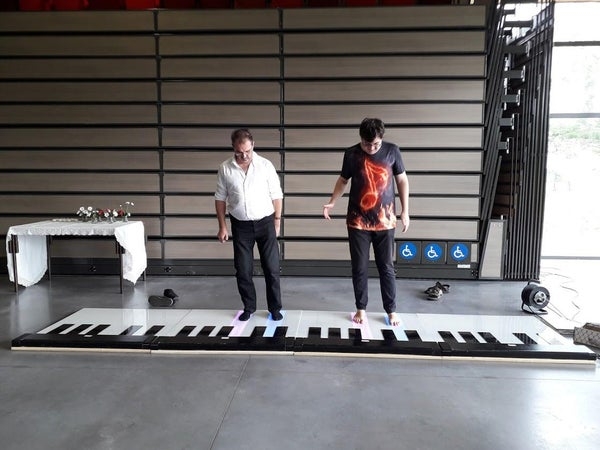
I created design to build a big and expandable floor piano (1 to 8 or more octaves) .
They were plenty of challenges with this piano.
I wanted all bullet ticked:
– Cheap
– Big but could fit in a car (from 1 to 8 meters long)
– Expandable (from 1 to 8 octaves now)
– Strong (it’s for kids, even if adults love to play too)
– No moving parts (same reason as above)
– Easy to use.
Current version is 300$ per octave (essentially because of wood and translucent acrilyc, and about 50$ for electronic), and 50$ for master. It tooks me about 60 hours to build it.
A video of the piano in action (from movie big).
And a google album : https://photos.app.goo.gl/zgVPkDczEqyu9RbT6
Supplies
For each octave, you’ll need :
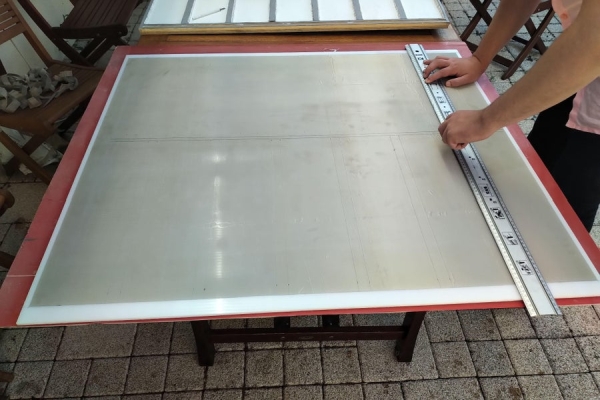
1x Plywood : birch plywood for rigidity, thickness 12mm, 105×100 cm
1x Acrilyc translucent sheets (white) : 105x90cm for each octave, 6 to 8mm thickness
5x Acrilyc translucent black sheets : 40×10 cm 3mm thickness
1x Wood 2.5x1cm : plenty for inside structure (description in step 1)
1x Wood 1cmx1cm : plenty for inside structure (description in step 1)
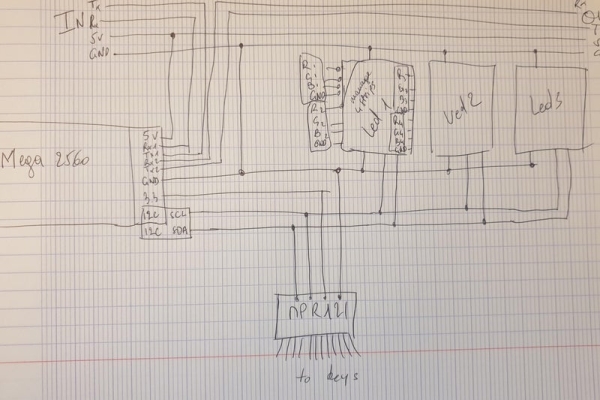
1x Arduino Mega to drive the octave, and send and receive data to/from master
1x Mpr121 or any chipset capable of capacitive detection
3x Led drivers : whatever you choose, I created my own with PCA9685 (using 12 channels on 16)
1x Few transistor (12 per card, 3 cards for one octave)
1x Silver Fabric Fiber Conductive Mesh for detection
1x RGB 5050 Led strip (30 led by meter is enough) 20m
For the master :
1x arduino mega
1x midi sound card
Step 1: Prepare the Wood

First use diagram to cut wood, and glue it as shown in picture.
Then paint in white.
Then glue felt fabric on the wood (it will help avoiding wood weird noise with the acrilyc)
Step 2: Prepare Acrylic With Silver Fabric
You’ll first need to glue silver fabric to the acrilyc sheet. I’m using a adhesive spray (gorilla, 3M, scotch, you have a lot of choice, I’m using 3M).
Then solder a wire to each of the pads as seen on picture 4 (these will be attached to the MPR121).
Step 3: Prepare LEDs
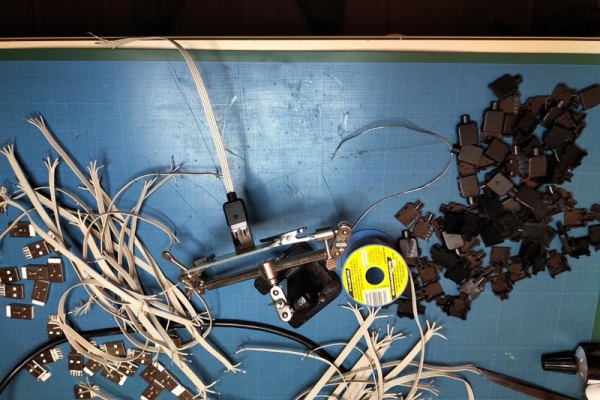
For the LED, I used USB A connector to be able to connect easily the led strip to the controlers.
First cut led strip to correct length, then solder the wires to the strip.
When this is done, you can use hot glue to glue the led strips to the wood.
Step 4: Electronic of the Octaves
A friend created a board to drive the LED strips. This board is provided in the rar file attached with name of components.
Just solder transistor, resistor, capacitor (just one), USB connectors, Power connector, I2C link connector, and chipset and that’s pretty much it.
I’ve not done this part, I’m not very good at SMD, but it is also very easy to build one with full size components (that’s what I had done first hand).
The 0 to 5 pad allow you to give a I2C number to the board. You’ll have 3 of them for one octave, + the MPR121 on the I2C bus.
This done, you need to link all stuff together. Look at schematic, this is kind of easy once you figure it :
The piano is built with one master driving the whole thing and one slave for each octave. The slaves can be interchanged without constraint (no ordering of the octave, easy add with no configuration at all, actually there is ordering and configuration, but it’s all done in the code and the end user doesn’t have to take care of it)
I’m using a RS232 bus to go from the master to the slaves, and one RS232 bus to go from the slave to the master (hence the use of arduino Mega that has multiple hardware serial buses). for this link, I’ll use RJ45 cables
There is also a power line for each of the octave, so 220V (110 depending where you live) is going from slave to slave. It’s 12V that drives the power the LED only (it was easier to have 10 Amps Power supplies in each octave than having to have till 80Amps in 12V) It’s about 20 meter of led by key than could all be lighted at the same time in the end, it’s 20mA * 3color * 20meter * 30ledsbymeter = 36Amps, fortunately, you never have all keys in white at the same time.
Step 5: Software
The software part is quite easy for the master and the slaves. Files are attached.
How it works ?
First plug the octaves, then plug the master to the first octave, then turn it on.
When turned on, the master will send a message on the COM bus to discover the number of octaves, and will give each of them a number.
When a key is touched on an octave, the software will get the number of the key, will add the number of the octave, and will send the message to it “father”. The message will then go to the master, and master will play the note.
Step 6: Hardware and Software of the Master
Master is simply an arduino mega with a midi music shield (in my case, I used VS1053, but it can be any).
The software part is similar to the one in the octaves, except it handles information from BUS and trtansform it into midi command sent to the shield.
Step 7: Remarks
My time is limited, and I can’t spend too much time to think more to a better way to present this instructable. If you find any point unclear, if you need any explanation, don’t hesitate to ask, I’ll answer, and will use it to make it better.
Source: Cheap Expandable Floor Piano