Cayenne and SparkFun IoT 433 Mhz Sockets

I know the Z-Wave or Netatmo system for IoT, domotic system and automation of house. But now you can make a simple system that uses a Node MCU board and Cayenne platform for control five 110/220 V sockets.

You can download the Cayenne app on your phone or visit the Dashboard on the web by your computer, and switch ON/OFF your sockets by remote. This is possible also if you are out of your home or out of your state!

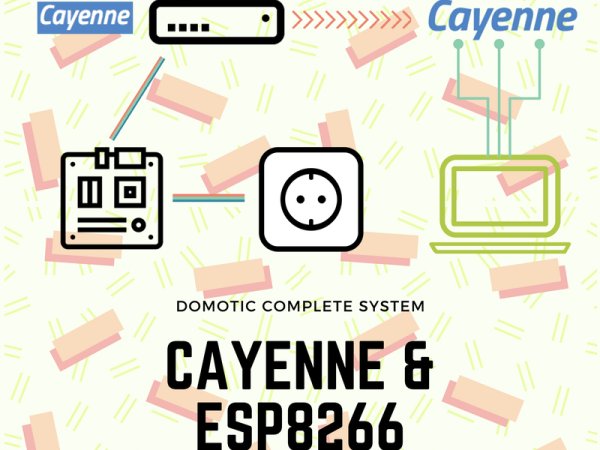
The control is possible behind the Cayenne servers. See the picture below. The signal starts by your phone by the Cayenne app, goes to Cayenne server in the cloud. After The server sends you signal to your Node MCU device connected to your LAN, and it sends the signal by using the 433 Mhz antenna to the 110/220 V sockets.

I want to use the new SparkfunESP8288 Thing – Dev Board ( https://www.sparkfun.com/products/13804).

A development board that has been solely designed around the ESP8266, with an integrated FTDI USB-to-Serial chip. The ESP8266 is a cost-effective, and very capable WiFi-enabled microcontroller. Like any microcontroller, it can be programmed to blink LEDs, trigger relays, monitor sensors, or automate coffee makers, and with an integrated WiFi controller, the ESP8266 is a one-stop shop for almost any Internet-connected project. To top it all off, the ESP8266 is incredibly easy-to-use: firmware can be developed in Arduino, and uploaded over a simple, serial interface. The ESP8266 Thing Development Board breaks out all of the module’s pins, and the USB-to-serial converter means you don’t need any peripheral components to program the chip. Just plug in a USB cable, download the Arduino board definitions, and start IoT-ing.

Simple!

This is the list of materials:

SparkFun ESP8266 Thing – Dev Board on Amazon

Arduino Nano on Amazon

Node MCU Amazon

Node MCU GearBest

433 Mhz antenna on Amazon

433 Mhz antenna on GearBest

5 sockets with remote control on Amazon

Optional:

Breadboard on Amazon

Breadboard on GearBest

Wires for breadboard on Amazon

Wires for breadboard on GearBest

Kit Arduino on Amazon

Step 1: Subscribe to Cayenne

First of all subscribe now to “Cayenne my device service”. Point your browser to http://www.cayenne-mydevices.com and Sign Up for free. After that click on Add new… and choose a new board. Now you can obtain the Token code. This code will return useful after in the Node MCU step.

Step 2: Scan the Remote Control

Now for switch ON/OFF your sockets you must be scan the signal of your remote control and note the binary code. After you can catch this code and include in your Arduino code.

First of all, connect the 433 Mhz receiver to your Arduino Nano or Arduino UNO. By using the scheme in the picture.

Install RC Switch library. You can use the little and popular 433 Mhz module to receive the remote controller signals.

After the installation of the library (see the installation library tutorial here), you can open the example file:

File > Examples > RC_Switch > ReceiveDemo_Advanced and upload the firmware on your board.

Now you can push the ON button on your remote command. After this open the Serial monitor. Like in the picture, see the BinaryPulseLenght and Protocol for every button. Take note of this numbers into a file. You must be this procedure for ON/OFF switch of 5’s sockets. Note all the code in the order and goes to the next step.

Step 3: Compiling the Node MCU Code

Now you can write the Node MCU code with the binary code of your remote control.

If you haven’t Node MCU in the Arduino IDE menu you must install the Node MCU board in the program.

Follow this guide to install Node MCU in the Arduino IDE.

After that, you can download the Cayenne Arduino library and install it in your Arduino IDE. Follow my previous Instructables on Cayenne.

Now you can try the example code. You can select Node MCU like the board, and write your SSID and WifiPass of your LAN correctly.

If all works, you can upload the code with your personal binary code. The binary code are the code of your remote control. Right!

Step 4: Write the Code of “your” Remote Command

Now you can copy the code below and add your credential:

Cayenne Auth TokenWiFi SSID and WiFi password.

Set the pin of transmission on Node MCU D0 (numner 16):

mySwitch.enableTransmit(16); // on NodeMCU is D0

Set your pulse lenght that you have registered in the previous step:

mySwitch.setPulseLength(xxx);

Set your binary code for each button:

mySwitch.send(“xxxxxxxxxxxxxxxxxxxxxxxx”);

<p>//#define CAYENNE_DEBUG         // Uncomment to show debug messages<br>#define CAYENNE_PRINT Serial  // Comment this out to disable prints and save space
#include "CayenneDefines.h"
#include "BlynkSimpleEsp8266.h"
#include "CayenneWiFiClient.h"</p><p>#include RCSwitch mySwitch = RCSwitch();</p><p>// Cayenne authentication token. This should be obtained from the Cayenne Dashboard.
char token[] = "xxxxxxxx";
// Your network name and password.
char ssid[] = "xxxxxxxx";
char password[] = "xxxxxxxx";</p><p>void setup()
{
	mySwitch.setPulseLength(xxxx);
	Serial.begin(9600);
        mySwitch.enableTransmit(16); // on NodeMCU is D0
	Cayenne.begin(token, ssid, password);
}</p><p>void loop()
{
	Cayenne.run();
}</p><p>CAYENNE_IN(V2)
{
  CAYENNE_LOG("Got a value: %s", getValue.asStr());
  int i = getValue.asInt();
  
  if (i == 0)
  {
    mySwitch.send("xxxxxxxxxxxxxxxxxxxxxxxx");
  }
  else
  {
    mySwitch.send("xxxxxxxxxxxxxxxxxxxxxxxx");</p><p>  }  
}</p>

Step 5: Make the Cayenne Dashboard

Now in the Cayenne you can make your personal dashboard. After the Node MCU connection, you can see your board online. Great!

Add ON/OFF toggle switch like the widget on your Dashboard and remember, connect the switch to your Virtual pins in the code.

Step 6: Switch ON/OFF the Sockets

Now you can test the project.Try to switch ON/OFF the socket by using your Cayenne dashboard or Cayenne App.

Great! Now you have a little IoT system for command your home.

Source: Cayenne and SparkFun IoT 433 Mhz Sockets


About The Author

Ibrar Ayyub

I am an experienced technical writer holding a Master's degree in computer science from BZU Multan, Pakistan University. With a background spanning various industries, particularly in home automation and engineering, I have honed my skills in crafting clear and concise content. Proficient in leveraging infographics and diagrams, I strive to simplify complex concepts for readers. My strength lies in thorough research and presenting information in a structured and logical format.

Follow Us:
LinkedinTwitter

Leave a Comment

Your email address will not be published. Required fields are marked *

Scroll to Top