Summary of Catching Your Breath
This article describes a small breath-sensing device using a thin-film differential pressure sensor and a microcontroller to detect exhalation pressure changes, log breaths to an SD card, and optionally drive a NeoPixel LED alarm (e.g., for snorkel safety). It covers parts, wiring, enclosure/venting considerations, two software modes (logging and LED alarm), and application-specific mounts for snorkel, biking, and hiking.
Parts used in the Catching Your Breath project:
- Adafruit Feather 32u4 Adalogger
- Lipo battery sized to the Feather
- Generic power pushbutton
- MP3V5004G differential pressure sensor (0 to 3.92 kPa, 0.6 to 3.0 V output)
- 0.125 OD hose for gas engines
- 1/8 ID vinyl hose
- Small plastic pill bottle or other enclosure
- Small capacitors and tiny breakout board for sensor signal conditioning
- NeoPixel LED stick (optional)
- SD card (for logging mode)
We are nation of obsessive counters: of pulse, steps, followers and calories. Most of these numbers mean little as physiology cannot be reduced to these metrics. But we try and I wondered how do we count a breath? Remember the cinematic days before hospital demise a cold mirror was a crude indicator of expiring breath. I needed a micro controller-sensor that would do this. Published methods of sensing a breath have included a expanding force sensor around your midsection, a temp probe that works on exhaled air being warmer than inhaled stuff, and sip/blow switches available on quadriplegic control units and strange laser sensors that look at patients expanding girth while in MRI machines. The easy method I settled on was an analogue thin-film sensor for detecting relative pressure differences that occur with rising water levels in washing machines. With a little bit of data tinkering the very sensitive unit is able to detect the subtle uptick in pressure that accompanies exhalation in a monitored space.
Step 1: Gather Your Materials

This project is fairly simple in construction. It involves a Analog read with a microcontroller, a sensor, a lipobattery for power and a neopixel stick and SD card for output. The absolute size of the unit can be reduced further if you want to forgo the card output and downsize the battery.
1. Adafruit Feather 32u4 Adalogger–great board about $20
2. LipoBattery–I used the same size as the Featherboard which had plenty of power–with the new travel mailing restrictions these are getting harder to obtain.
3. Power Button–generic
4. MP3V5004G Series 0 to 3.92 kPa (0 to 400 mm H2O) 0.6 to 3.0 V Output — Mouser Electronics about $17
5. 0.125 OD hose for gas engines
6. 1/8 ID vinyl hose
To make your sensor waterproof you must enclose it some container–I used a small plastic pill bottle.
Step 2: Wire It Up
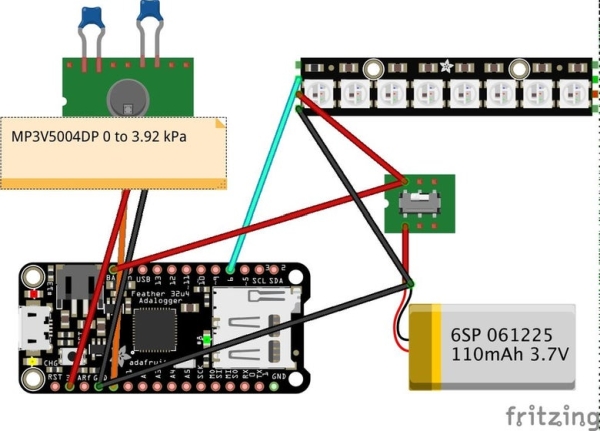
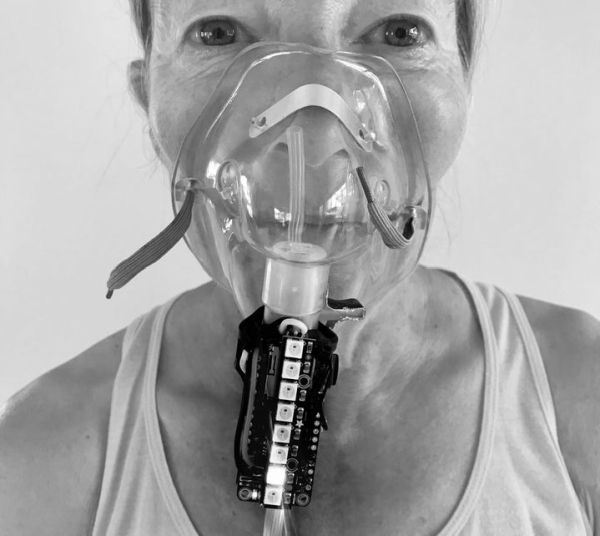
This is such a tiny unit. The sensor is only 1/2 inch across so it can be mounted on the back of the lipo battery which is mounted to the backside of the microcontroller. The signal and the power have a couple of small capacitors attached to a tiny board that I mounted the sensor on. Follow the wiring diagram included with the sensor. The output of the sensor is sent to A0. The power to the sensor comes off the 3 volts on the microcontroller. Originally I had a tilt sensor so the unit would only turn on when upright but unfortunately the switch was a little quirky with movement so I changed to a tiny pushbutton. The code sets up a new recording file with each new boot.
Step 3: Build It

This will of course vary with what you want to use the device for. In my case I wanted to test it with a variety of conditions just to see how it would respond. I built one variation for snorkel use and another for biking and hiking. The sensor has two ports with a very sensitive strain gauge baffle in-between. It has On-Chip Signal conditioning with temperature compensation. The relative uptick in the pressure from your breathing must enter the upper tube and the lower tube must be exposed to the relative stability of outside air–it cannot be sealed in a container as the increase in pressure from the upper tube would cause a reverse increase in pressure in the lower tube nullifying the output. I used a small plastic tube that snuggly fit the output bib and sealed this in a larger tube that was more easily manipulated. When using it inside a waterproof sealed container make sure that you provide a tiny vent hole or multiple ones in the container. Alternatively you can lead an additional small vent tube to the outside for the lower barb. The tube must sense a slight increase in air pressure for it to trigger so designing a breath catcher is necessary — in the case of the snorkel all your breath is directed into the tube which easily triggers a pulse. The mask works well even when there are multiple holes for air input as it restricts sudden outflow and raises the pressure.
Step 4: Program It
I have included two programs for the sensor. The first utilizes the SD file system to count breaths the other program is designed to light the LED stick blue if your breathing and red if you’re not. The program first initializes the sensor to remove any baseline drift by subtracting the A0 reading for the baseline reading. It then has the loop function where you can set the sampling time in microseconds and calls a function to have a rolling mean for ten readings. A call is made when a sustained high pressure is followed by a sustained low pressure measurement. This is considered a breath which is counted and timed. The file system can be triggered by calculating the rate/min for each breath but this is highly variable. I found more usable results if the breaths in ten seconds were counted and then multiplied by six and placed in the file system. It also ignores overly long stops and breaks in breathing so the data wouldn’t look so spotty.
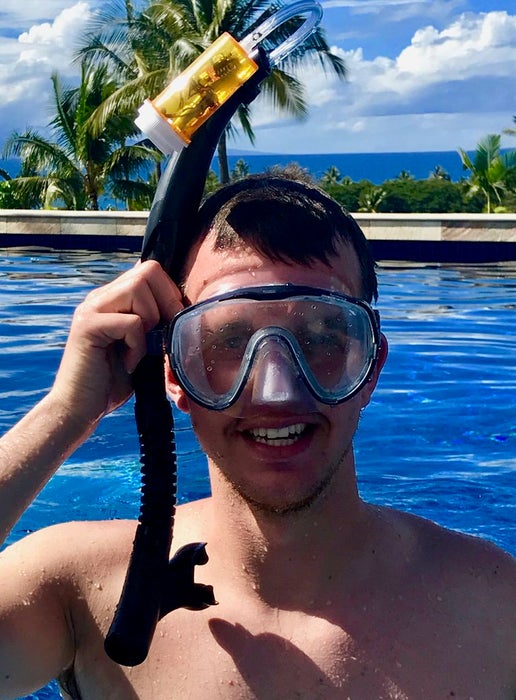
The second program is designed for a safety snorkel sensor. With the high rate of sudden death while snorkeling it is sometimes hard to tell if people with their face in the water are snorkeling or in trouble with apnea. This device can act as a monitor to signal with flashing LED’s if a snorkeler has not taken a breath in a set period and change its flash pattern from running blue to running red. The device is small and light enough to sit near the end of the snorkel with its sense tube running down into the top end of the snorkel. Monitoring for hyperventilation with resultant shallow water drowning may also prove useful.
Source: Catching Your Breath
- What sensor is used to detect breath?
The project uses an MP3V5004G thin-film differential pressure sensor to detect small pressure changes from exhalation. - How is the sensor connected to the microcontroller?
The sensor output is wired to analog input A0, and its power is taken from the microcontroller 3V supply with small capacitors on the signal/power lines. - Can the device log breath data?
Yes, one included program logs breaths to an SD card using the Adalogger board. - How does the device determine a breath?
The code removes baseline drift, computes a rolling mean, and counts a breath when a sustained high pressure is followed by a sustained low pressure. - Does the enclosure need venting?
Yes, the enclosure must have a tiny vent hole or an external vent tube to allow the sensor lower port to reference outside air. - Can this be used on a snorkel?
Yes, a snorkel-mounted version directs exhaled air into the sensor tube and an LED mode can alarm if no breath is detected in a set period. - What power source is used?
The device uses a Lipo battery sized to the Feather board as the power source. - Is the sensor waterproof?
The sensor itself is enclosed in a small plastic container (for example a pill bottle) to make it waterproof, but proper venting must be provided. - Can the NeoPixel show breathing status?
Yes, the second program lights the LED stick blue when breathing and red when not breathing.