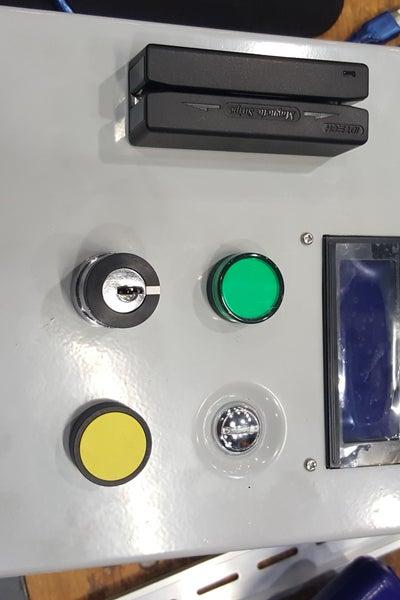
This box reads any card with a magnet strip and, if you’re on the registered personnel list, turn on the shop power via a relay. A sole person, to be added to the program file upon creation, has the power to add others to this list for the utmost security.
Step 1: Hardware
This is the list of hardware I ended up using, but it can be trimmed, pruned, or changed to fit your needs.
1 @ 8x8x4 steel box
1 @ Arduino Uno
1 @ USB Host shield
1 @ Adafruit DataLogger Shield
1 @ 4G SD Card
1 @ Magnetic Card Reader
1 @ 20×4 LCD Screen
1 @ 12VDC Power Supply
1 @ 120VAC Relay
1 @ Large 120VAC 20mA LED
1 @ 240VAC 3A Button
1@ 10A Key Switch
1 @ TIP120 Transistor
3 @ 1K Resistors
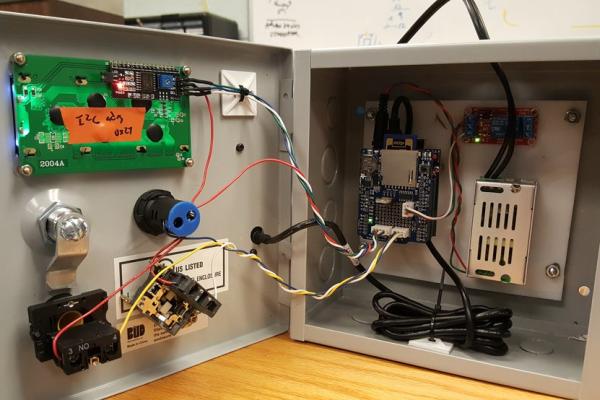
The LCD, button, key switch, LED, and card reader are mounted on the face of the box. The Arduino, relay, and power supply are mounted on an acrylic sheet, which is mounted to the back of the box on stand-offs. The hardware wired to the Arduino is attached with unpluggable connectors for ease of serviceability. The two shields are stacked up on the Arduino.
Step 2: Software
This is a lot of code.
This first section contains the libraries and global variables that are used to run the program.
#include <hidboot.h> /*handles the card reader*/
#include <spi.h> /*Serial for the mag Reader and SD Shield */
#include <sd.h> /*library to handle the SD SHield*/
#include <wire.h> /*I2c Library for Real Time Clock (RTC)*/
#include "RTClib.h" /*RTC library*/
#include <liquidcrystal_i2c.h> /*LCD Display library*/

/*various variables*/
String readMag; /*string to store car info*/
String checkName = ""; /*buffer for reading names from List file*/
unsigned long currentMillis = 0; /*handles timeout for card reader to reset readMag after entire card is read*/
long previousMillis = 0; /*part of currentMillis situation for the card reading code*/
long pMillis = 0; /*used for loop code to indicate "ready" or "wait" for user to waait for card reader to reset*/

/*various pins for the different hardware  Special note: USB Shield chip selecter is 10
                SD Shield chip selecter is 4
  Turn them low to activate and high to deactivate
*/
const byte relayPin = 3;
const byte keyInput = 5;
const byte GreenLED = 7;
const byte button = 6;

/*various state recording variables*/
boolean powerState = false; /*tool power is off at start*/
boolean keyState = false; /*key is off*/
boolean buttonState = false; /*button is off*/
boolean swipeState = false; /*no one has swiped yet*/
boolean once = false; /*only lets the lcd print the swiped card and time once rather than indeffinitely*/
boolean adminSwipe = false; /*handles admin adding cards*/
boolean timer = false; /*records state for*/

/*instnaces for the magReader*/
USB     Usb;
HIDBoot<usb_hid_protocol_keyboard>    HidKeyboard(&Usb);

/* instance for the SD file handler*/
File openedFile;

/* instance to RTC*/
RTC_PCF8523 rtc;

/* LCD instance */
LiquidCrystal_I2C lcd(0x27, 20, 4);

/*Class for the magReader*/
class KbdRptParser : public KeyboardReportParser {
  protected:
    void OnKeyDown	(uint8_t mod, uint8_t key);
    void OnKeyPressed(uint8_t key);
};
/*instance of the magReader class*/
KbdRptParser Prs;
This next section is the setup that initiates all of the variables and starts all the different serial communications, and the Class header and cpp code for the magReader. The thing to note is in the MagReader class cpp is where most of the action happens when a card is swiped. This is also where the Admin’s first 15 characters of their card are stored.
The logic for manipulating the swiped card’s data down below is as follows: *****
If the button is pressed and the Admin swiped then activate Admin mode so the next swiped card is added to the list of registered people. Else if admin mode has been activated go to WriteToList to add this new person’s card. If neither of those then go to CheckList to see if this new swipe is on the list.
void setup() {
  Serial.begin( 115200 );

  /*start usb mag Reader*/
  digitalWrite(10, LOW);
  if (Usb.Init() == -1)
    Serial.println(F("OSC did not start."));
  ( 200 );
  HidKeyboard.SetReportParser(0, &Prs);
  digitalWrite(10, HIGH);

  /*start RTC */
  rtc.begin();

  if (! rtc.initialized()) {
    Serial.println(F("RTC is NOT running!"));
    rtc.adjust(DateTime(F(__DATE__), F(__TIME__))); /*saves the time and date of your pc to rtc*/
  }

  /*start sd shield*/
  digitalWrite(4, HIGH);
  if (!SD.begin(4)) {
    Serial.println(F("initialization failed!"));
    lcd.print("init Failed");
    return;
  }
  digitalWrite(4, HIGH);
  digitalWrite(10, LOW);

  /*starts lcd display*/
  lcd.begin();
  lcd.backlight();

  /*pinmodes for the various hardware*/
  pinMode(button, INPUT);
  pinMode(keyInput, INPUT);
  pinMode(GreenLED, OUTPUT);
  pinMode(relayPin, OUTPUT);
}

//--------------------Reading card-------------------------------------------//
void KbdRptParser::OnKeyDown(uint8_t mod, uint8_t key) {
  //        Serial.print("DN ");
  // PrintKey(mod, key);
  uint8_t c = OemToAscii(mod, key);
  if (c)
    OnKeyPressed(c);
}
void KbdRptParser::OnKeyPressed(uint8_t key) {
  timer = true; /*card has been swiped, saved for lcd indication timeout*/
  /*timeout for card reader to reset readMag after larger cards have been read*/
  currentMillis = millis();
  if (currentMillis - previousMillis > 17000) {  //if it has been more than 1 second clear variable
    previousMillis = currentMillis;
    readMag = "";
  }
  char theChar; //buffer to store ascii value from reader
  theChar  = ((char)key); //pass ascii value from usbhost to variable

  /*this prevents the card reader from reading any more than the required characters*/
  if (readMag.length() < 16) {
    readMag += theChar;  // assemble the ascii into a string
  }

  /*if readMag is 15 characters long do the stuff*/
  if (readMag.length() == 15) {
    /*Switch communication from USB Shield to SD Shield*/
    digitalWrite(10, HIGH);
    digitalWrite(4, LOW);
    //    Serial.println(readMag);

    /*if the button is pressed during a swipe then activate admin mode and indicate on lcd*/
    *****
    if (digitalRead(button) == HIGH && readMag == /*Admin's card info*/(F("first_15_Characters_Of_Your_Admin_ID"))) {
      adminSwipe = true;
      lcd.setCursor(0, 1);
      lcd.print(F("ADMIN ACCESS    "));
      lcd.setCursor(0, 2);
      lcd.print(F("               "));
      lcd.setCursor(0, 3);
      lcd.print(F("                 "));
    } else if (adminSwipe) {
      WriteToList(readMag); /*go to WriteToList method with swiped card info if in admin mode*/
    } else {
      checkList(readMag); /*check to see if you are on the list*/
    }

    /*switch communication from SD Shield to USB Shield*/
    digitalWrite(4, HIGH);
    digitalWrite(10, LOW);
    return;
  }
}
The loop method monitors the user inputs. Usb.Task() watches the card reader. The timer controls the “READY” or “WAIT” indications on the LCD for when the card reader is busy. The rest monitors if the button is pressed and if a card turns tool power on(cardState = true) or if the key turns tool power on(keyState = true). I used this cascading boolean state logic so that either the key or card reader can activate the powerState, but whenever the powerState is true then power is on. Whenever either the swipeState or the keyState is true, the Arduino is constantly checking the time, and whenever it reaches 5:15 pm it turns the power off. If the button is pressed then power is turned off.
void loop() {

  /*handle the card reader*/
  Usb.Task();

  /*if a card has been swiped start the indication timer.  Run for 20 seconds indicating "wait",
    when the timer runs out record the state and indicate "ready"
  */
  if (timer) {
    if (millis() - pMillis > 20000) {
      pMillis = millis();
      timer = false;
    } else {
      lcd.setCursor(15, 0);
      lcd.print(F("WAIT "));
    }
  } else {
    lcd.setCursor(15, 0);
    lcd.print(F("READY"));
  }

  /*Do all the stuff if the button is not pressed*/
  if (!buttonState) {
    /*if the key is turned on turn power on*/
    if (digitalRead(keyInput) == HIGH) {
      keyState = true;
    } else {
      keyState = false;
      buttonState = false;
      powerState = false;
    }

    /*if either the key is on or someone on the list swiped, the power is on.
       Record the time someone swiped and turned power on
    */
    if (keyState || swipeState) {
      DateTime now = rtc.now();
      powerState = true;
      //      if (keyState && once) {
      //        lcd.setCursor(0, 1);
      //        lcd.print(F("KEY POWERED AT "));
      //        lcd.print(String(now.hour()));
      //        lcd.print(F(":"));
      //        lcd.print(String(now.minute()));
      //        lcd.setCursor(0, 2);
      //        lcd.print(F("               "));
      //        once = false;
      if (swipeState && once) {
        lcd.setCursor(0, 1);
        lcd.print(readMag);
        lcd.print(F("     "));
        lcd.setCursor(0, 2);
        lcd.print(F("SWIPED AT "));
        lcd.print(String(now.hour()));
        lcd.print(F(":"));
        lcd.print(String(now.minute()));
        once = false;
      }
      if (now.hour() == 17 && now.minute() == 15) {
        swipeState = false;
        keyState = false;
        powerState = false;
        lcd.setCursor(0,3);
        lcd.print(F("AUTO POWER OFF   "));
      }
    }

    /*If the button is pressed turn power off, record and indicate time, and reset states*/
    if (digitalRead(button) == HIGH) {
      buttonState = true;
      keyState = false;
      swipeState = false;
      powerState = false;
      DateTime rn = rtc.now();
      lcd.setCursor(0, 3);
      lcd.print("POWERED OFF ");
      lcd.print(rn.hour());
      lcd.print(":");
      lcd.print(rn.minute());
    }

    /*If the power is on, turn LED and relay on and indicate on lcd.
      Else do the opposite of all that
    */
    if (powerState) {
      digitalWrite(GreenLED, HIGH);
      digitalWrite(relayPin, HIGH);
      lcd.setCursor(0, 0);
      lcd.print(F("TOOL POWER ON "));
      lcd.setCursor(0, 3);
      lcd.print(F("                    "));
    } else {
      digitalWrite(GreenLED, LOW);
      digitalWrite(relayPin, LOW);
      lcd.setCursor(0, 0);
      lcd.print(F("TOOL POWER OFF"));
    }
  }
The WriteToLog method takes the recently read card’s info and writes it, the date, and the time to the SwipeLog file, creating a running log of whoever turns tool power on with their card. The benefit of using an SD card to store the log and the list of registered people is that if the power goes out in the building the data is preserved on the card. That and we can have much larger logs and lists on the SD card than stored on the Arduino itself.
/*This method writes the card info, time, and date to the SwipeLog file on the SD card*/
void WriteToLog(String Name) {
  DateTime now = rtc.now();
  openedFile.close();
  openedFile = SD.open(F("SwipeLog.txt"), FILE_WRITE);
  if (openedFile) {
    Serial.print(F("here?"));
    openedFile.print(Name);
    openedFile.print(',');
    openedFile.print(now.month(), DEC);
    openedFile.print('/');
    openedFile.print(now.day(), DEC);
    openedFile.print('/');
    openedFile.print(now.year(), DEC);
    openedFile.print(',');
    openedFile.print(now.hour(), DEC);
    openedFile.print(':');
    openedFile.print(now.minute(), DEC);
    openedFile.print(':');
    openedFile.print(now.second(), DEC);
    openedFile.println();
  }
  openedFile.close();
}
The checkList method takes the recently read card’s info and compares it to the list of names in the List file. The file.read() command only reads one byte at a time so checkName is a buffer that stores the characters until it reaches 17, trims the carriage return, and compares to the newly read card. If there is a match then it writes the card to the log file in WriteToLog and activates swipeState to turn tool power on. There are three different checkName = “”; to ensure each name in the list file is only one name and not a combination of two. If there is no match then it indicates so on the LCD.
/*This method iterated through the List file and compares the swiped card with each in the list
  If one matches then power state is on and WriteToLog, else indicate you are not on the list
*/
void checkList(String Name) {
  openedFile.close();
  openedFile = SD.open(F("List.txt"));
  if (openedFile) {
    while (openedFile.available()) {
      /*only reads one character at a time, store wach in a string and when that reaches the return character
        in the file trim it and compare to swiped card info*/
      char temp = char(openedFile.read());
      checkName += temp;
      if (checkName.length() == 17) {
        checkName.trim();
        if (Name.equals(checkName)) {
          swipeState = true;
          once = true;
          WriteToLog(readMag);
          checkName = "";
          return;
        }
        checkName = "";
      }
    }
    checkName = "";
  }
  lcd.setCursor(0, 1);
  lcd.print(F("NOT ON LIST      "));
  lcd.setCursor(0, 2);
  lcd.print(F("                 "));
}
WriteToList takes the recently read card’s info and writes it to the list of registered people and indicates this on the LCD. It restores the admin mode to false so the next swiped card isn’t added as well.
void WriteToList(String Name) {
  openedFile.close();
  openedFile = SD.open(F("List.txt"), FILE_WRITE);
  if (openedFile) {
    openedFile.println(Name);
    openedFile.close();
    lcd.setCursor(0, 1);
    lcd.print(Name);
    lcd.print(F("       "));
    lcd.setCursor(0, 2);
    lcd.print(F("ADDED TO LIST      "));
    lcd.setCursor(0, 3);
    lcd.print(F("                  "));
    adminSwipe = false;
  }
}
Step 3: Issues I Ran Into and What You Might As Well
Fun Fact: There are so many libraries and global variables that, at its current state, compiles with 71% of dynamic memory taken up, leaving about 590 bytes for run-time operations. This is just barely enough to open the files to manipulate the data. I kept having this very issue as I developed the code. I found here a way to free up more data in a very obscure manner. By using an F macro on all of the string buffers, such as [lcd.print(F(“ADDED TO LIST “));] the sting is stored in flash memory instead of Ram, allowing for more run-time space. At least that’s how I understand it. It’s basically JFM and freed up just enough space for me to open up my files and run my code. If I had to add more components I might have to upgrade the Arduino form factor to a larger model with more memory space or switch to a more robust microcontroller.
Something to keep in check is the chip selectors for your SPI components. Both the USB Card Reader and the SD Shield used the Arduino’s SPI communication protocol. Whenever I wanted to use the SD Shield I had to activate its chip selector, basically its address, which was pin 4, with digitalWrite(4, LOW). The same went for the USB Card Reader, except its selector was pin 10. In the program, you’ll see me switching these on and off at different moments to switch from USB Shield to SD Shield.
For some reason, the Real Time Clock on the SD Shield likes to run about 7 minutes slow, even after resetting it by taking the battery out and re-uploading the code, which is supposed to set the clock to the pc’s time and date. I’m going to leave this as a non-issue because it doesn’t necessarily break the system.
Step 4: Finished Product
It turned out great and I can’t wait to put it on the wall and plug it in!
This video is just a demonstration of its features, not a representation of its installation.
Source: Card Reading Shop Power Switch