Hi! Kaeru no Ojisan is back with Car No.06.
Car No.06 is a Programmed Automatic Driving Car with following procedure;
– Simulate the Car Trajectory based on the Target Passing Points.
– Drive automatically as simulated using Reflective Photosensor and Gyro Sensor .
– Adjust Car Position to the starting point using Web Camera, after coming back adjacent to the starting point.
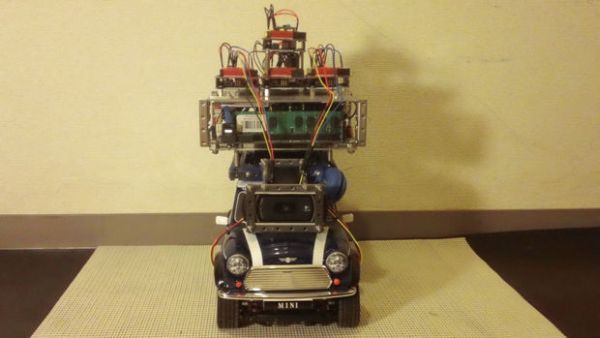
Car No.06 is composed of 4-Wheel-Steering chassis, R/C Car body and Car Top PC with 4 Arduinos and Web Camera.
R/C Car
– Car Body Tamiya 8085282 Mini Cooper
– Chassis Tamiya M-03R chassis x 2
– Motor 380 motor x 2
– Attaching Jig Kawada B57 x 2
– Servo Futaba S3003 x 2
– Motor Driver SyRen 10A
– NI-Cd Battery for R/C Car 1500mAh 7.2V
– Lubic
– Plarepair
Car Top PC
– Motherboard Intel D510MO
– Memory DDR2 2GB
– SSD SUPER TALENT FTM16GL25V
– Wireless LAN Planex GW-USHyper300
– Battery JTT Energizer XP8000 + 12V/3A conversion cable type B
Arduinos
– Arduino Duemilanove x 2
– Arduino UNO x 2
– Arduino ProtoShield Kit DEV-07914 x 4
Tachometers
– Reflective Photosensor Rohm RPR-359F x 2
– Resistance 510 ohm x 2, 47k ohm x 2
Gyro
– 3-axis gyro ITG-3200
Web Camera
– Logicool HD Pro Webcam C910
Step 2: 4-Wheel-Steering Chassis Assemble
2 sets of Tamiya M-03R chassis front unit shall be cut at the center of battery hold and glued together with plarepair.
(See above sequence pictures.)
Step 3: Relationship table between steval(steering servo value) and TR(turning radius)
Simulate the relationship between steval(steering servo value ) and TR(turning radius) in Excel.
(See attached Excel file.)
Measure TR for each steval using the attached Arduino and Processing codes.
Wiring note
Servo1(front) – D9
Servo2(rear) – D10
Motor Driver – D11
Arduino code
SVMD_A.pde
Processing code
TurningRadius_P.pde
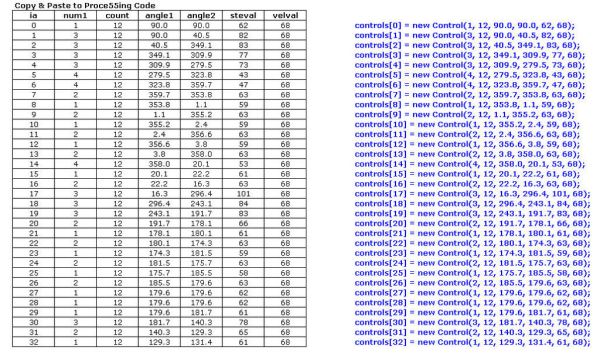
Make a relationship table between steval and TR.
(See above table.)
Step 4: Simulation Program
Utilize the relationship table in Step 3 and make a simulation program in Excel, to which car starting point, car starting direction and target passing points are input, then from which steval and car direction angles are provided as automatic driving data.
(See attached Excel file “SimulationProgram1_CN06.xls”.)
For confirmation, check by Excel Simulation Program2.
(See attached Excel file “SimulationProgram2_CN06.xls”.)
Draw the car trajectory with AutoCAD.
(See above figure.)
Obtain the Automatic Driving Data (steval and car direction angles for each steps).
(See above table.)
For more detail: Car No. 06 Programmed Automatic Driving Car