Summary of Build Your Own Arduino & Bootload an ATmega Microcontroller – part 1
This article explains how to create a custom Arduino circuit using an Atmega328P microcontroller. It details the role of the bootloader in enabling programming via a serial port without dedicated hardware. The guide outlines the necessary components for building the board and uses an existing Arduino UNO as a programmer to load the bootloader onto a blank chip, allowing users to replicate the open-source platform independently.
Parts used in Build Your Own Arduino:
- Atmega328-PU/ Atmega328P-PU
- 16Mhz Xstal
- 22pF Ceramic Capacitor
- Small Breadboard / Protoboard & 28-Pin (PDIP) IC socket
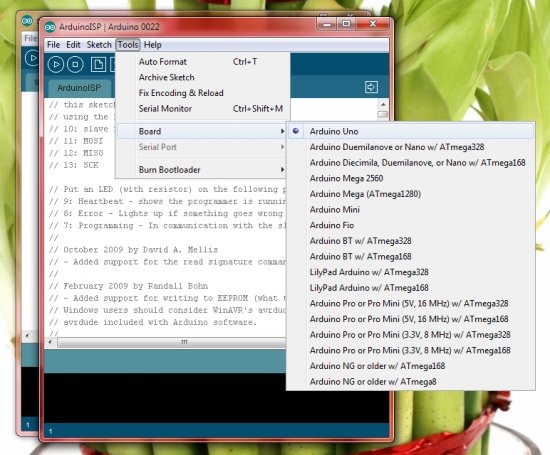
- Arduino UNO board
There are many reasons to build your own Arduino circuit on a protoboard or a custom-designed printed circuit board. At the heart of the Arduino platform is an AVR microcontroller, in usual way you need a special hardware programmer and suitable hex files to program the Atmel AVR chip. Fortunately, Arduino is a beginner-friendly platform because a bootloader is included in the AVR chip which allows you to program the board over the serial port without any dedicated AVR programmer.
 The bootloader is basically a small hex file that runs when you turn on the Arduino board. At first looks around to see if the computer (at the serial port) is trying to program it. If so, it absorbs the program code from the computer and transfers it into the AVR chip, in a specific location so as not to overwrite the bootloader. If the computer isn’t trying to upload any code, it instructs the microcontroller to run the code that’s already stored inside.
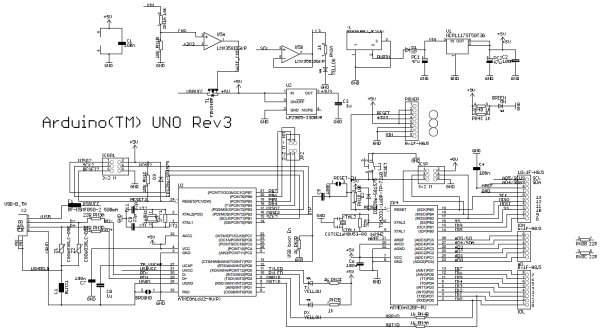
Now, have a look at our favorite Arduino UNO to find out the AVR chip inside. It is ATMega328P-PU, a low-power version of the traditional ATMega328-PU. The P indicates pico for pico-power which is a technology ATMEL has developed that allows the microcontroller to run with less power. This ATMega328 chip holds a pre-burned bootloader, allows you to upload code without using any additional hardware. So if you are in a plan to make your own open source microcontroller platform – Arduino, no doubt, you need an AVR chip with pre-charged bootloader!
This part of AVR tutorial will teach you how to make your own Arduino chip, ie Atmega328P with Arduino Bootloader. First we need one blank Atmega328P-PU microcontroller with a few supproting components:
- Atmega328-PU/ Atmega328P-PU – 1
- 16Mhz Xstal – 1
- 22pF Ceramic Capacitor – 2
- Small Breadboard / Protoboard & 28-Pin (PDIP) IC socket – 1
- Your Arduino UNO board (here used as a programmer)
For more detail: Build Your Own Arduino & Bootload an ATmega Microcontroller – part 1
- Why is Arduino considered beginner-friendly?
Because a bootloader is included in the AVR chip which allows you to program the board over the serial port without any dedicated AVR programmer. - What happens when the computer tries to program the board?
The bootloader absorbs the program code from the computer and transfers it into the AVR chip at a specific location so as not to overwrite the bootloader. - Which AVR chip is found inside the Arduino UNO?
The ATMega328P-PU chip is located inside the Arduino UNO. - What does the P in ATMega328P indicate?
The P indicates pico-power which is a technology that allows the microcontroller to run with less power. - Do you need additional hardware to upload code if the chip has a pre-burned bootloader?
No, the pre-burned bootloader allows you to upload code without using any additional hardware. - What is required to make your own Arduino chip?
You need one blank Atmega328P-PU microcontroller with a few supporting components. - How can you use an Arduino UNO board in this project?
The Arduino UNO board is used as a programmer to burn the bootloader onto the new chip. - What is the purpose of the small hex file mentioned?
The bootloader is a small hex file that runs when you turn on the board to check for programming instructions.