
Summary of Build A Automatic Tea Maker Using Arduino
This article describes an automatic tea maker designed for distracted tea drinkers. Unlike previous projects, it features a text display, clips onto the cup, and uses 3D-printed parts for a finished look. The device uses inexpensive hobby electronics to automate tea steeping times, preventing bitterness from oversteeping.
Parts used in Automatic Tea Maker:
- 16x2 LCD character display
- 5V Arduino Mini
- 9g servo motor
- Speaker
- Potentiometer
- Normally open (NO) switch
- 3 position rectangular male header pins
- 4-40 threaded rod or metric equivalent
- 4 @ 4-40 3/8" bolts
- 12 @ 4-40 nuts or metric equivalent
- 2 @ 3mm bolts which are at least 6mm long
- 2 @ 3mm nuts
- 2 @ 5mm bolts which are at least 12mm long
- 2 @ 5mm nuts
- 2 @ #4 wood screw
- Male USB plug with cord
- Small gauge wire
- Solder
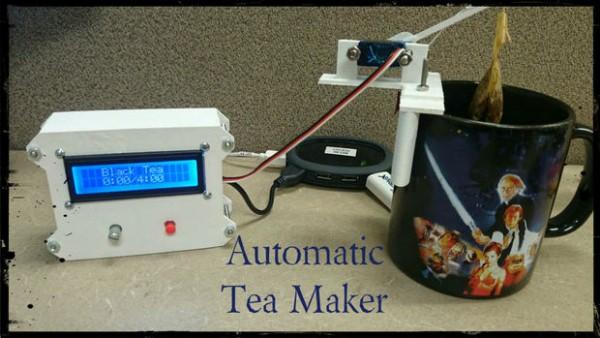
I am scatterbrained. I like to drink hot tea. Oversteeped tea gets bitter. I am easily distracted.
The natural choice was to (over)engineer something with inexpensive hobby-grade electronics. Automatic tea timers are hardly new and people have made them from discarded toasters and K’Nex which I have a lot of respect for. People on this site have been making them with Arduinos and Servos for a long time so I’m hardly the first. This project has three major differences though.
Uses a text display
Clips on the cup rather than free standing
3D printed for a finished look
Due to the printed parts the MATERIALS list is short. Most of the parts can be found on eBay very inexpensively.
16×2 LCD character display
5V Arduino Mini
9g servo motor
Speaker
Potentiometer
Normally open (NO) switch
3 position rectangular male header pins
4-40 threaded rod or metric equivalent
4 @ 4-40 3/8″ bolts
12 @ 4-40 nuts or metric equivalent
2 @ 3mm bolts which are at least 6mm long
2 @ 3mm nuts
2 @ 5mm bolts which are lat least 12mm long
2 @ 5mm nuts
2 @ #4 wood screw
Male USB plug with cord
Small gauge wire
Solder
There are a minimal amount of TOOLS necessary for this build
Computer for printing and programming
3D printer
Soldering iron
Small screwdriver for small bolts
Programming board for Arduino Mini
This project requires you to know how to solder and send a program to an Arduino Mini. The program has already been written so you don’t need to write any code. There are plenty of instructions for doing both these things so I won’t go into them here. This is a big change from my tCDS unit which had 72 steps and didn’t rely on previous skills.
Step 1: Start Printing
Picture of Start Printing
There are two files to print. The first is the parts which do the tea dipping. The second file is for the enclosure. The enclosure isn’t strictly necessary and if you chose to construct a wooden enclosure that would add a welcome touch of class to this project.
STL model for parts
STL model for enclosure
The source code for these files can also be found on my blog. Just check out the final posting of this project and look for the links at the bottom of the page. These links will open new windows or tabs.
For more detail: Build A Automatic Tea Maker Using Arduino
-
What makes this project different from others?
This project uses a text display, clips on the cup rather than being free standing, and is 3D printed for a finished look. -
Where can I find the materials for this build?
Most of the parts can be found on eBay very inexpensively. -
Do I need to write code for the Arduino?
No, the program has already been written so you do not need to write any code. -
Can I use a wooden enclosure instead of the 3D printed one?
Yes, the enclosure is not strictly necessary and a wooden enclosure would add a welcome touch of class. -
What skills are required to build this?
You must know how to solder and send a program to an Arduino Mini. -
What files need to be printed?
You need to print two files: one for the parts that do the tea dipping and one for the enclosure. -
Is there a source code available for the STL models?
Yes, the source code can be found on the author's blog at the bottom of the final posting of the project. -
What tools are necessary for this build?
The necessary tools include a computer, 3D printer, soldering iron, small screwdriver, and a programming board for the Arduino Mini.
