Summary of Build a 3D Printed Color TV with Arduino Mega
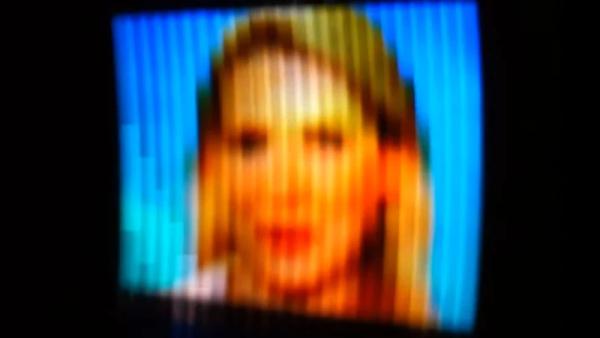
This article describes a modern mechanical television project using a Nipkow disk to display 32-line color images. The build leverages an Arduino Mega for driving three six-bit DACs (red, green, blue) and a PWM motor controller for the spinning disk. Synchronization is achieved via reflective tape and an IR proximity sensor, while video content is sourced from an SD card. The author highlights that despite low resolution, the resulting image quality is surprisingly good, especially compared to traditional monochrome versions.
Parts used in the Mechanical TV Project:
- Arduino Mega
- Three six-bit DACs
- PWM motor controller
- Reflective tape
- IR proximity sensor
- SD card
- 3D printed parts
- Nipkow disk
The oldest form of television used a spinning disk with a progression of holes — a Nipkow disk — to slice the image into lines for display. They’re surprisingly simple machines and capable of unexpectedly high-quality images despite their relatively low resolution. Even better, in an age of microcontrollers and bright LEDs, making one that works is not the chore it might once have been. [Markus Mierse] has created one that uses an Arduino Mega and a set of 3D printed parts, so there’s no excuse for not having a spinning disk TV on your shelf.
The Arduino Mega is chosen because it has enough lines to drive three six-bit DACs for each of red, green, and blue. The disk is driven by a PWM motor controller, and synchronization is taken care of by a piece of reflective tape and an IR proximity sensor. Images and video are read from an SD card and displayed on the screen in glorious 32-line colour. The full build process can be seen in the video below the break.
A surprise when viewing mechanical TV is that its quality is much better than the meager resolution would have you believe, and this one with its colour display is much better than the usual monochrome devices. It’s hardly HDTV, but it acquits itself well and would provide an excellent talking point.
If you’re curious about Nipkow disks, they’re a subject we’ve examined in the past.
Source: 3D PRINT A COLOUR TV
- Why was the Arduino Mega selected for this project?
The Arduino Mega was chosen because it has enough lines to drive three six-bit DACs for each of red, green, and blue. - How is the synchronization managed in the spinning disk mechanism?
Synchronization is taken care of by a piece of reflective tape and an IR proximity sensor. - What method is used to read images and video for display?
Images and video are read from an SD card. - What type of components were used to create the physical structure?
The project uses a set of 3D printed parts alongside the electronic components. - What resolution does the final color display achieve?
The device displays images in glorious 32-line colour. - How does the color quality compare to typical mechanical TVs?
This color display is much better than the usual monochrome devices found with mechanical TV. - Is the build process considered difficult in modern times?
In an age of microcontrollers and bright LEDs, making one that works is not the chore it might once have been.