
Summary of Boozeduino using arduino
This article details a DIY Arduino Mega-powered breathalyzer prototype using an MQ-3 sensor to create a relative alcohol level gauge via a 32-LED bar graph. The author emphasizes the device is for entertainment only, noting the sensor lacks accuracy and is sensitive to environmental factors. The project involves soldering components onto a PCB within a project box, utilizing specific LEDs and voltage regulation hardware.
Parts used in the Arduino Mega Breathalyzer:
- Arduino Mega 2560
- MQ-3 Alcohol Gas Sensor
- 4x 5mm Clear Blue LED
- 18x 5mm Green LED
- 6x 5mm Red LED
- 10x 5mm Yellow LED
- Drilled PCB for LEDs
- Power supply PCB for MQ-3
- 7805 Voltage Regulator
- 2x 10uF capacitors
- 50x 250ohm resistors
- Project Box
- #4 Machine Screws
- 9V Snap Connectors
- Heat shrink tubing or cord with 4 wire
- Cheap microphone housing (Rockband)
- Mic holder
- On/off Switch
- Solder
- Alcohol hand sanitizer
- Velcro pieces
- Adhesive
- Multi-colored wire
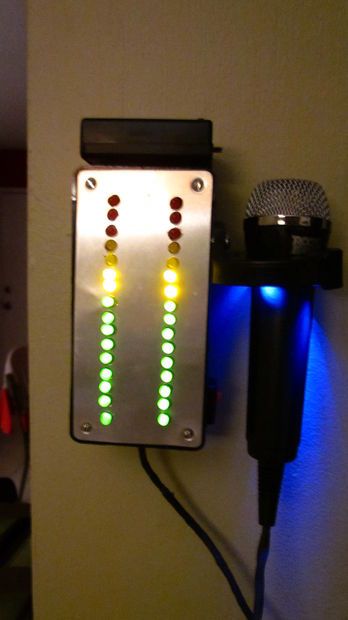
Now with more LED.
Arduino mega powered breathalyzer using the MQ-3 sensor. A relative gauge for judging how intoxicated you are.
NOT TO BE USED AS MEANS OF BREATHALYZING NEVER DRINK AND DRIVE.
This is more of a device to encourage one to drink more. The MQ-3 can’t achieve the accuracy to register exact BAC.
And It behaves weirdly. Sensitive to temperature and humidity. This is purely for fun.
Links
http://nootropicdesign.com/projectlab/2010/09/17/arduino-breathalyzer/
http://www.danielandrade.net/2010/03/07/building-an-breathalyzer-with-mq-3-and-arduino/
http://www.gfxhax.com/drinkshield/drinkshield-coding/
http://www.sparkfun.com/datasheets/Sensors/MQ-3.pdf
http://nootropicdesign.com/toolduino/ Awesome tool for this, made testing MQ-3 analog levels a snap.
Intro
My first project, instructable, First everything. I’m a total noob and my main goal was to not burn out any chips. I got an Uno early in January and my girlfriend got me an MQ-3(among other goodies) for Valentines day. I had blinked and breadboarded but hadn’t tried a complete project. Here it goes…
Step 1: Parts & tools
PARTS LIST
1x Arduino+Mega+2560 $50 Liquidware *Great Price*
4x 5mmClearBlue Led $5 Sure electronics
18x 5mmGreenLed $4 Adafruit
6x 5mmRedled $4 Adafruit
10x 5mmYellowLed 35cent/each Sparkfun
1x MQ-3 Alcohol Gas Sensor $5 Sparkfun
1x Drilled PCB for leds $3 Radioshack
1x Power supply PCB for MQ-3 $2 Radioshack
1x 7805 Voltage Regulator $2 Radioshack
2x 10uF capacitors
50x 250ohm resistors
1x Project Box $5 RadioShack
4x #4 Machine Screws $2 RadioShack
2x 9V Snap Connectors $3 for 5 Radioshack
1x Really long heat shrink tubing or cord with 4 wire $2 Local store
1x Cheap microphone housing(Rockband) $Salvaged
1x Mic holder $5
1x On/off Switch
1x spool of solder
1x alcohol hand sanitizer
1x pieces of Velcro for mounting
1x tube of adhesive
Lots of wire in multi colors
Tools
Solder Iron
Heat Shrinker(Blowdryer or Lighter at worst)
Multimeter
Helping Hands
Usb cable
Arduino IDE 021
Dremel and/or Drill
3/8″ bit
Flathead screwdriver
A lot of stuff for a newbie but if you been at this a little bit, you’ve got most of these things, minus the MQ-3. You could use any number of other project boxes, more or less LEDs. This is a real flexible project.
Step 2: The code
@ Code by Daniel Spillere Andrade and Daniel Amato Zabotti
@ [email protected] / [email protected]
@ www.DanielAndrade.netconst int analogPin = 0; // the pin that the sensor wire is attached to
const int ledCount = 32; // the number of LEDs in the bar graph
int ledPins[] = {
53,52,51,50,49,48,47,46,46,45,44,43,42,41,40,39,38,37,36,
35,34,33,32,31,30,29,28,27,26,25,24,23,22};
// Here we have the number of LEDs to use in the BarGraph 53 is green 22 is red
void setup() {
for (int thisLed = 0; thisLed < ledCount; thisLed++) {
pinMode(ledPins[thisLed], OUTPUT);
}}
void loop() {
//This is the code to light up LED’s
int sensorReading = analogRead(analogPin);
int ledLevel = map(sensorReading, 500, 1023, 0, ledCount);
for (int thisLed = 0; thisLed < ledCount; thisLed++) {
if (thisLed < ledLevel) {
digitalWrite(ledPins[thisLed], HIGH);
}
else {
digitalWrite(ledPins[thisLed], LOW);
} }}
-
Can this device be used as a legal means of breathalyzing?
No, it is not to be used as a means of breathalyzing; the MQ-3 cannot achieve the accuracy to register exact BAC. -
Does the MQ-3 sensor behave consistently?
No, the sensor behaves weirdly and is sensitive to temperature and humidity. -
What is the main goal of this project?
The main goal was to build a complete project without burning out chips, serving purely as fun. -
How many LEDs are used in the bar graph?
The code defines a count of 32 LEDs for the bar graph display. -
Which microcontroller powers this device?
The device is powered by an Arduino Mega 2560. -
What voltage regulator is included in the parts list?
A 7805 Voltage Regulator is listed as one of the required parts. -
Can other project boxes be used for this build?
Yes, you could use any number of other project boxes as the project is described as real flexible.
