Summary of Blinking LED With Analog Input Using Arduino
This article explains how to control an LED's blinking speed using analog input from either a potentiometer or a flex sensor on an Arduino. The code reads the sensor value and adjusts the delay times for the LED turning on and off, effectively changing its blink rate based on physical interaction like turning a knob or bending the sensor.
Parts used in the Blinking LED With Analog Input Project:
- Arduino board
- Potentiometer
- Flex sensor
- LED (Light Emitting Diode)
- Wires for connections
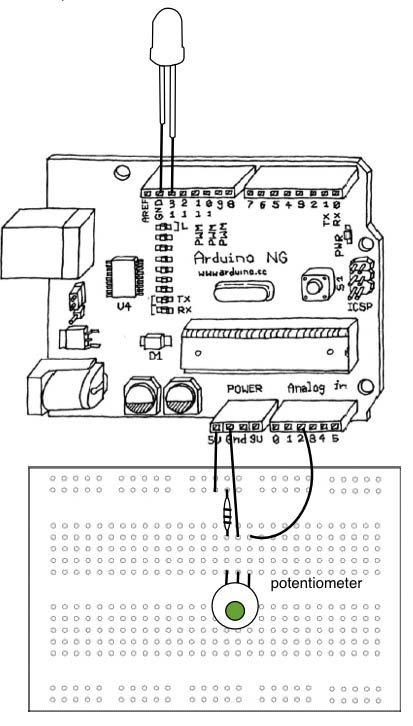
This program will allow adjust the speed of a blinking LED with analog input. Follow this patch to connect a potentiometer to your Arduino board. Then put an the long lead of an LED in pin 13 of your digital in/out, and the short lead in Ground.
/*

* AnalogInput

* by DojoDave <http://www.0j0.org>

* Turns on and off a light emitting diode(LED) connected to digital

* pin 13. The amount of time the LED will be on and off depends on

* the value obtained by analogRead(). In the easiest case we connect

* a potentiometer to analog pin 2.

*/

int potPin = 2;    // select the input pin for the potentiometer

int ledPin = 13;   // select the pin for the LED

int val = 0;       // variable to store the value coming from the sensor

void setup() {

pinMode(ledPin, OUTPUT);  // declare the ledPin as an OUTPUT}

void loop() {

val = analogRead(potPin);    // read the value from the sensor

digitalWrite(ledPin, HIGH);  // turn the ledPin on

delay(val);                  // stop the program for some time

digitalWrite(ledPin, LOW);   // turn the ledPin off

delay(val);                  // stop the program for some time}
 Program a flex sensor
A Flex sensor changes resistance between 10k Ohms (straight) and 40k Ohms (bent). Follow this schematic to patch a flex sensor to your Arduino board. Connect the long lead of an LED in pin 13 of your digital in/out, and the short lead in Ground.
For more detail: Blinking LED With analog input Using Arduino
- How does the program adjust the LED speed?
The amount of time the LED is on and off depends on the value obtained by analogRead. - Can I use a flex sensor instead of a potentiometer?
Yes, the article describes programming a flex sensor which changes resistance between 10k Ohms and 40k Ohms. - Which pin should the long lead of the LED connect to?
The long lead of the LED connects to pin 13 of your digital in/out. - What happens if I bend the flex sensor?
Bending the sensor increases its resistance up to 40k Ohms compared to 10k Ohms when straight. - Does the code turn the LED on and off repeatedly?
Yes, the loop turns the LED on, waits for a time defined by the sensor, turns it off, and waits again. - What is the purpose of the variable named val?
The variable val stores the value coming from the sensor read by analogRead. - How do I declare the LED pin in the setup function?
You declare the ledPin as an OUTPUT using pinMode in the setup function. - Is pin 2 used for the potentiometer input?
Yes, the code selects pin 2 as the input pin for the potentiometer.