Growing basil is great, but do you know what’s even better? Having an autonomous basil farm!
As the saying goes: “never spend ten minutes doing something by hand, when you could spend 10 hours failing to automate it”.
Although I may be bad at gardening, something I am good at is enthusiastically trying to solve problems through the medium of hot glue and sketchy electronics. I have written this Instructable in the hope that it might provide some inspiration and useful information about the process of creating your own autonomous basil farm!
Just as a quick disclaimer, I put this project together this week so have not had time to test it with growing yet. Hopefully In 50-60 days I will be able to report back with tales of an epic basil harvest.
Supplies:
- PVC piping
- MG996R servos
- Aluminum extrusion
- Stepper motor & driver board
- Arduino
- Wall power supply / battery with voltage regulator
- Nutrient solution
- Rockwool cubes
- Basil seeds
- 5v pumps and tubing
- LED lights
- 3d printing facility
- Pulley belt
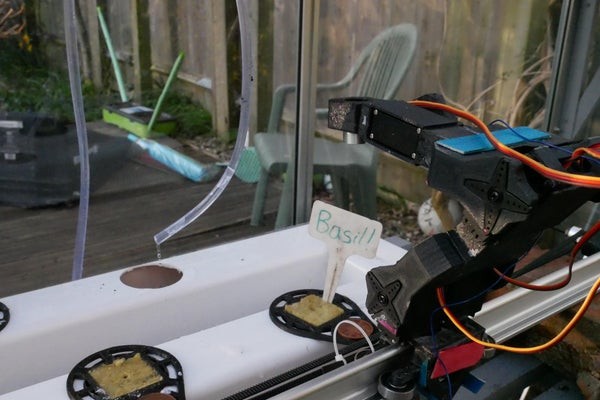
Step 1: PVC Pipe System

This farm does not use any soil, this is for a few reasons:
- Growing things in soil is less efficient in terms of water usage
- Soil is less space efficient.
- The nutrient composition in soil is harder to tune.
Therefore the basil is to be grown hydroponically. This means that a pipe system has to be made to carry the nutrient solution around the basils.
I used PVC box section from Wickes. This was big enough for me and the shape meant that it was easy to drill holes using a hole saw bit.
I’m sure there are connector parts that you can buy to fit these parts together however I didn’t really want to have to buy them and hot glue seemed to work well-ish.
The PVC can be easily cut with a hacksaw.
In terms of the spacing of the basils, I followed the guidance of the seed packets and just used a^2+b^2=c^2 to ensure they weren’t to close together.
Step 2: Basil Deep Frying
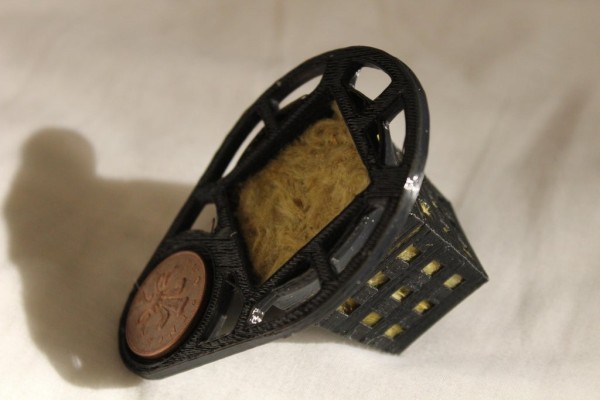
Obviously, you can’t just drop the basil seeds into the pipe system and let them swim around. This is why you need to use rock-wool cubes (yes, it is literal wool made from rocks!). This keeps the basil seeds in place and provides an initial medium for them to grow in.
I 3d printed little baskets that fit the rock-wool and go into the pipe system holes. They also have a cylindrical section cut out for 2p coins (the only things I could really find that worked). This allows the electromagnet on the robotic arm to attach on them and move them about.
Step 3: The Water System
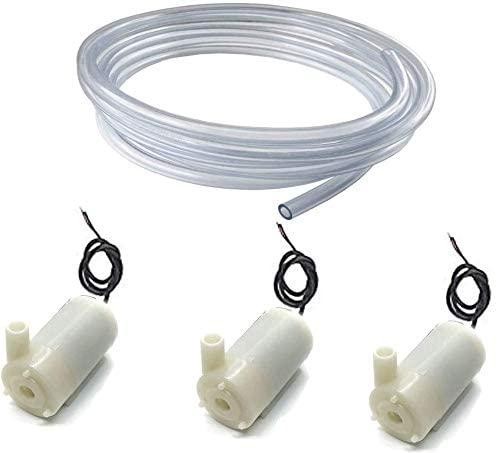
This system uses three pumps:
- The first pump runs from the nutrient-water reservoir into the main pipe system. This pumps turns on at specific intervals in time, in order to keep the nutrients topped up.
- The second pump runs inside of the main pipe system to circulate the water around the plants, to ensure the plants get an even amount of nutrients.
- The third pump is used to remove water from the system after its nutrients have been depleted.
These pumps run off 5 volts. Transistors are used in combination with an Arduino to control them.
The nutrient water has been made using Formulex 1 mixed with standard tap water in a ratio of 5ml for each litre of water.
The reservoirs have been made out of large Tupperware boxes.
Step 4: Step 3: Lighting
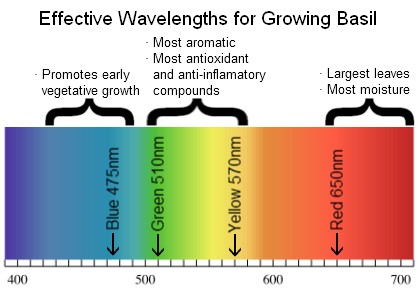
Basil is able to be grown with light 24/7. This means that I will be using a light at night to increase the yield.
Link to an article which explains the effect of light wavelength on growth – picture comes from here.
I am using a 12v LED light strip as this is something I had left over from a previous project. Unfortunately, I do not have one of the mini voltage-boost circuits, so they have to be run at a different voltage to the main system (5v).
I am using an LDR to sense when it is getting dark, which turns on the light.
https://www.instructables.com/Using-an-LDR-Sensor-With-Arduino/
The strip is mounted on top of the basils using some left-over dowels.
Step 5: Powering the System

This system runs at 5 volts and draws a significant amount of amps when the robot arm is moving. This means that a decent power supply is required.
There are two options:
1. Use a wall based power supply. This has the benefit of not needing to be recharged. Just make sure it can supply a decent amount of amps (2+) at 5v. Be careful.
2. Use a battery (lipo’s are the best in terms of current capability however a lead acid one could also work if you had one of them). This has the benefit of it being portable. A voltage regulator needs to be used, to smooth out the sag as the battery runs out of charge.
Step 6: Stepper Motor Linear Actuator
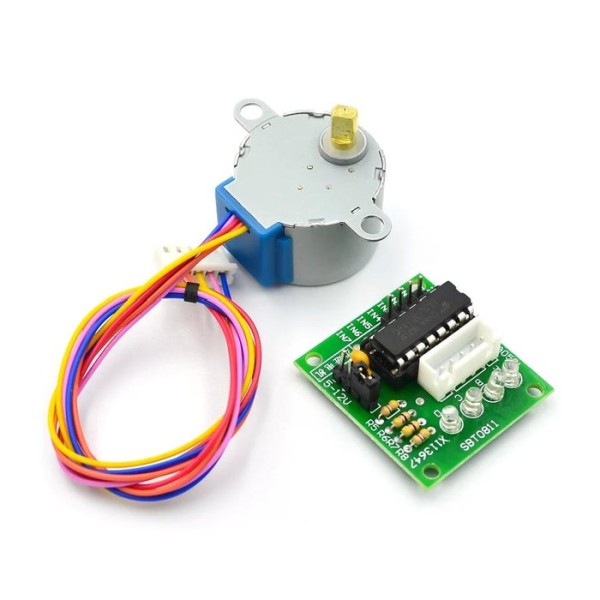
The robot arm needs to move along in a linear fashion in order to reach each of the basils.
I used a stepper motor that came with my Arduino and designed the slider in Fusion 360, I think the general rule is just add as many fidget spinner bearings as possible to try and make it stable.
I designed mine to slide along a left-over green house aluminium extrusion. A 3d printer belt can then be used in conjunction with the Arduino stepper motor library to slide the robotic arm up and down.
https://www.instructables.com/BYJ48-Stepper-Motor/
Source: Autonomous Basil Farm With Robot Arm!