Summary of ATtiny85 for Simple Projects: Arduino Basics
The article explains using the ATtiny85 or Digispark breakout as a compact, low-cost Arduino alternative for permanent projects, including programming steps in the Arduino IDE, soldering tips (use sockets), and wiring a Blink sketch and NeoPixel strips. It notes Digispark variants, installing Digistump board support, uploading workflow, and cautions about heat when driving many NeoPixels.
Parts used in the ATtiny85 for Simple Projects:
- ATtiny85 chip
- Digispark breakout board (regular USB plug or USB Micro version)
- Socket (for ATtiny85 when soldering)
- Female headers
- Male headers
- NeoPixel strips
- USB port or USB power bank
- Onboard voltage regulator (part of Digispark)
Bare bones: The ATtiny85 on its Own
The ATtiny is a small, inexpensive chip that can replace the Arduino in a project you have prototyped. This helps make the project smaller and more permanent, as well as freeing up the Arduino for more fun!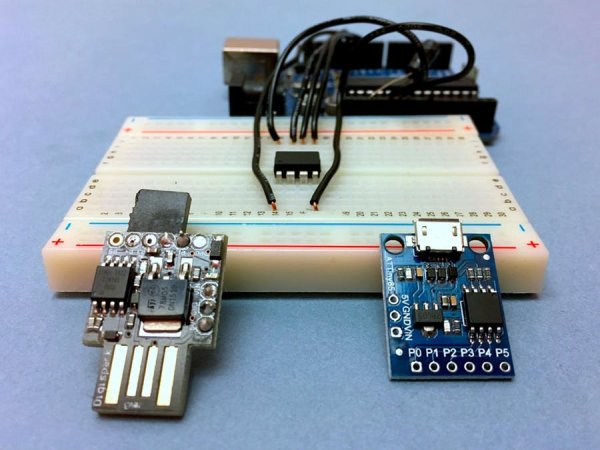
The chip comes in a few different types – ones with more flash memory, lower power, and so forth. The ATtiny is great if you want to program a bunch of chips in a row, put them in your circuits, and forget about them.
If you’re soldering together an ATtiny-based project, use a socket instead of soldering directly to the chip. This protects the IC from the high temperature, and you’ll be able to remove and reprogram it later.
If you want to go this route, check out Arjun’s fantastic tutorial.
Just right: The Digispark Breakout
What I’ve found most useful is the Digispark breakout board. It’s the best of both worlds – a hybrid of the ATtiny’s size and price with the convenience of programming it directly from your computer. You can take the other Arduino out of the picture completely! There are two main versions: one with a direct plug for your computer (or a USB power bank), and one with a USB Micro jack.
Blink Circuit
With a Digispark, you can solder straight to the breakout pins. I attached female headers to the board so that I could easily swap it in and out of NeoPixel circuits. But for the simple Blink sketch, here’s all you need:
THE CODE
We’ll start with the Blink example sketch (File > Examples > 01.Basics > Blink). Change each instance of pin 13 to a 0 , to match your setup.
To program the board, first we need to open up the Arduino IDE’s Preferences pane. Under “Additional Boards Manager URLs”, enter this URL (after any you already have):
http://digistump.com/package_digistump_index.json
(Didn’t work? Check the official page for updates, and let me know!)
This tells the IDE how to talk to your Digispark, and you only have to do it once. Now, go to Tools > Board > Boards Manager, find the Digistump list item, click on it, and hit the Install button. After this has completed, you’ll need to restart the IDE.
Assuming you went with the regular board, pick Digispark (Default – 16.5mhz) from the Boards menu. Don’t even worry about the port! You’re going to hit Upload first, then plug the board into a USB port, when the output window asks you to. This thing programs pretty fast, so you’ll be done in a flash 🙂
What next?
You can also hook it up to NeoPixels and control them! It’s a fantastic solution for a shortish string of lights. I tried running about 120 NeoPixels off one Digispark, and it got a bit hot due to the onboard voltage regulator, so maybe keep it on the lower side (or use a plain ATtiny85).
Here’s the circuit: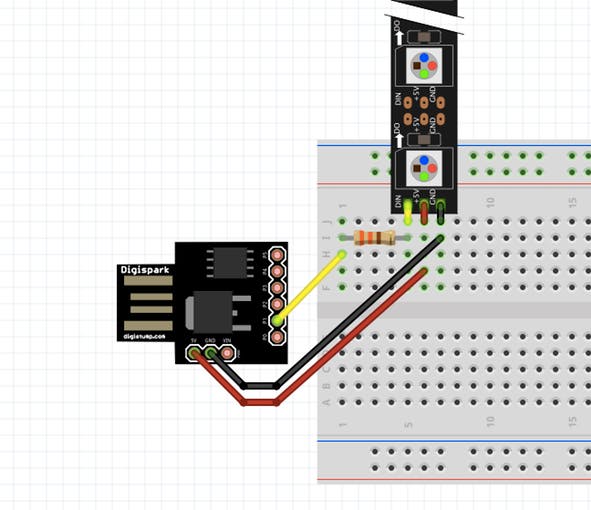
I had already soldered male headers to the end of my NeoPixel strips, so I soldered a matching female header to my Digispark so I could easily swap it between projects. Pure magic!
For more detail: ATtiny85 for Simple Projects: Arduino Basics
- Can the ATtiny85 replace an Arduino in a prototyped project?
Yes. The ATtiny85 is a small, inexpensive chip that can replace the Arduino to make projects smaller and more permanent. - Should I solder the ATtiny85 directly to my circuit?
No. The article recommends using a socket to protect the IC from high temperature and to allow removal and reprogramming. - What is the Digispark breakout board useful for?
The Digispark combines the ATtiny85 size and price with USB programming convenience so you can program directly from your computer. - How do I install Digispark support in the Arduino IDE?
Enter http://digistump.com/package_digistump_index.json into Additional Boards Manager URLs, then install Digistump via Tools > Board > Boards Manager and restart the IDE. - How do I upload code to a Digispark?
Select Digispark (Default - 16.5mhz) as the board, click Upload, then plug the board into a USB port when the output window prompts you. - What pin change is needed for the Blink example on Digispark?
Change each instance of pin 13 to pin 0 in the Blink sketch to match the Digispark setup. - Can a Digispark control NeoPixels?
Yes. The article describes hooking NeoPixels to a Digispark and successfully controlling a string of LEDs. - Is there a limit to how many NeoPixels a Digispark can run?
Yes. Running about 120 NeoPixels caused the Digispark to get hot due to the onboard voltage regulator, so fewer pixels or a plain ATtiny85 is recommended.