Dear friends welcome to another Arduino project Instructable! I am very excited because today I am going to show you how I built this Art Deco style FM Radio project using Arduino. It is by far the most complex project I have ever built and also my favorite.
Let’s see what we are going to build today! As you can see, we are going to build an Art Deco style FM radio receiver. The design of this radio is based on a spectacular 1935 AWA radio. I discovered this old radio while searching online and also in this book about the most beautiful radios ever made . I loved the design of this radio so much that I wanted to have a similar one. So I devoted a month of my time to build my own.
As you can see, I have used a Nokia 5110 LCD display to display the frequency that we are listening to, and I am using a rotary encoder to change the frequency and another knob to increase or decrease the volume. I don’t know if you have noticed, but I am using a custom Art Deco font on the LCD display. Also, if we listen to the same radio station for over five minutes, the radio will automatically save the station to its memory so the next time we turn on the radio, it will automatically tune in to the frequency we were using before. The radio also features a built-in Lithium Battery and the appropriate charger so it can last on batteries for days.
The sound quality of the project is pretty good. I am using a small 3W speaker with a low power amplifier. The radio sounds good, and it looks even better. Let’s now see the parts need in order to build this project.
Step 1: Get All the Parts
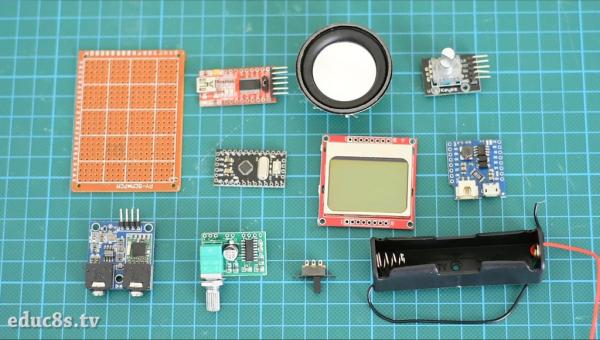
We are going to need a lot of parts to build this project. If you are a beginner to Arduino, make sure to build some simpler projects first because this is an advanced project and there are many things that can go wrong.
So we are going to need the following parts:
- Arduino Pro Mini ▶ http://educ8s.tv/part/ArduinoProMini
- An FTDI Programmer ▶ http://educ8s.tv/part/FTDI
- An FM Radio module ▶ http://educ8s.tv/part/FMRadioModule
- A 3W Speaker ▶ http://educ8s.tv/part/3WSpeaker
- A PAM8403 Amplifier Module ▶ http://educ8s.tv/part/PAM8403
- A rotary encoder ▶ http://educ8s.tv/part/RotaryEncoder
- A Nokia 5110 LCD display ▶ http://educ8s.tv/part/NOKIA5110
- A Wemos Battery Shield ▶ http://educ8s.tv/part/WemosBatteryShield
- A 18650 battery ▶ http://educ8s.tv/part/Batteries18650
- A 18650 battery holder ▶ http://educ8s.tv/part/18650Holder
- A switch ▶ http://educ8s.tv/part/Switch
- A 5×7 CMs prototyping board ▶ http://educ8s.tv/part/PCB5x7
- Some wires ▶ http://educ8s.tv/part/Wires
- A speaker grill cloth ▶ http://educ8s.tv/part/SpeakerCloth
The total cost of the project is around 22$.
Step 2: The Electronics
First of all, let’s built the electronics of the Radio. A few months ago I built an FM radio project on a breadboard. You can read the Instructable about that project here. I made some changes to that project and here is the improved version of it on a breadboard. I am using an Arduino Nano now, but I will use an Arduino Pro Mini later for lower power consumption. You can find the schematic diagram of this project attached to this Instructable.
If we power up the project, we can see that a Splash Screen is displayed on the Nokia display for a few seconds and then the radio loads the previous radio station we were listening to from its EEPROM memory. We can change the frequency from this knob and the volume from this knob. The project is working fine. We now have to make the project smaller to fit in the enclosure. For that, we are going to use the Arduino Pro Mini which is very small in size and also offers lower power consumption. We are also going to use this small prototyping board to solder some of the components on it. Before that let’s design the enclosure in Fusion 360 a free but extremely powerful software.
Step 3: Designing the Enclosure
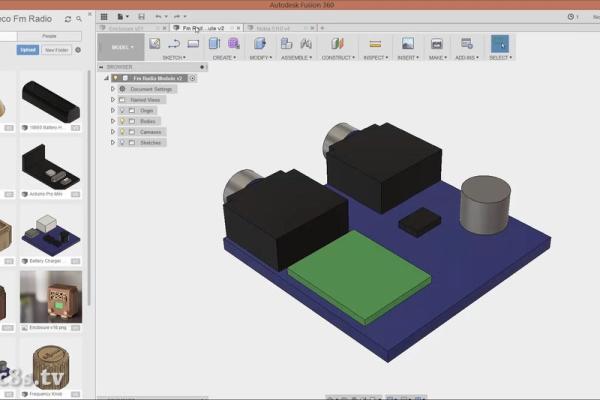
Since we are going to design a complex enclosure and we are going to use a lot of parts we first have to model each electronic part in Fusion 360. This way we are going to be sure that every part will fit perfectly and the enclosure is big enough to fit everything inside. It took me about a week to learn how to model a part in Fusion 360 and then model all the parts I was going to use. Then it took me another week to design the enclosure since I am not an experienced Fusion 360 user. I have already uploaded all the design files to Thingiverse.
Get the files ▶ https://www.thingiverse.com/thing:2826999
The result, in my opinion, was worth it. The design looks fantastic, and I could arrange all the parts inside the enclosure as I wished. This way I was certain that when I was going to print all the enclosure parts, they would fit just fine. This way, we can reduce the trial and error prints which result, in a lot of wasted time and filament. Another cool feature that Fusion 360 offers is the ability to create high quality renders of your design using different materials and see how the project will look like in reality. Cool. The render I created looked gorgeous. I couldn’t wait to see the project completed, so I started 3D printing the enclosure files on my Wanhao I3 3D printer.
Step 4: 3D Printing and Post Processing
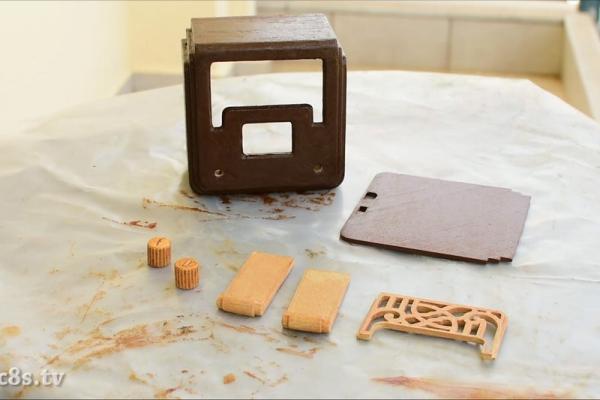
I used two wood filaments from FormFutura. Coconut and Birch filament. If you follow my channel, you probably know that I love the look and feel of wood filaments. I never had any problems while printing with them so far. This time was different though. The project consists of 7 parts. I started printing the smaller parts first with success. The last part, the big part of the enclosure turned out to be more difficult to print. For some reason, the nozzle clogged every time I tried to print it. I tried many settings, changing the speed, the retraction, the layer height, the temperature. Nothing worked. I changed the nozzle to 0.5mm one.
Still the same. The print failed constantly. I even had some power failures which made me invest in a UPS. I was desperate, I wanted the project to move on, and I was stuck. Then I came up with an idea. Could I resume printing a failed part after changing the clogged nozzle? After searching online, I discovered that it is possible. Unfortunately, I was so frustrated at that time that I didn’t record a video of the procedure. But it worked like a charm, and finally, I had the last part of the enclosure ready on the print bed! What a relief!
The next things to do were easy, removing the support material from the prints, sanding and polishing with wood varnish. I sanded all the parts carefully. As you can see the main enclosure part was not printed as good as I wanted but since it was so difficult to print I had to work with it. In order to heal the imperfections, I used some wood putty. Since I couldn’t find a wood putty with a color similar to my part, I mixed two color putties together to create a color close enough to my part. I applied the wood putty to all the parts, and I corrected all the imperfections. After the putties were dry, I sanded the parts once more and applied wood varnish. I used walnut wood varnish for the dark parts and oak wood varnish for the light ones. I let them dry for a day, and I was ready to move on to the electronics.
Step 5: Putting Everything Together
The next step was to shrink the electronics to fit in the enclosure. Since I had already modeled all the parts in Fusion 360, I was certain how to do it. As you can see, each part has its specific position in the enclosure.
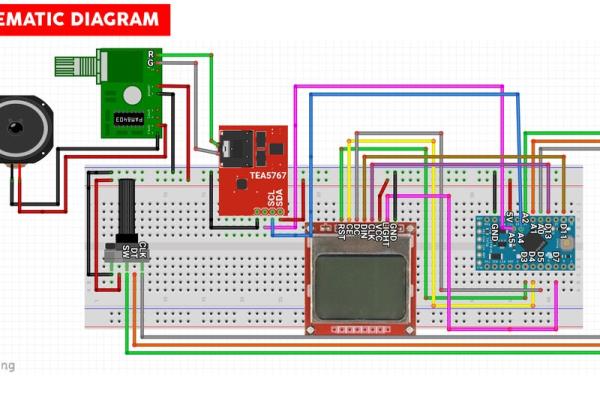
I soldered all the parts together according to the schematic diagram I have attached here.
First, I soldered the Arduino Pro Mini and uploaded the code to it using an FTDI programmer.
The next step was to create the power supply for the circuit. I am going to use the Wemos battery shield, a very handy shield which can charge a 18650 battery and boost its voltage to 5V. I removed the battery connector from the shield and soldered the wires from the 18650 battery connector. Next, I soldered the switch to the 5V output. Check the second schematic I have attached here. The power supply was ready.
I then soldered all the other parts one after another for a couple hours. I didn’t use an audio cable at the audio output of the FM radio module this time, but I soldered wires at the bottom of the board instead. Check a photo I have attached to this Instructable. This signal can now go to the amplifier for amplification. I also added a 330μF capacitor to the power rail on the prototyping board. This addition reduced the noise on the radio signal. After all the soldering was done, I tested the project and it worked!
The last step was to put everything together, the enclosure parts and the electronics parts. I first glued the grill of the radio and then I glued the grill cloth. Then I glued the display using regular glue and the speaker using hot glue. Next, I hot glued the battery holder, the switch and the battery charger. Then I hot glued the amplifier module to its position, then the rotary encoder and lastly the prototyping board. Finally, all I had to do was to glue the remaining parts of the enclosure together. The project was ready, and I couldn’t wait to try it.
At last 6 months after its inception, the Art Deco FM Radio project was playing some music on my desk. What a feeling!
Step 6: The Code of the Project
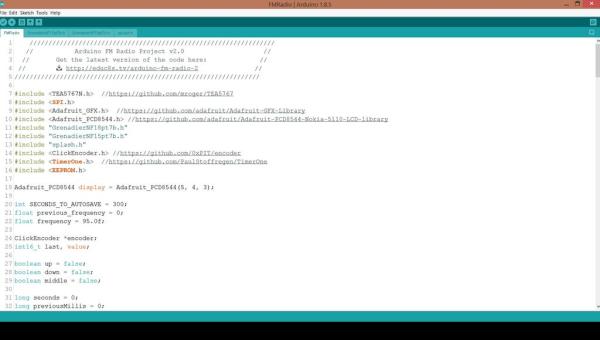
Let’s now go to the computer to take a quick look at the software side of the project. As you can see we are using a lot of libraries in this project.
The code is more complex than most of the projects we have built so far. I tried to make it a simple as possible with easy to read and to understand functions.
The basic idea is this: If the rotary encoder shaft has changed position and has stayed in the same position for more than 1 second we need to set that frequency to the FM Radio module.
if(currentMillis - previousMillis > interval)
  {
    if(frequency!=previous_frequency)
    {
      previous_frequency = frequency;
      radio.selectFrequency(frequency);
      seconds = 0;
    }else
The FM radio module needs around 1 second to tune in to the new frequency so we can’t change the frequency on each rotary encoder change because this way, the frequency change will be very slow. When the new frequency is set to the module, we count how many seconds have passed since the frequency was set. If the time exceeds the 5-minute mark, we save that frequency to the EEPROM memory.
else
    {
      seconds++;
      if(seconds == SECONDS_TO_AUTOSAVE)
      {
          float read_frequency = readFrequencyFromEEPROM();
          if(read_frequency!=frequency)
          {
            Serial.println("loop(): Saving new frequency to EEPROM");
            writeFrequencyToEEPROM(&frequency);
          }
      }
    }
You can find the code of this project attached here.
Source: Art Deco FM Radio Project Using Arduino
