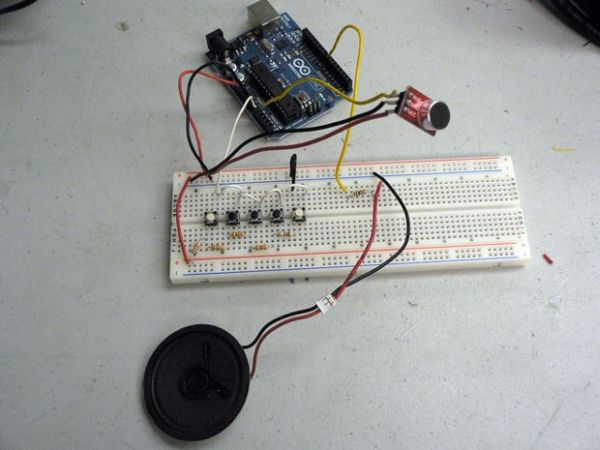
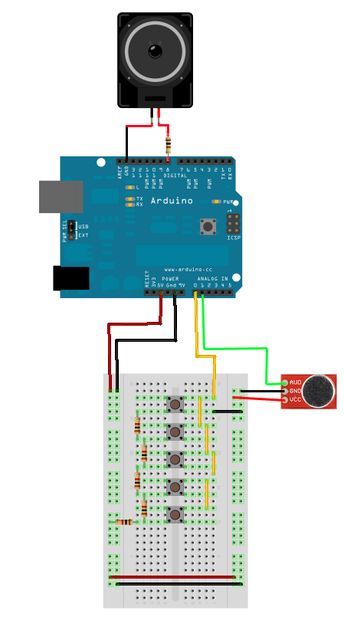
I wanted to create an Arduino instrument that was easy to play, but would sound better with practice. This “wind” instrument combines the Sparkfun Electret Microphone breakout board with the Tone library and 5 buttons on one analog pin. The musician must make a sound or blow into the microphone in order to enable the buttons. The buttons use the input from the microphone to determine what frequency to play. One of the buttons disables the buttons and the musician must make a sound or blow into the microphone to re-enable the instrument.

If you’re blowing into the microphone, be careful, too much practice can make you dizzy!
Step 1: Parts
1 Arduino Microcontroller
1 Breakout Board for Electret Microphone (BOB-09964 http://www.sparkfun.com/products/996 )
1 8-ohm speaker
5 1KΩ resistors
1 100Ω resistor#
5 6mm Tactile switch, flat top Model # SW-6mm-TACT-FLAT-01
(http://www.allspectrum.com/store/product_info.php?products_id=298 )
1 Solderless breadboard
22-AWG hookup wire
When you are running out of digial I/O pins for switches you can create a voltage divider and add a small amount of code to get many buttons working on one analog pin. The example below shows how 5 buttons can be identified using 5 1K Ω resistors and one analog pin. The resistor values must be small enough so that there isn’t too much current through them but large enough to have a reliable and stable voltage divider circuit.
This circuit uses one analog pin and an equal number of resistors configured in series across +5V and GND. Each button connected to the analog input pin is at some fixed position in the series circuit. The code checks within a range of values and returns a button number if a button pushed was in that range.
You can connect more or less than five buttons to your analog pin.
1. Copy and paste the code below into a new sketch.
2. Compile, upload and then open the Serial Monitor.
3. Push the buttons and write down the values returned.
4. Replace my values with yours.
5. Comment out the line: #define DEBUG_ON
// This code is based on:
// Code by Doug LaRue
// from November 2008
// released under
// Creative Commons Attribution-Noncommercial-Share Alike 3.0
**********************/
#define ERROR_WINDOW 50
#define INTERVAL 100
#define DEBUG_ON
int whichButton;
// variable to limit the button getting checked every cycle
long lastChecked = 0;
void setup(){
Serial.begin(9600);
}
void loop(){
if( millis() – lastChecked > INTERVAL ) {
if( int buttNum = buttonPushed(0) ) {
if(whichButton!=buttNum){
Serial.print(“Button “);
Serial.println(buttNum);
switch (buttNum){
case 1:
Serial.println(“Do something for Button 1”);
break;
case 2:
Serial.println(“Do something for Button 2”);
break;
case 3:
Serial.println(“Do something for Button 3”);
break;
case 4:
Serial.println(“Do something for Button 4”);
break;
case 5:
Serial.println(“Do something for Button 5”);
break;
}
whichButton=buttNum;
}
}
lastChecked = millis(); // reset the lastChecked value
}
}

int buttonPushed(int pinNum) {
// variable to store the read value
int val = 0;
// enable the 20k internal pullup
digitalWrite((14+pinNum), HIGH);
val = analogRead(pinNum); // read the input pin
#ifdef DEBUG_ON
Serial.println(val);
#endif
/* don’t use the upper position because that is the same as the all-open switch value when the internal 20K ohm pullup is enabled.
For 5 buttons, the ERROW_WINDOW is 50*/
//if( val >= 923 and val <= 1023 )
// Serial.println(“switch 0 pressed/triggered”);
if( val >= 780 and val <= 880 ) { // 830
return 1;
}
else if ( val >= (630-ERROR_WINDOW) and val <= (630+ERROR_WINDOW) ) { // 630
return 2;
}
else if ( val >= (430-ERROR_WINDOW) and val <= (430+ERROR_WINDOW) ) { // 430
return 3;
}
else if ( val >= (230-ERROR_WINDOW) and val <= (230+ERROR_WINDOW) ) { // 230
return 4;
}
else if( val >= 0 and val <= (20+ERROR_WINDOW) ) {
return 5;
}
else
return 0;
}
For more detail: Arduino Wind Instrument
