Summary of Arduino Weather Station with DHT11 and BMP180
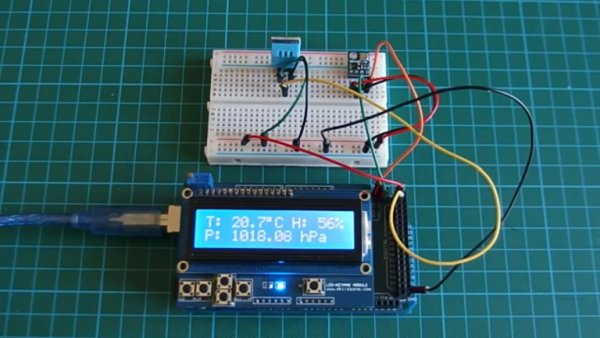
This tutorial upgrades a previous weather station project by replacing the DHT11's temperature reading with the more accurate BMP180 sensor. The system now uses the DHT11 solely for humidity measurement while the BMP180 handles pressure and temperature data. All components connect to an Arduino Mega via a 16×2 LCD keypad shield, utilizing I2C for the BMP180 and 1-wire for the DHT11 to display real-time environmental readings.
Parts used in the Arduino Weather Station:
- BMP180 barometric pressure/temperature sensor
- DHT11 temperature and humidity sensor
- 16×2 LCD keypad shield
- Arduino Mega
- Breadboard
- Jumper wires
- Resistors
Introduction
In the previous tutorial I showed you how to build a weather station using only the DHT11 sensor and I said the readings from this sensor is fairly accurate. In this tutorial, I will be using the DHT11 to measure only the humidity and BMP180 to measure pressure and temperature. That’s because its readings are more accurate than the DHT11 temperature readings.
Project Parts
I will be adding only the BMP180 sensor to the list in the previous tutorial.
1. BMP180 barometric pressure/temperature sensor.
2. DHT11 temperature and humidity sensor.
3. 16×2 LCD keypad shield.
4. Arduino Mega.
5. Breadboard.
6. Jumper wires.
7. Resistors.
The BMP180 is the new digital barometric pressure sensor from Bosch Sensortec, with a very high performance and it uses the I2C (pronounced I-squared- C or I-two- C) protocol. This digital sensor can measure barometric pressure, temperature and altitude.
This sensor is a four pin device, the first pin is labelled VCC, second pin GND and the last two are the clock (SCL) and data (SDA) pins. You can purchase this sensor here.
The DHT11 is something we are familiar with, it has been used in couple of our tutorials here as a low cost temperature and humidity sensor that operates using the 1-wire protocol. It costs about $2 and you can get it here.
The readings from this sensor are fairly accurate, so we will be using this sensor to only measure humidity since the BMP180 gives more accurate temperature readings.
This sensor has three pins, the first which is the power pin VCC, next pin which is the middle one, which is the signal out or DATA pin and lastly the ground pin labelled GND.
Yes, we will also be using the 16×2 LCD keypad shield as used in the previous tutorial. This shield makes connecting the 16×2 LCD module to any system quite easy, as it simply just plugs on the Arduino mega which is being used for this project. You can get this shield here.
Read more: Arduino Weather Station with DHT11 and BMP180
- Why is the BMP180 sensor added to this project?
The BMP180 provides more accurate temperature readings than the DHT11. - What function does the DHT11 serve in this specific build?
The DHT11 is used exclusively to measure humidity. - Which communication protocol does the BMP180 use?
The BMP180 uses the I2C protocol. - How many pins does the BMP180 sensor have?
The BMP180 is a four pin device. - What are the pin labels on the BMP180 sensor?
The pins are labelled VCC, GND, SCL (clock), and SDA (data). - Does the DHT11 sensor operate using the I2C protocol?
No, the DHT11 operates using the 1-wire protocol. - What role does the 16×2 LCD keypad shield play?
The shield makes connecting the LCD module to the Arduino Mega easy by simply plugging it on.