UPDATE: Please see Addendum 2 at the end of this article for an Excel automatic logging implementation.
There are several good articles on Instructables about building your own Arduino. Depending on your horde of electrical parts, you may be able to build an Arduino clone for as little as $3. I recently built two: one on a solderless breadboard and another that is like a USB-stick made on perfboard and my parts cost were approximately $7 (the breadboard parts were sacrificed to build the stick after I got all the hardware and software working.)

Once you get your CloneDuino built, or even if you purchase a commercial model such as the UNO (picture #5), then you need to do some programming for the next step down the path of creating something useful or fun. BUT, what if you could use the Arduino for gathering the state of digital or analog information and then log that data to the PC for later manipulation? This would mean that the Arduino software would not need to be changed (or perhaps only minor changes) to perform many experiments.
Step 1: Building the USB hardware interface
To connect a genuine Arduino UNO or a clone UNO to your PC USB port, you need to have an interface.
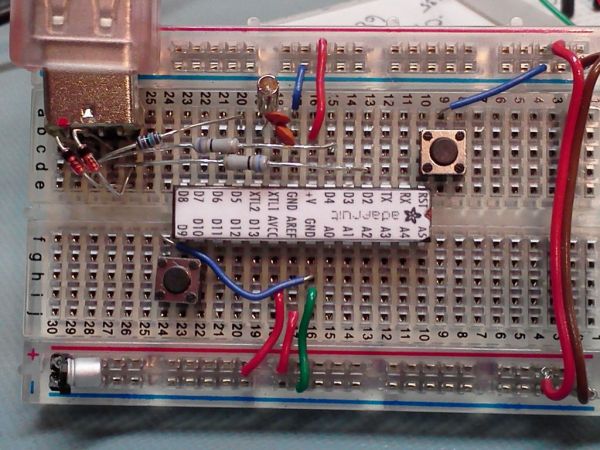
The interface built by rancidbacon for his tests is shown in the first picture.
http://code.rancidbacon.com/ProjectLogArduinoUSB
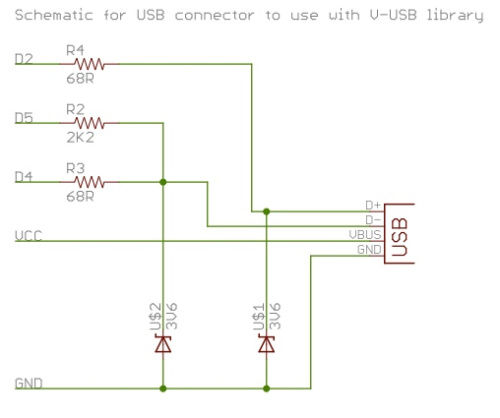
The schematic for the interface is shown in the second picture.
http://petrockblog.wordpress.com/2012/05/19/usb-keyboard-with-arduino-and-v-usb-library-an-example/
To be successful with this project, you will need to construct this circuit in some manner, either as shown here or as I showed in the previous section. While the construction is not complicated, errors will keep the V-USB software from working (said another way, the project will be a BIG flop and will not work.) Additionally, if you have a wiring accident, diode reversed, improper parts selection, or cold solder joints, the circuit is likely to not work. AT WORST, IMPROPER CONSTRUCTION AND WIRING COULD DAMAGE YOUR PC USB PORT, SYSTEMBOARD, OR CREATE OTHER SERIOUS AND EXPENSIVE DAMAGE.
DO NOT ATTEMPT TO BUILD THIS INTERFACE AND USE IT ON YOUR PC UNLESS YOU ARE CONFIDENT YOU CAN CONSTRUCT THE CIRCUIT PROPERLY AND HAVE THE ABILITY TO TEST YOUR INTERFACE BEFORE CONNECTING TO YOUR PC. IF YOU MOVE FORWARD WITH CONNECTING TO YOUR PC YOU ASSUME ALL RISKS ASSOCIATED WITH THIS PROJECT.
Step 2: Download the V-USB modified code
You will need to download the V-USB for Arduino library. This library is located here:
http://code.google.com/p/vusb-for-arduino/downloads/list

The code should be integrated into your Arduino environment in the library section. On my XP machine, the location is:
My Documents\Arduino\Libraries\UsbKeyboard
Adjust your location (directories) to match the install requirements for Arduino on Linux or iOS.
Download and expand the ZIP file. The ZIP file is structured as:
vusb-for-arduino-005.zip\vusb-for-arduino-005\libraries\UsbKeyboard
Only the files in the \UsbKeyboard folder and subordinate folders are required to be moved to
My Documents\Arduino\Libraries\UsbKeyboard
For more detail: Arduino V-USB / HID 14 channel data logger
