Summary of Arduino/Unity Car Driving Experience
This article details a DIY arcade-style car game created by a 12-year-old enthusiast using an Arduino Uno and Unity. The project integrates physical controls like a steering wheel, gear shaft, and pedals with a virtual simulation to mimic real driving physics. The author emphasizes cost-saving by repurposing household materials, achieving a $0 budget, while highlighting the importance of troubleshooting electronics early in the process to avoid complex disassembly later.
Parts used in the Arduino/Unity Car Driving Experience:
- Foam board
- Skewers
- Rubber bands
- Legos and/or Knex
- Zip ties
- Non-stretchy string
- Tape
- Wires (male-male, male-female, female-female)
- Breadboards
- Potentiometers
- 10k ohm resistor
- Buttons
- Arduino Uno
- Exact o-knife
- Scissors
- Cutting board
Idea behind project
Hi, I am a 12-year-old kid who loves electronics, coding, space, and building. I remember, on my 10th birthday, I began sitting in the front seat of our car, and I loved it. Not only did I not get car sick, but it reminded me of a beloved game, Asphalt 9. If you don’t know what that is, it is a car racing game. (I hope you can see where this is going).
Jump forward 1 year, and I start getting into the free game building engine, Unity. After building my first character movement project, I fell in love and convinced my parents to buy me a $10 tutorial on c# (the Unity programing language). Since then, I have created a space simulation using real physics equations, a game with soft bodies and toggle-able ragdoll physics, experimenting with Perlin noise and procedural terrain generation, and now, using Arduino to create a real-life car game.
Things to keep in mind while building I would like to say a few things that came in handy when constructing this.
1. If you have any questions or issues while constructing, please contact me at [email protected]. I would love to help! This build was very fun, and I hope you enjoy it too.
2. Keep in mind that the build can be frustrating at times. There are times where errors just keep popping up, and it is very overwhelming. I would suggest taking a break, even if you don’t want to. I know that the lack of information available online was scarce and that drove me nuts (I was so desperate I even went to the second page on google). But keep going! The reward is worthless.
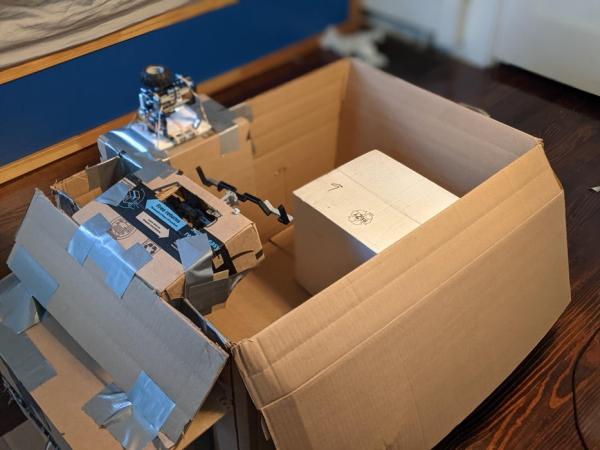
3. Except for the electronics, none of the building materials or tools are mandatory. Because I have an awesome and creative family, I had all of the materials at my house lying around, and the electronics I had from old Arduino builds. In the end, the project cost me EXACTLY $0!! I am very happy.
4. I just wanted to make it as arcade-style-car-game as possible, without the cost of getting a $4,000 (I know the price freaked me out too) arcade car game machine. Plus, mine has a working gear shaft, and a customizable game if you know a bit of coding.
5. Good luck!!!
Supplies
What you need:
Parts (these parts are only suggested and can be substituted. For example, I can replace foam board with cardboard, although I suggest cardboard as it is st. Also, you do not have to get any of the items from the links provided):
1. foam board (Foam board – amazon)
2. skewers (Skewers 100 pack – amazon)
3. rubber bands (rubber bands – amazon)
4. Legos and/or Knex (really any building material works – it could be wood or metal if you wish)
If you were to choose Legos and you don’t have any, I would suggest:
Lego techic build – this would give you all the pieces you would most likely need.
Knex set – This should be all the Knex you will need
5. zip ties (500 zip ties – amazon)
6. non-stretchy string (Spoll of yarn – amazon)
7. tape (duct tape – amazon)
Electronic parts (must needs):
1. Lots of wires (male-male, male-female, and female-female) (Wires assortment – amazon)
2. 5 breadboards (some small and some large) (4pcs Breadboard – amazon: I would really suggest these)
3. 3 potentiomenters (Potentiometers – amazon)
4. 10k ohm resistor (Resistors – amazon: these are more than enough, although if you are looking to do anymore Arduino projects I suggest getting these)
5. 4 buttons (Buttons – amazon: more than enough but would suggest if you are doing more arduino projects in the future)
6. Arduino Uno (an Arduino Mega would work too) (Arduino Uno – amazon)
Software:
1. Unity (free) Download Unity
2. Arduino software (free) Download Arduino Software
Tools:
1. exact o-knife (Not necessary but helps. Also, be careful when using this tool. I have cut myself with it and it is not fun)
2. Scissors
3. cutting board (non-static so perfect for electronics)
Step 1: The Steering Wheel Electronics
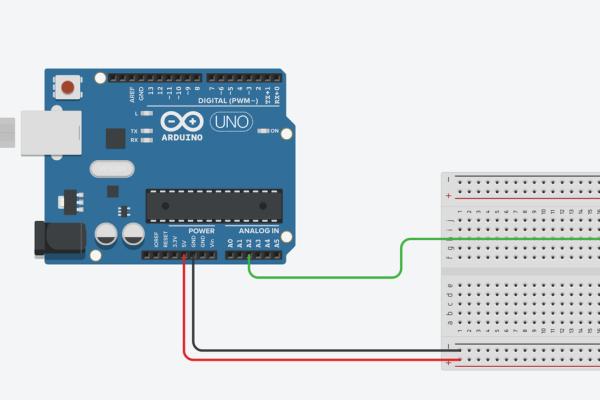
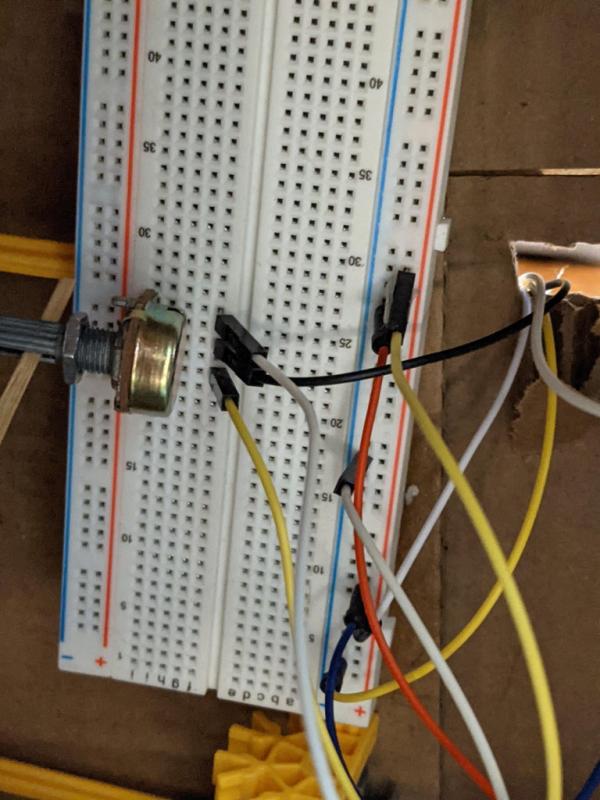
The steering wheel schematic is very simple. All that is required is supplying voltage and ground to the potentiometer (no resister required) and a connection between the middle pin and the analog 2 (A2) input on the Arduino Uno. The analog pin reads the input as a numerical value, so instead of using the digital pins which is either 1 or 0 (true or false), we use the analog pins. The potentiometer must be attached to the A2 pin because it will come into play once we start coding. Don’t worry about the end product, and how you want your steering wheel to work/look yet because right now we’re just getting all the electronics handled.
Step 2: Gear Shaft Electronics
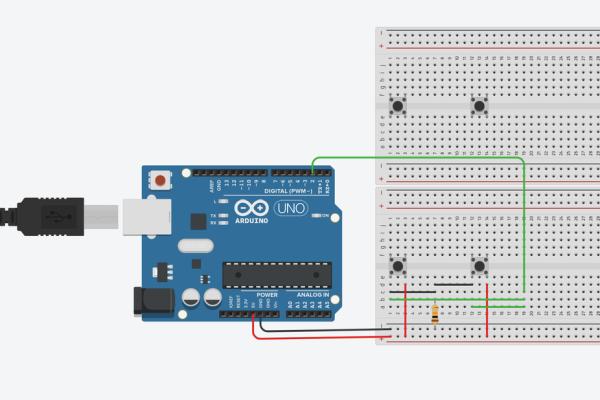
For this schematic, I a 2 gear system; forward and reverse. Feel free to add as many shafts as you would like, such as parking, but with the simple tools/material I am using 2 gears works just fine.
The Arduino button mechanics for the gear shaft is quite simple. This model is comprised of 4 buttons and 2 breadboards placed right next to each other. The 2 extra buttons on the other breadboard are required for the building process.
Step 3: Pedal Mechanics
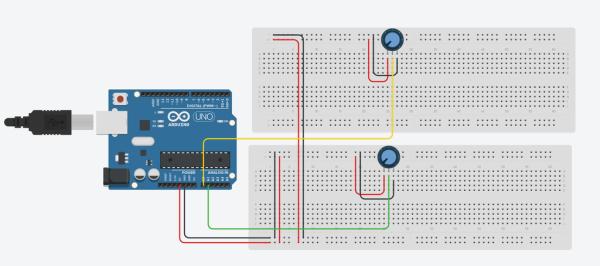
The pedal is very self-explanatory. You use 2 potentiometers to measure how hard you brake and accelerate in whatever direction you wish to go in (either forward or reverse). I didn’t have enough potentiometers to show my real-life model, but the Tinkercad schematic should be enough to work off. I tried my best to fit it on one breadboard, but it just wouldn’t work for the design that I have in mind for the pedal.
The green and yellow pins connect to analog inputs, which reads the number of degrees that have turned.
Step 4: All the Electronics
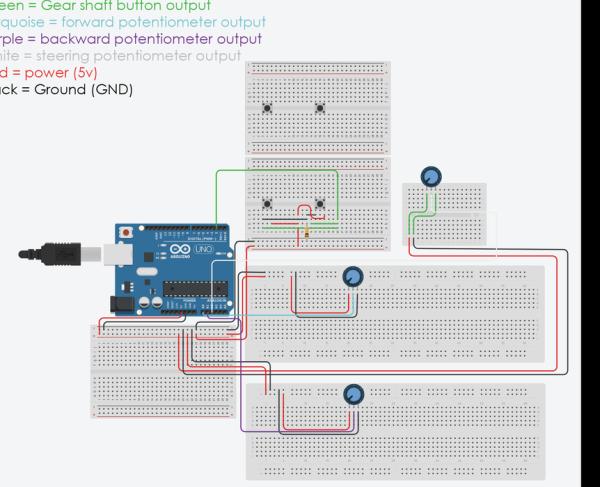
In the end, your electronics should be the same as mine, or pretty similar. You might notice that there is another breadboard right below the Arduino in the Tinkercad schematic, which is just like a hub for electronics so it doesn’t get too messy. You don’t have to include this, but you can if you’d like. I was unable to make a real-life model because I didn’t have enough potentiometers to make it, but everything else should be the same. Keep in mind the wire color choices are not necessary. For me, I organized the colors for the sake of it being less complicated. It does not harm your end product if you change the colors. If you have all of this completed, you are ready for the building stage!
Step 5: Troubleshooting Electronics Using Code
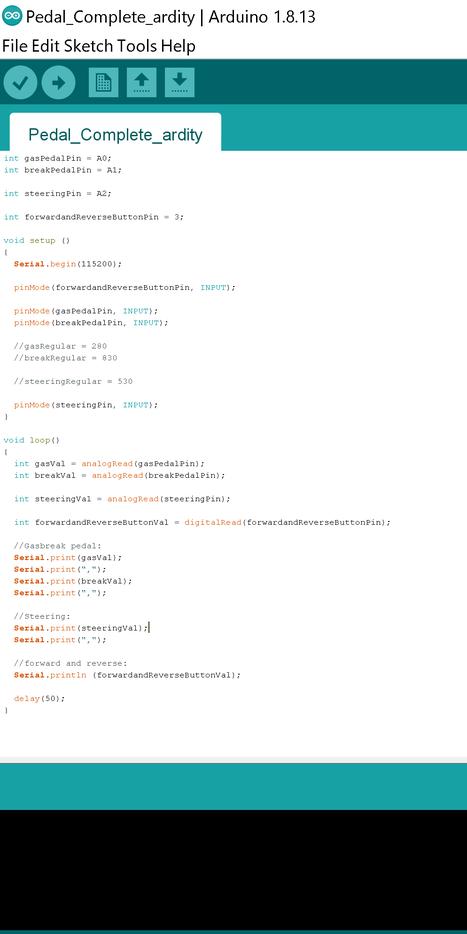
In this section, you will make sure that you wired everything up correctly, by making sure that the code gives the right output. I like to do this as sort of a benchmark every so often to make sure that everything is working, and if there is a problem in the future I know what is working. It only takes a basic understanding of Arduino coding, to understand what this code means, and if it is your first time coding in Arduino software then I would suggest looking up a basic tutorial. There are many tutorials online about it. If everything is wired up correctly, the output should give you a number value for each potentiometer and button. If not, then recheck that all the electronics are wired properly. You can often find a solution by pasting your output into google.
The code can be found in the google doc below:
https://docs.google.com/document/d/12DS-lb2IfXig1k…
All you have to do is copy the code and paste it into an Arduino project. The results should look like the picture above.
Step 6: Design for Steering Wheel
I think the steering wheel has a simple design. I created a wheel attached to a gear, which is connected to a rubber band to add restraint as you pull the steering wheel backward, and then used gears to lower the amount of rotation the potentiometer reads so that the wheel movement could fit the turning diameter of the potentiometer. Then I just shaved 2 sides of a Lego shaft to fit in the potentiometer with a sheetrock knife. I encourage a different solution, but for my case, this was the only solution available. I did have to do it with my dad, however, because it was kind of dangerous, so please be cautious of that.
Step 7: Design for Gear Shaft
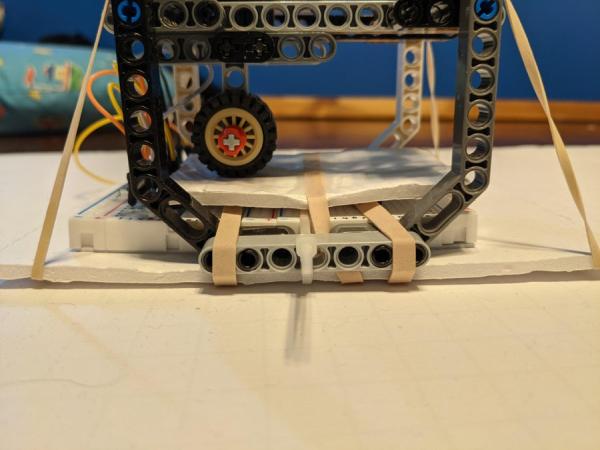
I think my design was a cool looking way to solve my problem, and quite creative as well. You need to create a system that when you move the gear shaft back and forth, it is pushing down on the button, creating a sensor system. Because there is only forward and reverse, I only had to do the circuitry for one side (forward side), and if that is not being pressed, then the car is going in reverse. It is a simpler and more reliable way of accomplishing this problem. I used Legos, but you can use anything (e.g. cardboard, Knex, foam board, 3d printer filament – if you have a 3d printer). For me, this method worked, but if you are having issues, you can also use a potentiometer, and measure the change. Although, that is more complicated, will require slight changes to the code, and this works.
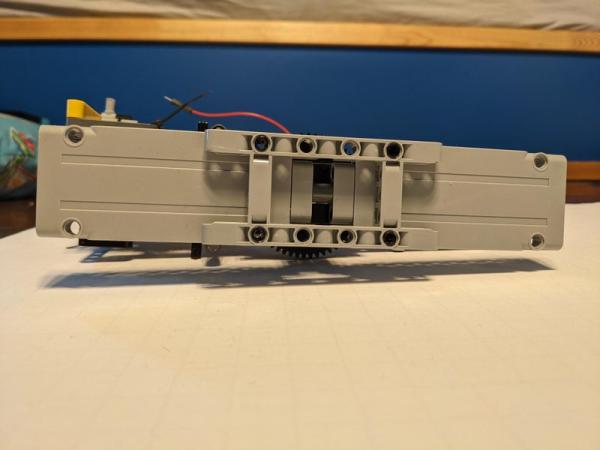
Step 8: Design for Pedals
This was the most complicated out of the 3 for me. I had to create a sort of “arm”, where when pressure is applied to the end, it converts to rotational force. This took me 4 days individually because it just kept breaking, and I was getting irritated. After the “arm”, everything else was quite easy. Once I got the electronics and build working together, it was easy. I used rubber bands to add tension when you pulled it back, and a limit by cutting semi-circles into the box.
Step 9: Troubleshooting
I like to troubleshoot periodically throughout my builds because it helps eliminate potential problems when they almost inevitably occur. In this case, it is to make sure all your electronics are hooked up properly. I made the mistake of doing this step once all of the building aspects are completed, which wasn’t smart because when navigating through the wires to evaluate the issue, it took was quite annoying. I had to deconstruct my builds numerous times, which is why I suggest troubleshooting now. Remember, it can be both a software and hardware issue. Often I find myself searching the web “why is my Arduino software not working”, but I usually make silly mistakes, like forgetting to hook up the right wires.
Source: Arduino/Unity Car Driving Experience
- How can I build this project for free?
You can achieve a $0 cost by using household materials like cardboard instead of foam board and repurposing electronics from old Arduino builds. - What is the best way to troubleshoot electronics during construction?
It is recommended to troubleshoot periodically throughout the build rather than waiting until all building aspects are completed to avoid deconstructing the model multiple times. - Can I substitute the suggested building materials?
Yes, you can substitute items like foam board with cardboard, wood, metal, or 3D printer filament as long as they function for your design. - Does the project require specific wire colors?
No, wire color choices are not necessary; you can organize them for simplicity, but changing them does not harm the end product. - What software is needed to run this project?
The project requires the free Unity engine for the game simulation and the free Arduino software for the hardware code. - How does the gear shaft mechanism work?
The system uses buttons where moving the gear shaft back and forth pushes down on a button to register forward or reverse direction. - Why did the author suggest taking breaks during the build?
Errors can be overwhelming and information online may be scarce, so taking a break helps manage frustration and maintain progress. - What is the purpose of the rubber band in the steering wheel design?
The rubber band provides restraint when pulling the steering wheel backward and adds tension to the mechanism.