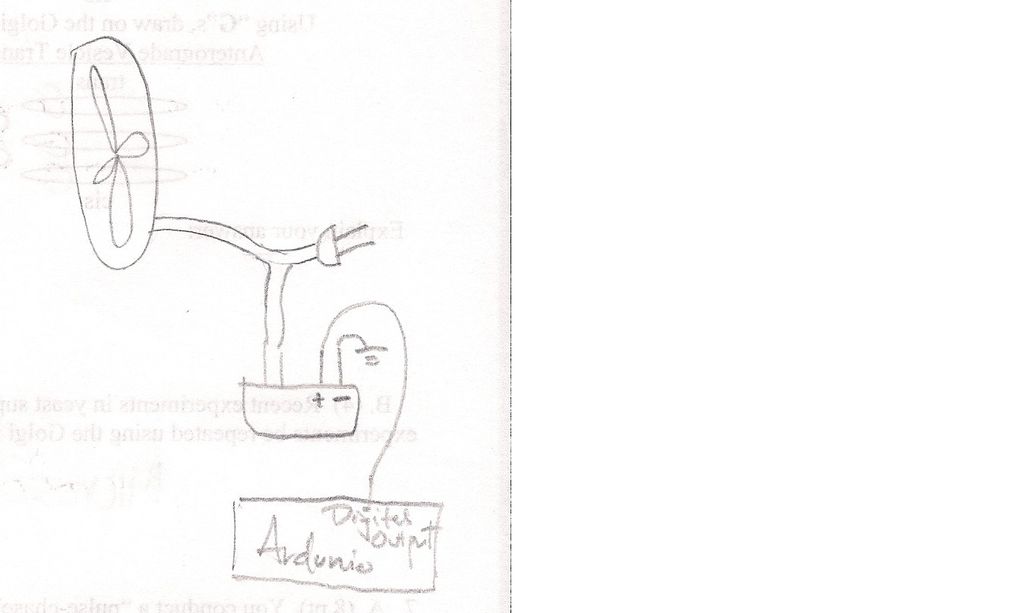
Summary of Arduino Thermostat with TC74 sensor
This guide shows how to use an Arduino with a TC74 temperature sensor to automatically switch a cooling fan and a heater via solid-state relays based on measured temperature. It covers materials, wiring the AC devices through relays, hooking up the TC74 I2C sensor, and example Arduino code to read Celsius temperatures and drive digital output pins for the fan and heater.
Parts used in the Arduino Thermostat Project:
- Arduino microcontroller (with USB connector)
- Fan (standard 120 V AC personal fan)
- Heater (120 V AC space heater)
- TC74 temperature sensor (TC74A2)
- Wires
- Solid-state relay for fan (Crydom D2W202F, 2 Amp)
- High-current relay for heater (NTE Electronics, 25 Amp)
- Breadboard
- Heat-shrink tubing
- Two wall outlets
- Optional potentiometers (10,000 ohm, two)
- Computer with Arduino software
- Code (Arduino sketch using Wire library)
This is a quick guide on how to use an Arduino© to control whether a cooling fan and a heater is turned on depending on the detected temperature from a TC74 Arduino sensor.
This is for a final project for an Electronics class I am currently taking, though I came into this project with pragmatism in mind, because of the hot summers and cold winters (ok, 60 degrees indoors is cold for me, but that’s probably because I’m Californian).
Working on this project should give good hands-on practice in working with the Arduino, soldering, and general circuitry, as well as coding for the Arduino and workin gon the logic needed for the coding.
Why adjust the fan and/or heater if the Arduino can do it for you? (Ok, this is probably easy enough to do, but making it technologized (not a word) is just much cooler (no pun intended).
Also, there is a video at the end of this Instructables if you’d like everything described verbally.
Best of luck!
Step 1
Materials.
You’ll need…
* An Arduino© microcontroller, made by Arduino (with USB connector)
* A Fan (This project used the following one: http://www.amazon.com/Lasko-Personal-Inches-White-2002W/dp/B000QR6VXW/ref=sr_1_1?s=home-garden&ie=UTF8&qid=1333608671&sr=1-1)
* A Heater (This project used the following heater: http://www.amazon.com/Pelonis-Heater-fan-Heat-Settings/dp/B000PAQHLG/ref=sr_1_32?s=home-garden&ie=UTF8&qid=1333608582&sr=1-32 )
* TC74 Temperature Sensor
* Wires
* Relays, Relays here were solid-state relays, with a smaller current (2 Amp) Crydom D2W202F for the Fan and a large current 25 Amps NTE Electronics Relay for the heater, which requires up to 1500W.
* A breadboard
* Heat-shrink tubes
* Two wall outlets for use
* Two optional (10,000 ohm) potentiometers
* A computer with Arduino software
* Code
Tools
* Soldering iron
* Wire cutter and wire stripper
* Crimper
* Screwdriver or alternative
* Heat gun (optional)
Safety warning: Live wires may be dangerous, especially when either the fan or heater is plugged in. Please either use the heat-shrink tubes to cover these up or better yet, box the whole contraption.
 Remove these ads by Signing Up
Step 1: Starting off
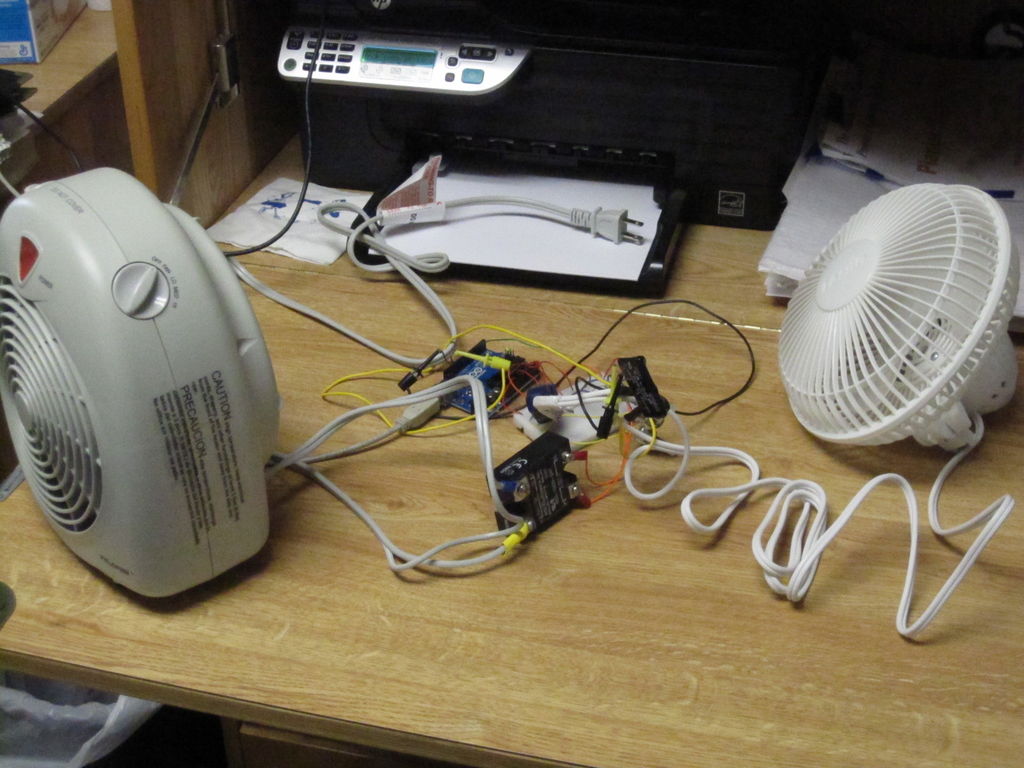
We’ll start with the fan, as this poses less fire hazard (the heater pulls a lot of current).
We wish to make a closed current loop through the solid-state relay, 120 V AC and the fan motor itself. Basically, we want to be able to put in zero volts somewhere such that the fan is told to turn off and when we give in 5 V somewhere, then the fan turns on.
After this is done, we can test the fan to make sure that it’s talking to the Arduino.
Use any digital output pin you want, but I chose pin 13.
For an easy pin 13 on/off program…
Go to Files -> Basics -> Examples -> Blink when your Arduino software window is open. (This is conveniently pointed at pin 13.) Don’t forget to plug in the fan into a 120 V AC plug or the equivalent.
Hardware wise, follow these steps.
1. Unpackage the fan.
2. Make a cut across half of the wire to expose one end.
3. Solder the two ends of this wire to the two ends on the solid-state relay’s AC side.
4. Heat-shrink tubing should cover this connection.
5. Hook up the two other leads (+ and – 3 to 28 V DC) to the Arduino at pin 13 and ground, respectively.
6. Upload code and watch your fan work!
Step 2: Setting up the heater
1. Cut to half the heater’s cord and pull the wire apart to create two open ends.
2. Use the other solid state relay (heavy-duty) by screwing down the ends of crimped wires to ensure contact. Do the same with connections to the Arduino on the 3 to 32 V side.
3. Plug into Arduino at pin 4 and at ground.
4. Upload code, and hopefully the heater should work! (Use a similar code as the fan code, but switch the pin to pin 4.
Note: Make your incision close to the fan. This will leave lots of cord length for the plug to be further away from all the wires set up. Do similarly with the heater.
Step 3: Integrating the TC74 Sensor
Usage of the TC74 can be found at this Instructables page.
http://www.instructables.com/id/Arduino-Temperature-Sensor/
In short, hook up the TC74 as such. (From the side of the inscription.)
Pin on far left, nothing
Second pin to Analog 4
Middle pin to ground
Fourth pin to Analog 5
Far right pin to 5 V (from Arduino, may be hooked via the breadboard)
TC74A2’s code is 1001010, which is hexadecimal for 4a. This will come in handy later.
Step 4: TC74 Arduino code
The code is as follows, and can be modified to fill in other needs.
#include “Wire.h”
//wire library
#define address 0x4a
#define baudrate 9600
//baudrate for communication
byte val = 0;
void setup()
{
Wire.begin();
Serial.begin(baudrate);
}
void loop()
{
Serial.print(“temperature in Celsius: “);
//let’s signal we’re about to do something
int temperature;
//temperature in a byte
Wire.beginTransmission(address);
//start the transmission
Wire.write(val);
Wire.requestFrom(address, 1);
if (Wire.available()) {
temperature = Wire.read();
Serial.println(temperature);
}
else {
Serial.println(“—“);
}
delay(5000);
}
(Downloadable below.)
Note that the code submitted by nadav at http://www.instructables.com/id/Arduino-Temperature-Sensor/step4/Code-Code-and-more-code/ is for the old version of Arduino, hence the changes of Wire.receive and Wire.send to Wire.read and Wire.write.
What this program should do is, provided that you set some threshold temperatures, converts the fahrenheit temperature reading from the TC74 and sends it to the Arduino, where the Arduino determines whether the value is high or low enough to trigger the turning on of the fan and the heater. It will then wait another 5 seconds before taking another reading and figuring out whether the reading has changed the digital state of the system.
Turning on the serial monitor of the Arduino program should read out…
Temperature in Celsius __ (Current temperature from TC74)
Note that we cannot control when the heater and fan turn on yet.
 Basic_Fan_Program.ino512 bytes
- What is the purpose of this project?
To use an Arduino and TC74 sensor to control a fan and heater via relays based on temperature readings. - Which pins are used to control the fan and heater?
The example uses digital pin 13 for the fan and pin 4 for the heater. - How is the fan wired to be controlled?
Cut one conductor of the fan power cord and solder the two ends to the AC side of the solid-state relay, cover with heat-shrink tubing, and wire the relay DC side to Arduino pin and ground. - How is the heater wired to be controlled?
Cut one conductor of the heater power cord, connect the two ends to the heavy-duty relay AC side with crimped wires and screws, and connect the relay DC side to the Arduino pin and ground. - How is the TC74 sensor connected to the Arduino?
From left to right: first pin nothing, second pin to Analog 4, middle pin to ground, fourth pin to Analog 5, far right pin to 5 V. - What I2C address does the TC74A2 use?
The TC74A2 address is 0x4a (binary 1001010). - Which Arduino library is used to read the TC74?
The Wire library is used to communicate with the TC74. - How often does the provided code take temperature readings?
The example code reads the temperature every 5 seconds (delay(5000)). - What temperature units does the TC74 provide in the code?
The TC74 provides temperature in degrees Celsius as read by the code. - What safety precautions are recommended?
Be cautious with live AC wires, use heat-shrink tubing or enclose the wiring to prevent hazards, and be careful with the high current heater.