Summary of Arduino – Sonic range finder with SRF05
This article explains how to use the SRF05 ultrasonic sensor with an Arduino to measure object distance and control LED brightness via PWM based on proximity. The system sends 40kHz pulses, calculates echo time in microseconds, and converts this to distance using a divisor of 58. Code averaging is implemented to reduce reading fluctuations.
Parts used in the Arduino SRF05 Distance Sensor Project:
- 220 Ohm resistor
- SRF05 Ultrasonic range finder
- LED
- Arduino Deumilanove w/ ATMEGA328
- Breadboard / Prototyping board
- Jumper/ Connector wires
- Optional 9V DC power supply or USB power for the Arduino
A guide to using the SRF05 Distance Sensor with Arduino in order to calculate distances from objects. In this case I’m also altering the output of an LED with PWM according to how close an object is to the sensor. So the nearer you are the brighter the LED.
So if we start with the SRF05, it’s an IC that works by sending an ultrasound pulse at around 40Khz. It then waits and listens for the pulse to echo back, calculating the time taken in microseconds (1 microsecond = 1.0 × 10⁻⁶ seconds). You can trigger a pulse as fast as 20 times a second and it can determine objects up to 3 metres away and as near as 3cm. It needs a 5V power supply to run.
Adding the SRF05 to the Arduino is very easy, only 4 pins to worry about. Power, Ground, Trigger and Echo. Since it needs 5V and Arduino provides 5V I’m obviously going to use this to power it. Below is a diagram of my SRF05, showing the pins. There are 2 sets of 5 pins, 1 set you can use, the other is for programming the PIC chip so don’t touch them!
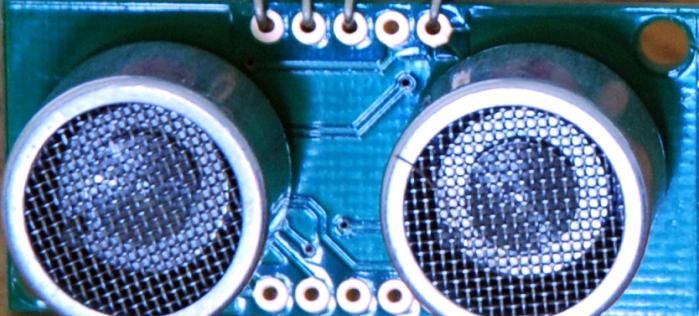
SRF05 Arduino Components
220 Ohm resistor (Red, Red, Brown, Gold)
SRF05 Ultrasonic range finder
LED
Arduino Deumilanove w/ ATMEGA328
Breadboard / Prototyping board
Jumper/ Connector wires
Optional 9V DC power supply or use the USB power for the Arduino
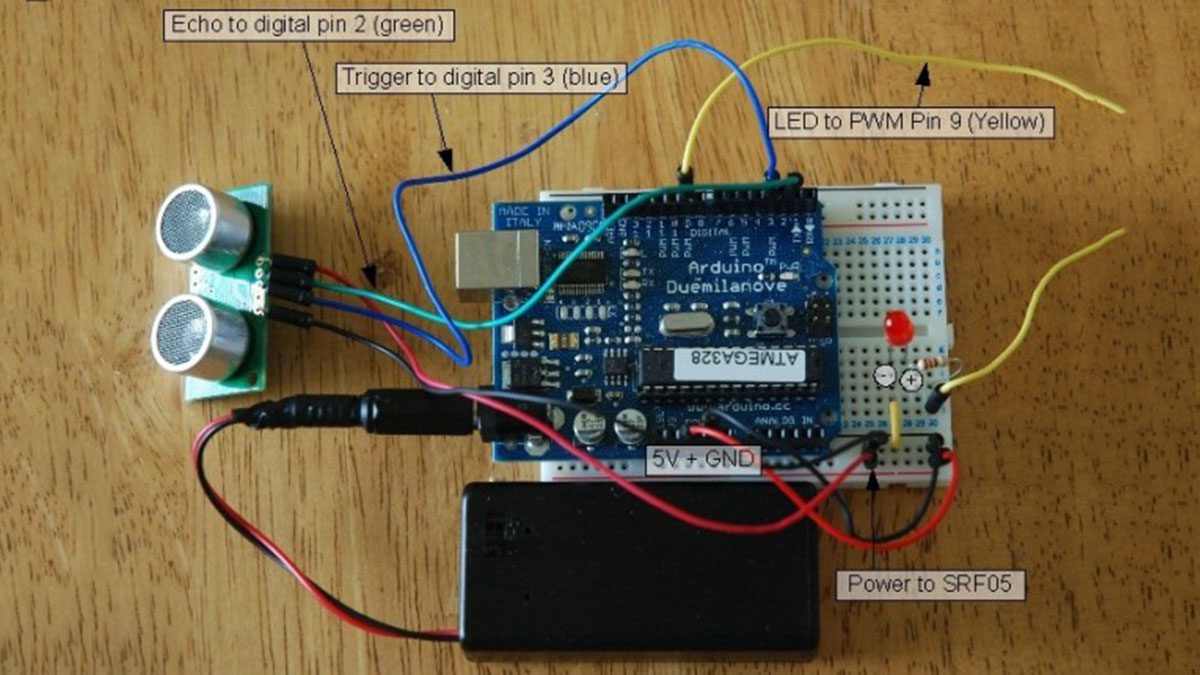
Arduino SRF05 Circuit
Very, very simple circuit, I’ve used the breadboard to share the GND connection and to add the LED which I could probably have done with out the breadboard. You’ll see the most complex thing is the code later on.
SRF05 Arduino Distance Sensor sketch
All the work is done here, I’ve added code that averages the distance readings to remove some of the jitter in the results as the SRF05 is calculating distances very rapidly and there can be a lot of fluctuation. Also I convert the time in microseconds to distance by dividing the time by 58.
Why 58? Well because if you take the time in microseconds for a pulse to be sent and received e.g. for 1 meter it takes about 5764 microseconds – at least from my wall anyway. If I divide this time by the distance in cm in I will get 57.64 so I just round this up – you can calculate distance in any other unit with this method.
For more detail: Arduino – Sonic range finder with SRF05
- How does the SRF05 sensor calculate distance?
It sends an ultrasound pulse at 40Khz, waits for the echo, and calculates the time taken in microseconds. - What is the maximum distance the SRF05 can detect?
The sensor can determine objects up to 3 metres away. - Can I power the SRF05 directly from the Arduino?
Yes, since the sensor needs 5V and the Arduino provides 5V, you can use the Arduino to power it. - Why do I divide the time by 58 to get distance?
Dividing the time in microseconds by 58 converts the measurement into centimeters based on the speed of sound. - Does the code include any features to improve accuracy?
Yes, the code averages distance readings to remove jitter caused by rapid calculation fluctuations. - How many pins are required to connect the SRF05 to the Arduino?
Only 4 pins are needed: Power, Ground, Trigger, and Echo. - What happens to the LED as an object gets closer to the sensor?
The LED becomes brighter as the object gets nearer to the sensor using PWM output. - Which Arduino board was used in this project example?
The project uses an Arduino Deumilanove with an ATMEGA328 processor.