Advances in technology continue to make life easier for individuals with disabilities. Inspired by a desire to help visually impaired individuals navigate their surroundings more confidently, this Arduino-based Smart Cane project is an affordable, open-source solution. With a combination of sensors, haptic feedback, and intelligent programming, this device enhances mobility and independence. The idea of creating a smart cane—simple, cost-effective, and easy to build, so even a child could assemble it in a few hours. This Smart Cane can detect obstacles and provide real-time feedback using a vibration motor and a piezo buzzer.

Key Features of the Smart Cane
- Obstacle Detection: Ultrasonic sensors detect objects in the user’s path.
- Haptic Feedback: Vibrations alert the user when obstacles are detected.
- Auditory Alerts: A buzzer provides an additional warning signal.
- Lightweight & Portable: Designed for everyday use, similar to a traditional walking stick.
How the Smart Cane Works
The Smart Cane comprises three main components:
- Input: An ultrasonic sensor detects obstacles up to 13 feet away.
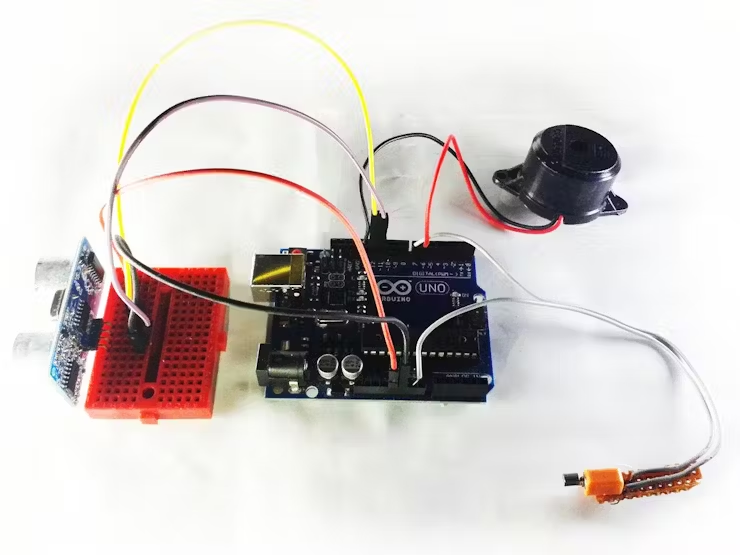
- Controller: An Arduino processes the sensor data to determine the distance to obstacles.
- Output: A vibration motor and piezo buzzer provide feedback to alert the user.
When the ultrasonic sensor detects an obstacle within a preset range, the Arduino triggers the vibration motor and buzzer to warn the user.
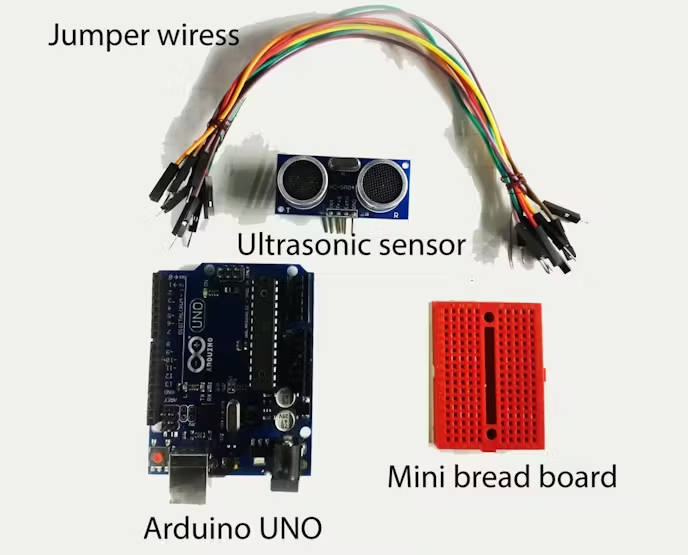
Materials Required
- Electronics:
- Arduino Uno (or compatible microcontroller)
- Ultrasonic sensor (e.g., HC-SR04)
- Vibration motor (salvaged from an old cell phone or purchased)
- Piezo buzzer
- Battery pack for portability
- Other Materials:
- 3/4-inch diameter PVC pipe and elbow for the cane frame
- Insulation tape
- Adhesive glue or screws
- A box to house the electronics
- Tools:
- Screwdriver
- Utility knife
- Breadboard and wires
Step-by-Step Guide to Building the Smart Cane
Prepare the Ultrasonic Sensor:
Connect the ultrasonic sensor to the Arduino as follows:- VCC to Arduino 5V
- GND to Arduino GND
- TRIG to Arduino D12
- ECHO to Arduino D11
Connect the Output Devices:
- Vibration Motor: Pin 1 to Arduino D7, Pin 2 to GND
- Piezo Buzzer: Red wire to Arduino D8, Black wire to GND
Assemble the Cane:
- Use a 3/4-inch diameter PVC pipe as the main cane. Attach an elbow joint to create a handle.
- Wrap the pipe with insulation tape for a clean finish.
- Mount the electronics in a box attached to the cane. Use glue or screws to secure the box.
- Attach the ultrasonic sensor to the box’s lid and position the vibration motor near the handle.
Implement the Code into Arduino:
Write The Code into your Arduino IDE And Implement itTest the Cane:
Power the system using a battery pack and test the functionality. Adjust the sensor range or feedback intensity as needed.
Benefits of the Smart Cane
- Improved Mobility: Real-time assistance ensures users can move safely.
- Enhanced Independence: Reduces reliance on external help.
- Customization: Add LEDs, advanced sensors, or other features for added functionality.
- Affordable Solution: Costs significantly less than commercial smart canes.
Files:
Why Build the Smart Cane?
This Smart Cane is more than a DIY project; it’s a step toward accessible technology that improves the quality of life for visually impaired individuals. By leveraging simple electronics and open-source programming, it empowers users with greater confidence, mobility, and independence.