Summary of Arduino Servo Catapult: DIY Catapult using Arduino
Summary (under 100 words): This project builds an Arduino-controlled servo catapult that launches food when a cat steps on a force sensitive resistor (FSR). It teaches servo control and analog input use: calibrate FSR threshold via serial monitor, lock the catapult with a pushbutton, and trigger the servo to return to neutral to launch. Use an external power source for motors rather than USB.
Parts used in the Arduino Servo Catapult:
- Arduino Uno with USB cable
- Computer with Arduino IDE
- Micro Servo
- Force Sensitive Resistor (FSR)
- Pushbutton
- 10k resistors (x2)
- Catapult
Use an Arduino and a servo to shoot food to your cat! (Also works with other animals). Check out the video below to see how this Arduino Servo Catapult works. While maybe not the most practical application, this project will teach you the basics of servo motors and analog inputs, which can be implemented into more practical projects, like these:
Give Your Camera Motion Tracking With Arduino
Make a Line Follower Robot in 10 Minutes
Create an Android Controlled Robot with Arduino
Make a Simple RC Plane at Home
Make a DIY Drone
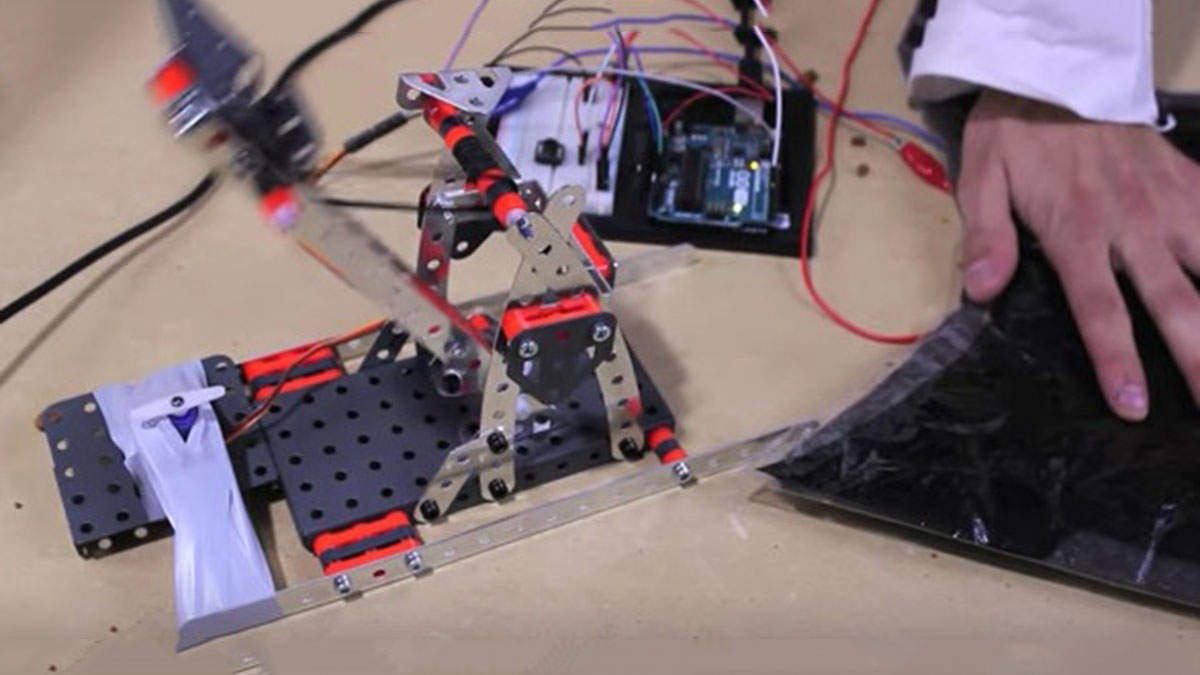
The Arduino Servo Catapult
Required Materials
Hardware:
- Arduino Uno w/ USB cable
- Computer with Arduino IDE
- Micro Servo
- Force Sensitive Resistor (FSR)
- Pushbutton
- 10k resistors (x2)
- Catapult
Software:
How Does it Work?
Before we get started with our arduino servo catapult, when using a motor, always use an external source to power your Arduino, do not draw power from a USB connection! Our Cat-a-pult uses an Arduino Uno with servo control and its analog input to read the FSR value which controls the servo.
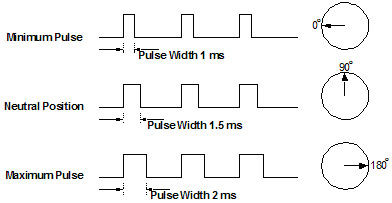
When we say that a servo starts in “the spot of zero,” we are referring to the servo’s neutral position. If you look at the diagram below, if a 1.5ms pulse width is applied to the control line, the servo will sit at its neutral position, which in this case is 90º. When the pulse width increases or decreases, the servo moves towards 180º (Increase) or 0º (Decrease). If you choose to describe the neutral position as 0º, your servo’s angular range would be from -90º to +90º. Our servo should move 90º (I said 110º in the video, oops!)
We initialized our serial monitor so that we can read our FSR’s values and adjust our kitty-threshold accordingly. Once we’re satisfied with our threshold value, we can turn the servo to lock the CAT-apult by pressing our pushbutton. When the cat puts its weight on the FSR, the servo moves back to the neutral position and launches cat food into the feline’s face.
Read More: Arduino Servo Catapult: DIY Catapult using Arduino
- What does the project teach?
It teaches the basics of servo motors and analog inputs using an Arduino-controlled catapult. - What hardware is required?
Arduino Uno with USB cable, micro servo, FSR, pushbutton, two 10k resistors, and a catapult. - What software is required?
The Arduino IDE is required to program the Arduino. - How is the FSR used?
The FSR is read via an analog input to detect the cat's weight and trigger the servo when a threshold is reached. - How do you set the trigger threshold?
Use the serial monitor to read FSR values and adjust the kitty-threshold accordingly. - How is the catapult locked before triggering?
Press the pushbutton to turn the servo to the lock position. - What servo positions are involved in launching?
The servo moves from a locked position back to its neutral position (90 degrees) to launch the food. - Should the Arduino be powered from USB while driving the servo?
No, the project advises using an external power source for the Arduino when using a motor; do not draw motor power from USB.