Summary of Arduino-Powered Smart Water Heater: A DIY Project
This DIY project builds a portable smart water heater using an Arduino Nano, DS1820B temperature probe, ultrasonic level sensing, and a 16×2 LCD to set and display target and actual temperatures and water level. Buttons adjust the set temperature; a relay drives the mini heater and logic turns heating on/off based on temperature and detected water level. Full code, wiring diagram, and step-by-step guidance are provided for replication.
Parts used in the Smart Water Heater:
- Arduino Nano
- 16×2 LCD display (LiquidCrystal interface)
- DS1820B temperature sensor (probe)
- Buzzer
- Push buttons (three)
- Single-channel relay
- Potentiometer
- Mini water heater
- Ultrasonic sensor (trigger and echo pins A4/A5 in code)
- Wiring, power supply, and mounting hardware
Greetings to all, we welcome you back to Techatronic. During today’s meeting, we will discuss the development of a smart water heater project that involves Arduino and DS1820B temperature sensors. If you’re interested in creating a mobile smart water heater for the winter, then this project is perfect for you. This new technology can be used for many different reasons when a small, smart, and safe water heater is needed.
Introduction
This project is simple yet adaptable, offering usefulness in many different environments. It is easy to transport due to its portability, which is advantageous for different scenarios. Although there are comparable smart water heaters on the market, this specific project differentiates itself with distinct added features. To easily make it, just follow the given directions.
Having some background in Arduino or basic electronics will greatly ease the construction process. Moreover, we have a detailed article on our website for individuals interested in learning about basic electronics and Arduino programming.
We have put together a comprehensive guide that includes code, circuit diagrams, and thorough step-by-step instructions. By adhering to these instructions, you can create your personal intelligent water heater plan.
Components Required.
By using the Arduino Nano, 16×2 display, DS1820B temperature sensor, buzzer, push button, single-channel relay, potentiometer, and mini water heater, you can create an impressive smart water heater setup.
The central control role in this project is taken on by the Arduino Nano. Famous for being a microcontroller, the Arduino excels at handling sensor information and controlling output devices. In this arrangement, the Arduino Nano gathers data from sensors like ultrasonic and temperature sensors. Using this information, the relay is activated to control the water heater’s operation.
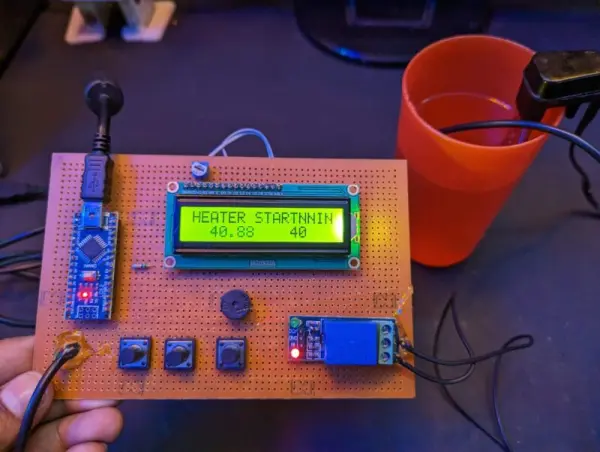
The purpose of the 16×2 display is to communicate system information. This intelligent water heater shows the current temperature, desired temperature, container water level, and operational guidance.
The DS1820B operates as a moisture-resistant temperature sensor, also known as a probe temperature sensor, perfect for sensing liquid temperatures.
Three push buttons are used for adjusting the temperature on this intelligent water heater. The initial button raises the value, the subsequent button lowers it, and the last button adjusts the values accordingly.
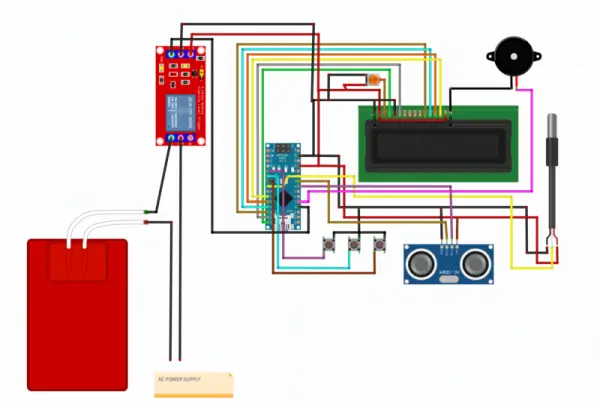
Circuit Diagram
Code
const int buttonPin1 = 2, buttonPin2 = 3;
int button1_State = 0, button2_State = 0;
int count_value =0;
int prestate =0;
#include
// initialize the library by associating any needed LCD interface pin
// with the arduino pin number it is connected to
const int rs = 12, en = 11, d4 = 10, d5 = 9, d6 = 8, d7 = 7;
LiquidCrystal lcd(rs, en, d4, d5, d6, d7);
#include
#include
// Data wire is conntec to the Arduino digital pin 4
#define ONE_WIRE_BUS 5
// Setup a oneWire instance to communicate with any OneWire devices
OneWire oneWire(ONE_WIRE_BUS);
// Pass our oneWire reference to Dallas Temperature sensor
DallasTemperature sensors(&oneWire);
int duration=0;
long distance=0;
int firstduration=0;
long firstdistance=0;
int secondduration=0;
long seconddistance=0;
void setup() {
// initialize the pushbutton pin as an input:
sensors.begin();
pinMode(buttonPin1, INPUT_PULLUP);
pinMode(buttonPin2, INPUT_PULLUP);
pinMode(4, INPUT_PULLUP);
pinMode(A0, OUTPUT);
pinMode(A1, OUTPUT);
lcd.begin(16, 2);
Serial.begin(9600);
lcd.clear();
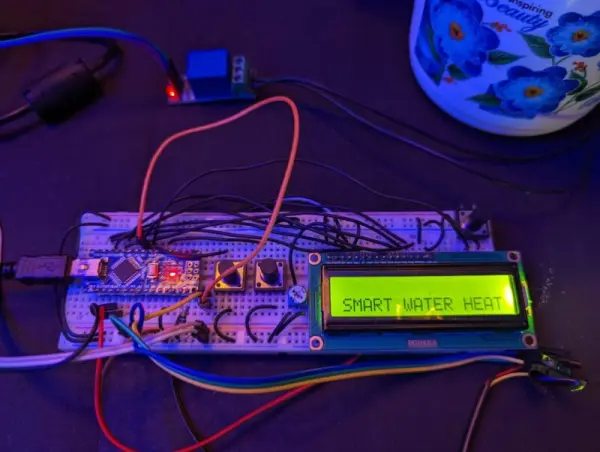
lcd.setCursor(2, 0);
lcd.print(“SMART WATER”);
lcd.setCursor(5, 1);
lcd.print(“HEATER”);
digitalWrite(A0, LOW);
digitalWrite(A1, HIGH);
pinMode(A4,OUTPUT);
pinMode(A5,INPUT);
}
void loop() {
// read the state of the pushbutton value:
button1_State = digitalRead(buttonPin1);
button2_State = digitalRead(buttonPin2);
int m = digitalRead(4);
// check if the pushbutton is pressed. If it is, the buttonState is HIGH:
if (button1_State == LOW && prestate == 0) {
count_value++;
Serial.println(count_value);
lcd.clear();
lcd.setCursor(0, 0);
lcd.print(“SET TEMPERATURE”);
lcd.setCursor(7, 1);
lcd.print(count_value);
prestate = 1;
delay(100);
}
//decrement
else if (button2_State == LOW && prestate == 0) {
count_value–;
Serial.println(count_value);
lcd.clear();
lcd.setCursor(0, 0);
lcd.print(“SET TEMPERATURE”);
lcd.setCursor(7, 1);
lcd.print(count_value);
prestate = 1;
delay(100);
}
else if(m==0)
{
digitalWrite(A4, HIGH);
delayMicroseconds(10);
digitalWrite(A4, LOW);
delayMicroseconds(2);
duration= pulseIn(A5,HIGH);
delay(100);
distance=duration*0.034/2;
Serial.println(distance);
if(distance==3 || distance==4)
{
digitalWrite(A1, LOW);
digitalWrite(A0, LOW);
while(1)
{
lcd.clear();
lcd.setCursor(11, 1);
lcd.print(count_value);
sensors.requestTemperatures();
lcd.setCursor(2, 0);
lcd.print(“HEATER START”);
lcd.setCursor(2, 1);
lcd.print(sensors.getTempCByIndex(0));
delay(500);
if(sensors.getTempCByIndex(0)>=count_value)
{
digitalWrite(A0, HIGH);
digitalWrite(A1, HIGH);
//delay(200);
}
else
{
digitalWrite(A0, LOW);
digitalWrite(A1, LOW);
}
}
}
else
{
lcd.clear();
lcd.setCursor(0, 0);
lcd.print(“FILL MORE WATER”);
lcd.setCursor(0, 1);
lcd.print(distance);
digitalWrite(A1, HIGH);
//digitalWrite(A0, LOW);
}
}
else if(button1_State == HIGH && button2_State == HIGH) {
prestate = 0;
}
}
Smart Water heater Working
By combining an Arduino Nano, a 16×2 display, a DS1820B temperature sensor, a buzzer, a push button, a single-channel relay, a potentiometer, and a mini water heater, you can create an impressive intelligent water heating system.
Source: Arduino-Powered Smart Water Heater: A DIY Project
- What microcontroller is used in the project?
The project uses an Arduino Nano as the central controller. - How is temperature measured?
Temperature is measured using a DS1820B probe temperature sensor accessed via the DallasTemperature library. - How do you set the desired temperature?
Three push buttons are used: one to increase, one to decrease, and one to confirm the set temperature; the code increments or decrements count_value when buttons are pressed. - How does the system detect water level?
An ultrasonic sensor measures distance; the code compares measured distance to thresholds to decide if there is sufficient water. - How is the heater controlled?
A single-channel relay driven by Arduino outputs (A0/A1 in the code) switches the mini water heater on or off based on temperature and water level. - What information is shown on the display?
The 16×2 LCD displays set temperature, current temperature, water level messages, and operational status like HEATER START or FILL MORE WATER. - Does the code include debounce or state handling for buttons?
The code uses a prestate variable and checks button states with INPUT_PULLUP to avoid repeated increments/decrements; prestate is reset when both buttons read HIGH. - What libraries are required by the provided code?
The code uses LiquidCrystal, OneWire, and DallasTemperature libraries.