Arduino is a perfect mindless slave. Give it a job and it performs the task endlessly without defaulting even for a nano second. On the other hand, Raspberry Pi, or Raspi, is a computer that has a brain of its own. But, it may falter as it gets busy doing some other job at that moment. Imagine a situation where Arduino is doing the job and Raspberry Pi is supervising it!

Described here is a temperature indicator project using Arduino and Raspi boards. A temperature sensor such as LM35 gives analogue output. Arduino has analogue pins whereas Raspberry Pi does not. LM35 is interfaced directly to Arduino analogue pins and then connected to Raspi. It displays the temperature on the terminal. Let us see how.
Arduino set-up
Arduino development boards are available in many variants in the market. I have used Arduino Uno board for this project. The LM35 temperature sensor is easily available in India. It produces analogue voltage directly proportional to temperature with an output of 1mV per 0.1°C (10mV per degree). The sensor has a temperature range from -55°C to +150°C.
Interfacing LM35 sensor to Arduino
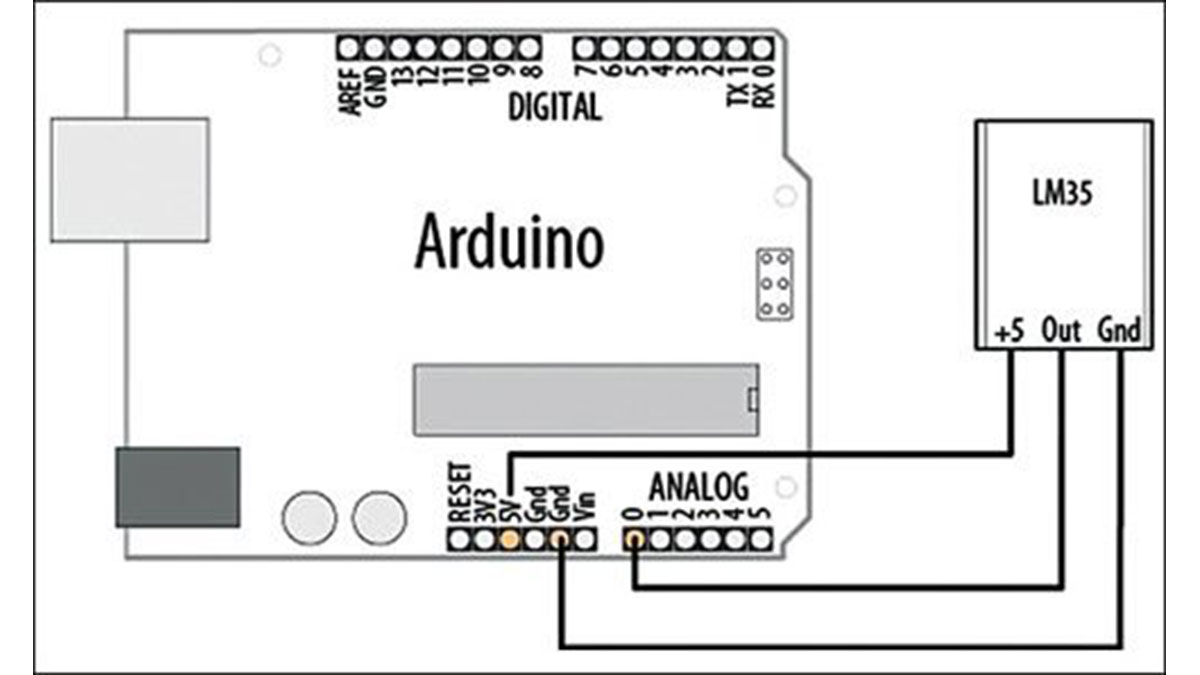
Connect LM35 sensor with Arduino as shown in Fig. 1 and then connect the USB cable to the computer. Open Arduino IDE, compile and upload the following arduino_temp.pde sketch (program) into the UNO board:
[stextbox id=”grey”]//arduino-temp.pdebyte n = 0;
const int tpin=0;
void setup(){
Serial.begin (9600);
pinMode(tpin, INPUT);
}
void loop() {
int value=analogRead(tpin);
float mv=(value / 1024.0 )*5000;
float cel = mv / 10;
float far=(cel*9)/5 +32;
delay(1000);
if(Serial.available() ) {
n = Serial.read();
Serial.print (“character
received:”);
Serial.println(char(n));
Serial.println(n,DEC);
if(char(n)==’c’) {
Serial.print(cel);
Serial.print(“:Deg Celsius”);
Serial.println(“”);
}
if (char(n)==’f’) {
Serial.print(far);
Serial.print( “:Deg Farhenite”);
Serial.println(“”);
}
else Serial.print(“enter c or f for
temperature”);
delay(1000);
}
}[/stextbox]
The sketch (program) converts analogRead values into millivolts and divides these by 10 to get degrees.
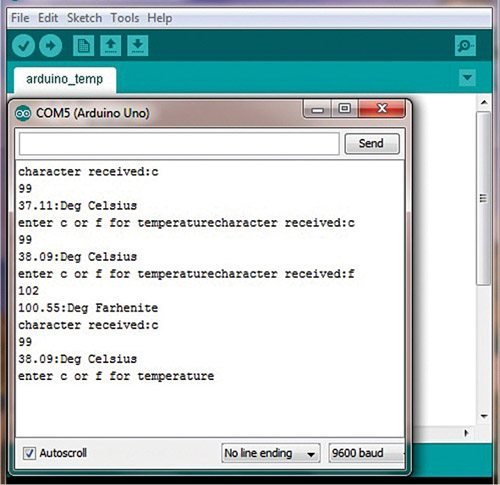
Run the sketch by opening Serial Monitor in Arduino IDE and write c to get temperature in Celsius and f to get temperature in Fahrenheit (Fig. 2).
So far so good!
Raspberry Pi set-up
You must have a Raspi board with basic set-up and an Internet connection. Install Python, Python-serial and any serial communication software, like Putty or Minicom. I prefer Minicom communication software as it is very light and fast. To install these on Raspi computer, give the following command:
python python-serial
minicom[/stextbox]
Now, in order to use Raspi’s serial port, we need to disable getty (program that displays the login screen). To do this, locate the following line in file /etc/inittab by issuing the command given below:
[stextbox id=”grey”]$sudo nano /etc/inittab
[/stextbox]A screen will pop up, where you need to remove a line that includes getty and 115200. Just comment it out by adding # in front of the line as shown below: [stextbox id=”grey”]#TO:23:respawn:/sbin/getty-L ttyAMA0 115200 vt100[/stextbox]
Save it and exit.
Now, when Raspi boots up, it sends data to the serial ports. We need to stop it from /boot/cmdline.txt file. This is a plain text file, parsed by Raspi as a text file. You need to remove a line from cmdline.text file by issuing the following command. (You need to have a backup file of this, so save the original file as cmdline_backup.txt.)
[stextbox id=”grey”]$sudo nano /boot/cmdline.txt[/stextbox]Remove console=ttyAMA0, 115200 kgdboc=ttyAMA0, 115220 line.
Save and exit. Reboot your Raspi so that everything comes into effect.
Piggyback configuration
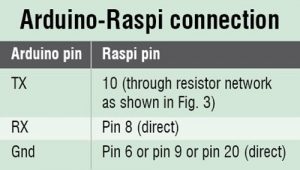
Arduino will sit on top of Raspi and then interact with the LM35 sensor. Arduino will give data to the serial port of Raspi.
Read More Detail :Arduino Piggyback on Raspberry Pi

