Summary of Arduino MKR1000 Getting Started
This unofficial tutorial guides users on setting up the Arduino MKR1000 board, addressing the lack of official documentation. It covers installing the correct IDE version and drivers, selecting the board in the Boards Manager, and uploading a blinking LED sketch. The guide also details how to install and troubleshoot the WiFi101 library for web server functionality and provides solutions for common connection issues.
Parts used in the Arduino MKR1000 Getting Started:
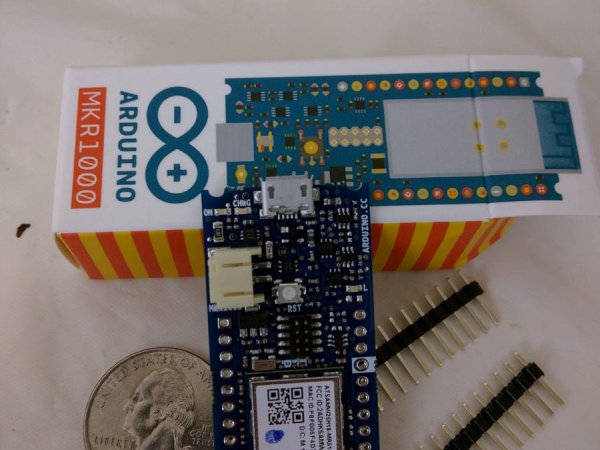
- Arduino MKR1000 Board
- Computer with Windows 10 (or other OS)
- Arduino IDE version 1.6.8 (nightly build)
- SAMD21 Cortex-M0+ 32bit low power ARM MCU
- Li-Po single cell battery (3.7V, 700mAh minimum)
- WiFi101 Library (version 0.8.0)
- Data-capable USB cable
- Web browser
An unofficial tutorial for getting started with the MKR1000 board as there are no official one yet.
Things used in this project
Hardware components |
||||||
 |
|
× | 1 | |||
Story
Motivation
When i received the new Arduino MKR1000, i was surprised that there is no official getting started, tutorial, or support in the IDE. I decided to write a short getting started guide to avoid others to spend a lot of time searching peaces of information across internet 🙂
Moreover, when you google it nowadays, you find more links to the contest organized on hackster.io than any other website. so hackster.io is now providing a getting started to setup en environment and start enjoining the MKR1000 board.
Arduino MKR1000
The MKR1000 is described in the official web site as a powerful board that combines the functionality of the Zero and the Wi-Fi Shield.
The main information regarding the technical specifications for getting started are :
- Micro-controller – SAMD21 Cortex-M0+ 32bit low power ARM MCU
- Board Power Supply – (USB/VIN) 5V
- Supported Battery – Li-Po single cell, 3.7V, 700mAh minimum
- Operating Voltage – 3.3V
Setup the IDE
Get the latest Arduino IDE from here. We use in this tutorial the version 1.6.8 (nightly build ) under windows 10. More details about the installation on other operating systems or versions are available this guides.
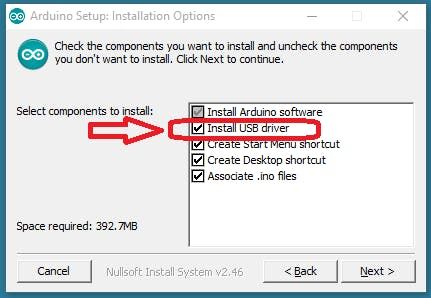
Run the setup once installed and make sure that you install the drivers as illustrated in the Figure 1.
One Installed, run the IDE and go the the menu under Tools > Board. You will be surprised as there is no board called MK1000. Don’t worry, you can avoid that.
Under Tools > Board, go to the Boards Manager. You have to install the support for the Arduino SAMD Boards (32bits ARM Cortex-M0+) as illustrated in Figure 2. There is a button install that appear when you click of that board.

When you go back to Tools > Board. You can now see that the Zero board and the MKR1000 was added to the available boards as illustrated in Figure 3.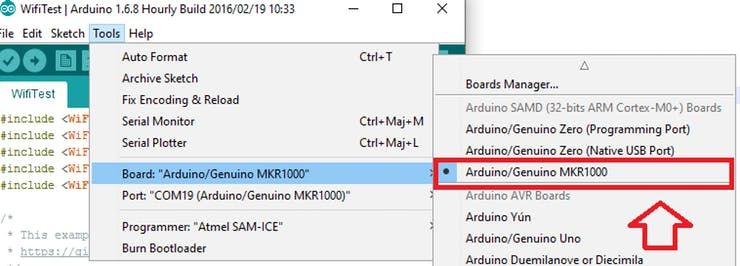
Now is time to connect your board and test the driver setup.
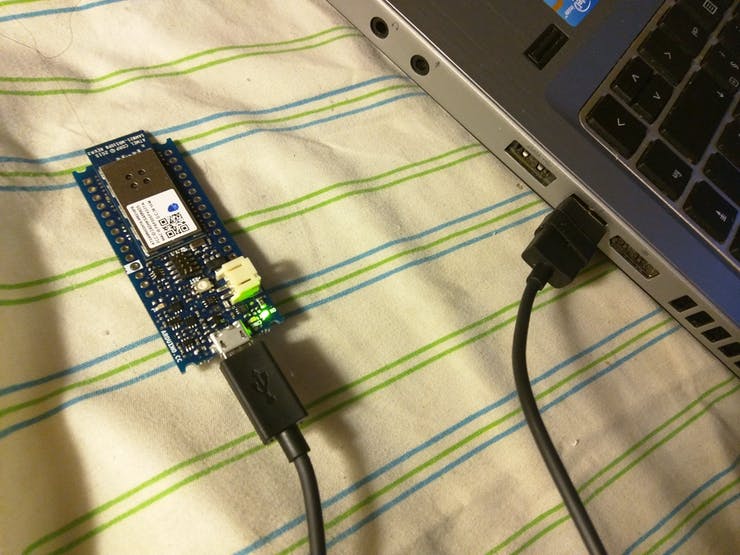
Plug in the MKR1000 to your computer as illustrated in Figure 4, the driver should be installed automatically. To check if the driver is installed correctly and the board is ready. Run the device manager and you should see the device available under “COM PORTS” as illustrated in Figure 5.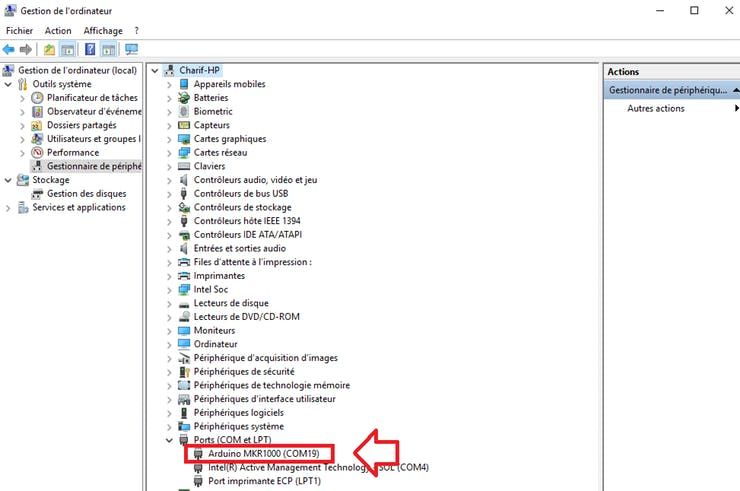
Compile and upload your first MKR1000 sketch
Let’s begin withe the Led blinking example. We will use here the pin 6 instead of the 13 that come with the IDE example as illustrated bellow:
void setup() {
  pinMode(6, OUTPUT);
}
void loop() {
  digitalWrite(6, HIGH);   // turn the LED on (HIGH is the voltage level)
  delay(500);              // wait for 500ms
  digitalWrite(6, LOW);    // turn the LED off by making the voltage LOW
  delay(500);              // wait for 500ms
}
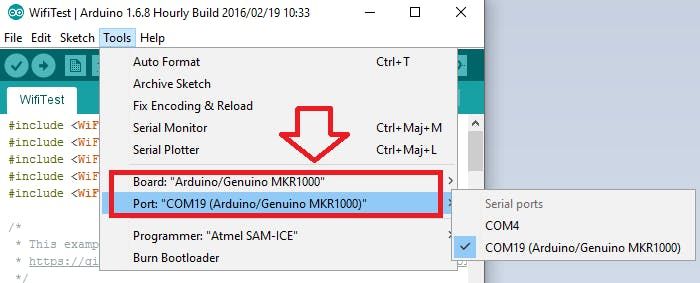
To upload a sketch, choose Arduino/Genuino MKR1000 from the Tools > Board menu in the Arduino IDE, and select the correct serial port from the Tools > Serial Port menu. In my case the port is COM19 as illustrated in the Figure 6.
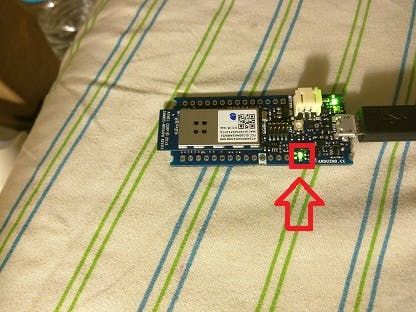
One uploaded, you should get something similar to the output on the Figure 7. The green Led should also blink each 500ms as illustrated in figure 8.

One of the main features of the MKR1000 is it’s ability to access to a WiFi network. To be able to use WIFI, you have to install the library first.
Install the WIFI 101 Library
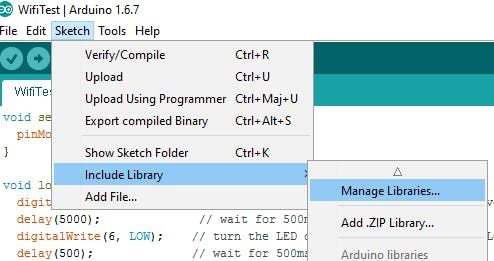
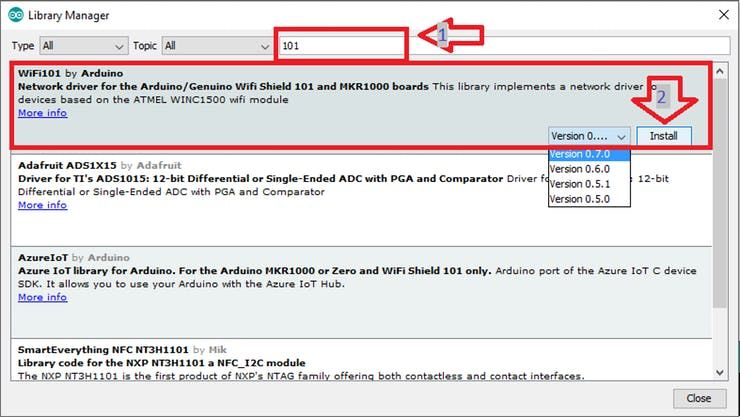
There is many way to install the wifi101 library (you must use WIFI101 0.8.0) on the IDE. We propose in this tutorial to install this library using the Library manager. This method DO NOT WORK as is, it needs an extra manipulation described bellow while waiting for the library update. First go to Sketch > Include Library > Manage Libraries as illustrated in Figure 9.
Search “101” and install the WiFi101 library as illustrated in the Figure 10.
IF THE INSTALLED VERSION OF THE WIFI101 IS 0.7.0
Download the library from github. open the folder “%userprofile%\documents\Documents\Arduino\libraries\WiFi101” and replace the content of the library with the content of the “WiFi101-master” folder in the downloaded zip
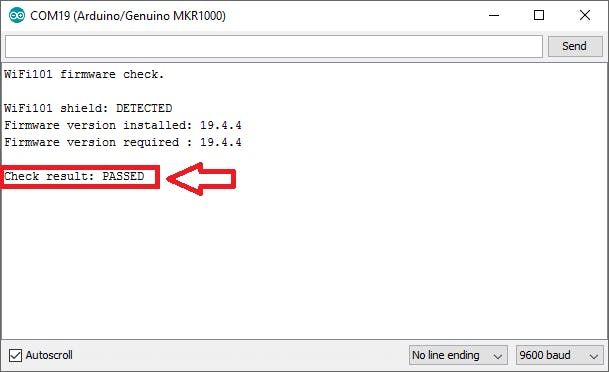
To check the WiFi101 library, open the Sketch located at Examples > WiFi101 > CheckWifi101FrimwareVersion as illustrated in Figure 11.
You can use the flowing code to start a web server that can turn on and off the MKR1000 Led. this code is an adaptation from the example from the WiFi101 library called “SimpleWebServerWiFi“. Once uploaded, you should see the address of the server in the Serial Monitor. Open it on any browser and you can enjoy executing the examples of the WiFi101 library.
#include <WiFi101.h>
#include <WiFiClient.h>
#include <WiFiServer.h>
#include <WiFiSSLClient.h>
#include <WiFiUdp.h>

/*
 * This example is modified from the original file
 * https://github.com/arduino-libraries/WiFi101/blob/master/examples/SimpleWebServerWiFi/SimpleWebServerWiFi.ino
 */
#include <SPI.h>
#include <WiFi101.h>

char ssid[] = "yourNetworkSSID";      //  your network SSID (name)
char pass[] = "yourNetworkPassword";   // your network password
int keyIndex = 0;                 // your network key Index number (needed only for WEP)
int ledpin = 6;
bool val = true;

int status = WL_IDLE_STATUS;
WiFiServer server(80);

void setup() {
  Serial.begin(9600);      // initialize serial communication
  Serial.print("Start Serial ");
  pinMode(ledpin, OUTPUT);      // set the LED pin mode
  // Check for the presence of the shield
  Serial.print("WiFi101 shield: ");
  if (WiFi.status() == WL_NO_SHIELD) {
    Serial.println("NOT PRESENT");
    return; // don't continue
  }
  Serial.println("DETECTED");
  // attempt to connect to Wifi network:
  while ( status != WL_CONNECTED) {
    digitalWrite(ledpin, LOW);
    Serial.print("Attempting to connect to Network named: ");
    Serial.println(ssid);                   // print the network name (SSID);
    digitalWrite(ledpin, HIGH);
    // Connect to WPA/WPA2 network. Change this line if using open or WEP network:
    status = WiFi.begin(ssid, pass);
    // wait 10 seconds for connection:
    delay(10000);
  }
  server.begin();                           // start the web server on port 80
  printWifiStatus();                        // you're connected now, so print out the status
  digitalWrite(ledpin, HIGH);
}
void loop() {
  WiFiClient client = server.available();   // listen for incoming clients

  if (client) {                             // if you get a client,
    Serial.println("new client");           // print a message out the serial port
    String currentLine = "";                // make a String to hold incoming data from the client
    while (client.connected()) {            // loop while the client's connected
      if (client.available()) {             // if there's bytes to read from the client,
        char c = client.read();             // read a byte, then
        Serial.write(c);                    // print it out the serial monitor
        if (c == '\n') {                    // if the byte is a newline character

          // if the current line is blank, you got two newline characters in a row.
          // that's the end of the client HTTP request, so send a response:
          if (currentLine.length() == 0) {
            // HTTP headers always start with a response code (e.g. HTTP/1.1 200 OK)
            // and a content-type so the client knows what's coming, then a blank line:
            client.println("HTTP/1.1 200 OK");
            client.println("Content-type:text/html");
            client.println();

            // the content of the HTTP response follows the header:
            client.print("Click <a href=\"/H\">here</a> turn the LED on pin 9 on<br>");
            client.print("Click <a href=\"/L\">here</a> turn the LED on pin 9 off<br>");

            // The HTTP response ends with another blank line:
            client.println();
            // break out of the while loop:
            break;
          }
          else {      // if you got a newline, then clear currentLine:
            currentLine = "";
          }
        }
        else if (c != '\r') {    // if you got anything else but a carriage return character,
          currentLine += c;      // add it to the end of the currentLine
        }

        // Check to see if the client request was "GET /H" or "GET /L":
        if (currentLine.endsWith("GET /H")) {
          digitalWrite(ledpin, HIGH);               // GET /H turns the LED on
        }
        if (currentLine.endsWith("GET /L")) {
          digitalWrite(ledpin, LOW);                // GET /L turns the LED off
        }
      }
    }
    // close the connection:
    client.stop();
    Serial.println("client disonnected");
  }
}

void printWifiStatus() {
  // print the SSID of the network you're attached to:
  Serial.print("SSID: ");
  Serial.println(WiFi.SSID());

  // print your WiFi shield's IP address:
  IPAddress ip = WiFi.localIP();
  Serial.print("IP Address: ");
  Serial.println(ip);

  // print the received signal strength:
  long rssi = WiFi.RSSI();
  Serial.print("signal strength (RSSI):");
  Serial.print(rssi);
  Serial.println(" dBm");
  // print where to go in a browser:
  Serial.print("To see this page in action, open a browser to http://");
  Serial.println(ip);
}
Troubleshoot
As the MKR1000 still brand new, there is some issues.
There is a Topic in Arduino forum about the wifi101 that may help. Another Topic discuss the IDE related issues.
If you have issues with the Arduino/Genuino MKR1000 port, you can use the Zero port. Note that the official documentation of the Zero board commands using the Programming Port, However, it do not work for the MKR1000. So i recommend using the Native USB Port.
I would recommend to you to try 3 things if your device is not detected by windows:
- Verify that the USB cable that you are using supports data. The D+ and D- data lines are missing in some charge only cables. For that, try to connect your android device or another board using the USB cable and see if windows can detect it.
- Verify that the USB port in your computer. For that, simply try to plug device in an other USB port and wait some second to see if there is any change in the windows device manager. Sometime, unplugging all the USB devices and restarting windows resolve this issue.
- Verify that the driver is installed correctly. Open the Device manager > Ports, unplug the MKR1000 and plug it, if you see a new device appear that is not recolonized as MKR1000, right click on this device and click on update the driver. Click on choose the driver from my computer than choose the Arduino drivers folder. This should update the driver and detect the device as MKR1000.
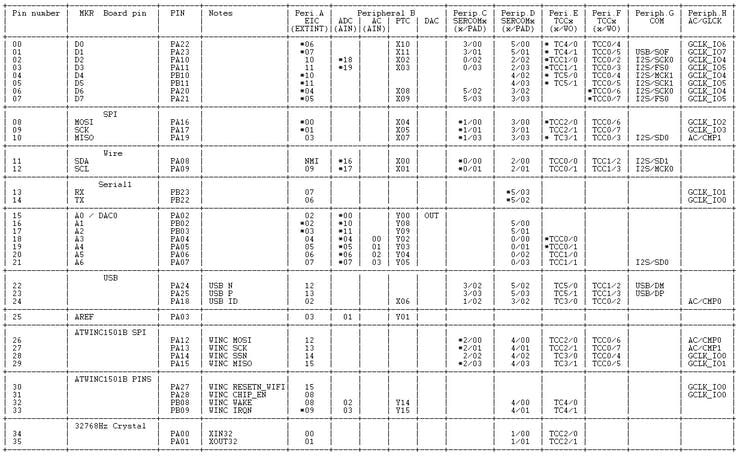
Advanced Pins description
An interesting pins description is illustrated in Figure13. This description was included in the code (then removed) from SAMD; It was used for their experiments on the MKR1000. The commit is available on github SAMD repository.
Use Microsoft Azure IoT
Steps are very well explained in this link:
Do not hesitate to post comment on this tutorial if you need help.
Source : Arduino MKR1000 Getting Started
- How do I find the MKR1000 board option in the Arduino IDE?
You must go to Tools > Board > Boards Manager and install support for the Arduino SAMD Boards (32bits ARM Cortex-M0+) to see the Zero and MKR1000 options. - What is the best way to install the WiFi101 library if the manager fails?
If the installed version is 0.7.0, download the library from GitHub, open the Documents/Arduino/libraries/WiFi101 folder, and replace its content with the downloaded WiFi101-master folder. - Does the MKR1000 require a specific USB cable type?
Yes, you must verify that the USB cable supports data transfer, as some cables only charge devices and lack the D+ and D- data lines. - Can I use the Zero port commands for the MKR1000?
No, the official documentation for the Zero board commands using the Programming Port does not work for the MKR1000; you should use the Native USB Port instead. - What should I do if the device is not detected by Windows?
Try changing USB ports, restarting Windows, or updating the driver via Device Manager by choosing the driver from your computer's Arduino drivers folder. - Which pin number is recommended for the LED example in this tutorial?
The tutorial suggests using pin 6 instead of pin 13 for the blinking LED example. - How can I check if the WiFi101 firmware is working correctly?
Open the Sketch located at Examples > WiFi101 > CheckWifi101FrimwareVersion to verify the library status. - Where can I find resources for using Microsoft Azure IoT with this board?
The article points to an external link titled Azure IoT Doc for detailed steps on integrating Microsoft Azure IoT.