
Summary of Arduino Fridge Magnet
This article guides readers in building a digital fridge magnet using an Arduino, LCD screen, and Bluetooth module to display wireless notes from an Android phone. The project emphasizes compactness, powered by a 9V battery. It details hardware assembly, circuit connections, code implementation for serial communication, and optional voltage regulation for custom boards.
Parts used in the Digital Fridge Magnet:
- 16x2 LCD Module
- Arduino (UNO, Mini, or custom-built)
- Bluetooth Module
- L805 Voltage Regulator
- 9V Battery
- Soldering iron
- Rheostat or Resistance
- Wood or Cardboard enclosure
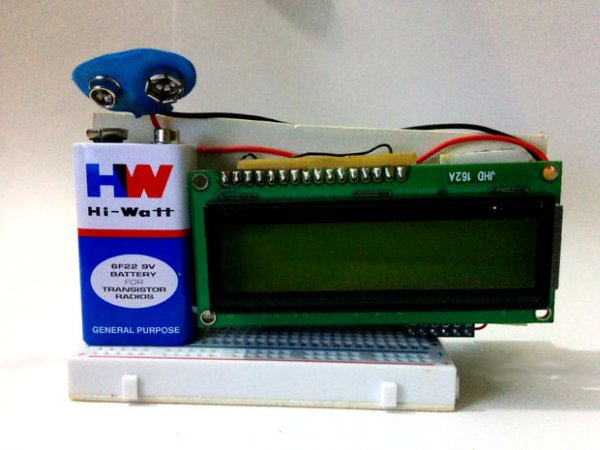
In this instructable I’m going to show you how to do just that. All you need is an Arduino, an LCD screen and a Bluetooth module to make this and a Android mobile to upload your note wireless. I tried to keep it as small as possible and it is powered by a 9V battery.
Check out my Facebook page and like it to support me.
So enjoy building your own project.
So lets start with getting all the parts.
Parts List:
- LCD Module 16×2
- Arduino (I built my own)
- Bluetooth Module
- L805 Voltage Regulator
- 9V Battery
 Tools:
- Soldering iron
Step 1: Arduino
Links
How to make a Arduino
Serial programmer
Step 2: LCD
Solder connector pins to the LCD and the same type connectors on the Arduino, so that you can easily plug them together. If you noticed that I had to change from the connectors in the previous step to this step a silly mistake that I made. You don’t have to connect all of the 16 pins just the ones in the circuit will do.
Step 3: Circuit
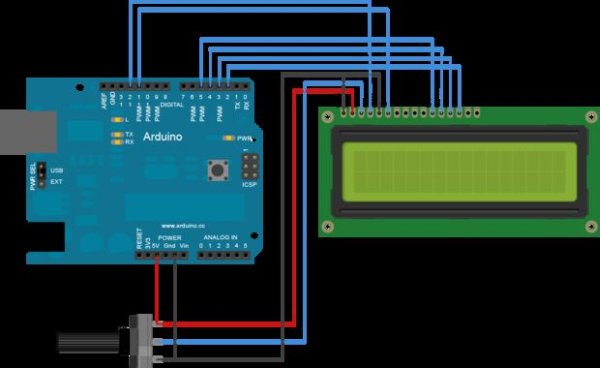
1)Complete the circuit connections
2)Upload “Hello World” code as in the IDE examples
3)Power the circuit and adjust the rheostat till you get a proper contrast.
4)Once you have the proper level, remove the rheostat and measure the value of resistance with respect to ground and LCD pin 3.
5)Replace the rheostat with the measured value of resistance.
Step 4: Bluetooth
Once you have the “Hello World” successfully working on your board. Now its time to connect it to your Android phone. To connect it you need to attach a Bluetooth module I got mine from eBay, but I had to make certain connections to the board to get it function as required, I’ll set up an instructable on how to do that soon. You can go for Bluesmirf if you don’t want to make any changes.
Step 5: Code
#include
// initialize the library with the numbers of the interface pins
LiquidCrystal lcd(12, 11, 5, 4, 3, 2);
void setup() {
// set up the LCD’s number of columns and rows:
lcd.begin(16, 2);
// initialize the serial communications:
Serial.begin(9600);
}
void loop()
{
// when characters arrive over the serial port…
if (Serial.available()) {
// wait a bit for the entire message to arrive
delay(100);
// clear the screen
lcd.clear();
// read all the available characters
while (Serial.available() > 0) {
// display each character to the LCD
lcd.write(Serial.read());}}}
 Step 6: Voltage Divider
To create it just follow the circuit and try to keep it as small as possible.
Step 7: Wood
Once you have completed setting up everything now you need a wood to which you need to glue it on. I did not use wood but some kind of a cardboard, I have no idea what they call it if you know leave a comment. The material I used is lighter and slimmer than wood.
For more detail: Arduino Fridge Magnet
- What components are required to build this project?
You need an Arduino, an LCD screen, a Bluetooth module, a 9V battery, and optionally a voltage regulator. - Can I use any type of Arduino board?
Yes, you can use an Arduino UNO or a Mini, or even build your own custom board to save space. - How do I adjust the contrast on the LCD screen?
You connect a rheostat to adjust the contrast until the text is clear, then replace it with a fixed resistor of the measured value. - Does the project require an external programmer?
No, if you use an Arduino UNO to upload code to a custom board, you do not need an external programmer, though one is an option. - Where can I find the code for the project?
The code is available in the IDE examples under Serial LCD, or you can copy the provided snippet directly. - Is the voltage divider step mandatory?
No, it is optional if you use an Arduino UNO because it has a built-in voltage regulator; it is only needed for custom boards like the ATmega 328 IC. - Can I use materials other than wood for the casing?
Yes, the author used cardboard as it is lighter and slimmer than wood. - How does the user send notes to the device?
Users upload notes wirelessly from an Android mobile phone via the connected Bluetooth module.
