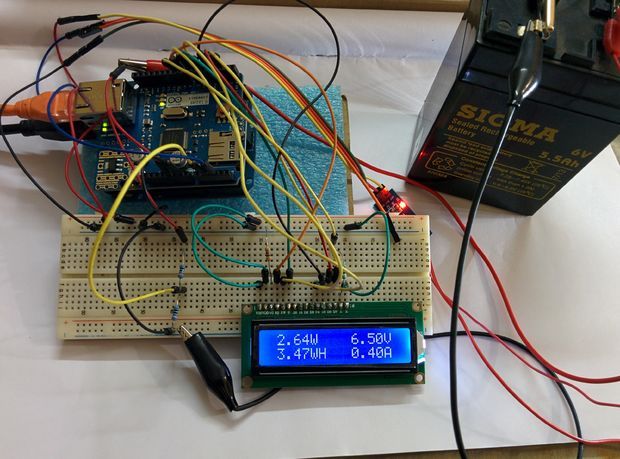
I belong to a village of Odisha, India where frequent power cut is very common. It hampers the life of every one. During my childhood days continuing studies after dusk was a real challenge. Due to this problem I designed a solar system for my home on a experimental basis. I used a solar panel of 10 Watt ,6V for lighting few bright LEDs. After facing lot of hardships the project was successful. Then I decided to monitor the voltage, current, power & energy involved in the system. This brought the idea of designing an ENERGY METER.I used ARDUINO as the heart of this project because it is very easy to write code in its IDE and there are huge numbers of open source library available in the internet which can be used according to the requirement.I have experimented the project for very small rated (10Watt) solar system but this can be easily modified to use for higher rating system.
Feature:
Energy monitoring by
1.LCD display
2. via internet (Xively upload)
3. Data logging in a SD card
You can also see my other instructables on
ARDUINO SOLAR CHARGE CONTROLLER (PWM)
Step 1: Parts Required :
1. ARDUINO UNO (Rev-3)
2. ARDUINO ETHERNET SHIELD
4. ACS 712 CURRENT SENSOR
4. RESISTORS (10k ,330ohm)
5. POTENTIOMETER (10K)
6. JUMPER WIRES
7. ETHERNET CABLE (CAT-5E)
8. BREAD BOARD
Step 2: Power and Energy
Power :
Power is product of voltage (volt) and current (Amp)
P=VxI
Unit of power is Watt or KW
Energy:
Energy is product of power (watt) and time (Hour)
E= Pxt
Unit of Energy is Watt Hour or Kilowatt Hour (kWh)
From the above formula it is clear that to measure Energy we need three parameters
1. Voltage
2. Current
3. Time
Step 3: Voltage Measurement
Voltage is measured by the help of a voltage divider circuit.As the ARDUINO analog pin input voltage is
restricted to 5V I designed the voltage divider in such a way that the output voltage from it should be less than 5V.My battery used for storing the power from the solar panel is rated 6v, 5.5Ah.So I have to step down this 6.5v to a voltage lower than 5V.
I used R1=10k and R2 =10K. The value of R1 and R2 can be lower one but the problem is that when resistance is low higher current flow through it as a result large amount of power (P = I^2R) dissipated in the form of heat. So different resistance value can be chosen but care should be taken to minimize the power loss across the resistance.
Vout=R2/(R1+R2)*Vbat
Vbat=6.5 when fully charged
R1=10k and R2=10k
Vout=10/(10+10)*6.5=3.25v which is lower than 5v and suitable for ARDUINO analog pin
NOTE
I have shown 9 Volt battery in bared board circuit is just for example to connect the wires.But the actual battery I used is a 6 Volt, 5.5Ah lead acid battery.
Voltage Calibration:
When battery is fully charged (6.5v) we will get a Vout=3.25v and lower value for other lower battery voltage.
AEDUINO ADC convert Analog signal to corresponding digital approximation .
When the battery voltage is 6.5v I got 3.25v from the voltage divider and sample1 = 696 in serial monitor ,where sample1 is ADC value corresponds to 3.25v
For better understanding I have attached the real time simulation by 123D.circuit for voltage measurement
Calibration:
3.25v equivalent to 696
1 is equivalent to 3.25/696=4.669mv
Vout = (4.669*sample1)/1000 volt
Actual battery voltage = (2*Vout) volt
ARDUINO CODE:
// taking 150 samples from voltage divider with a interval of 2sec and then average the samples data collected for(int i=0;i<150;i++)
sample1=sample1+analogRead(A2); //read the voltage from the divider circuit
delay (2);
sample1=sample1/150;
voltage=4.669*2*sample1/1000;
Step 4: Current Measurement
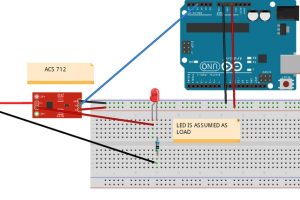
For current measurement I used a Hall Effect current sensor ACS 712 (20 A).There are different current range ACS712 sensor available in the market, so choose according to your requirement. In bread board diagram I have shown LED as a load but the actual load is different.
WORKING PRINCIPLE :
The Hall Effect is the production of a voltage difference (the Hall voltage) across an electrical conductor, transverse to an electric current in the conductor and a magnetic field perpendicular to the current.
To know more about Hall Effect sensor click here
The data sheet of ACS 712 sensor is found here
From Data Sheet
1. ACS 712 measure positive and negative 20Amps, corresponding to the analog output 100mV/A
2. No test current through the output voltage is VCC / 2 =5v/2=2.5V
Calibration:
Analog read produces a value of 0-1023, equating to 0v to 5v
So Analog read 1 = (5/1024) V =4.89mv
Value = (4.89*Analog Read value)/1000 V
But as per data sheets offset is 2.5V (When current zero you will get 2.5V from the sensor’s output)
Actual value = (value-2.5) V
Current in amp =actual value*10
ARDUINO CODE:
// taking 150 samples from sensors with a interval of 2sec and then average the samples data collected
for(int i=0;i<150;i++)
{
sample2+=analogRead(A3); //read the current from sensor
delay(2);
}
sample2=sample2/150;
val =(5.0*sample2)/1024.0;
actualval =val-2.5; // offset voltage is 2.5v
amps =actualval*10;

Step 5: Time Measurement
For time measurement there is no need of any external hardware, as ARDUINO itself has inbuilt timer.
The millis() function returns the no of milliseconds since the Arduino board began running the current program.
ARDUINO CODE:
long milisec = millis(); // calculate time in milliseconds
long time=milisec/1000; // convert milliseconds to seconds
Step 6: How ARDUINO Calculate Power and Energy
totamps=totamps+amps; // calculate total amps
avgamps=totamps/time; // average amps
amphr=(avgamps*time)/3600; // amp-hour
watt =voltage*amps; // power=voltage*current
energy=(watt*time)/3600; Watt-sec is again convert to Watt-Hr by dividing 1hr(3600sec)
// energy=(watt*time)/(1000*3600); for reading in kWh
Step 7: Visual Output

All the results can be visualized in the serial monitor or by using a LCD.
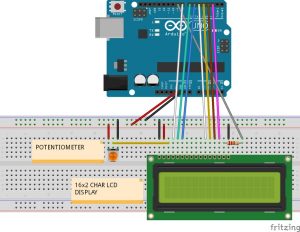
I used a 16×2 character LCD to display all the results obtained in the previous steps.For schematics see the bread board circuit shown above.
Connect LCD with ARDUINO as given bellow :
LCD -> Arduino
1. VSS -> Arduino GND
2. VDD -> Arduino +5v
3. VO -> Arduino GND pin + Resistor or Potentiometer
4. RS -> Arduino pin 8
5. RW -> Arduino pin 7
6. E -> Arduino pin 6
7. D0 -> Arduino – Not Connected
8. D1 -> Arduino – Not Connected
9. D2 -> Arduino – Not Connected
10. D3 -> Arduino – Not Connected
11. D4 -> Arduino pin 5
12. D5 -> Arduino pin 4
13. D6 -> Arduino pin 3
14. D7 -> Arduino pin 2
15. A -> Arduino Pin 13 + Resistor (Backlight power)
16. K -> Arduino GND (Backlight ground)
ARDUINO CODE:
For Serial Monitor:
Serial.print(voltage);
Serial.println(“Volt”);
Serial.print(“CURRENT :”);
Serial.print(amps);
Serial.println(“Amps”);
Serial.print(“POWER :”);
Serial.print(watt);
Serial.println(“Watt”);
Serial.print(“ENERGY CONSUMED :”);
Serial.print(energy);
Serial.println(“Watt-Hour”);
Serial.println(“”); // print the next sets of parameter after a blank line
delay(2000);For LCD :
For LCD display you have to first import the “LiquidCrystal” library in the code.
To know more about the LequidCrystal library click here
For LCD tutorial clickhere
The following code is a format to display in LCD all the calculation for power and energy
#include <LiquidCrystal.h>
lcd(8, 7, 6, 5, 4, 3, 2);
int backLight = 9;
{
pinMode(backLight, OUTPUT); //set pin 9 as output
analogWrite(backLight, 150); //controls the backlight intensity 0-254
lcd.begin(16,2); // columns, rows. size of display
lcd.clear(); // clear the screen
}
void loop()
{
lcd.setCursor(16,1); // set the cursor outside the display count
lcd.print(” “); // print empty character
delay(600);
lcd.setCursor(1,0); // set the cursor at 1st col and 1st row
lcd.print(watt);
lcd.print(“W “);
lcd.print(voltage);
lcd.print(“V”);
lcd.setCursor(1,1); // set the cursor at 1st col and 2nd row
lcd.print(energy);
lcd.print(“WH “);
lcd.print(amps);
lcd.print(“A”);
}
Step 8: Data Uploading to Xively.com
Refer the above screenshots for better under standing.
For data uploading to xively.com the following library to be downloaded first
HttpClient : click here
Xively : click here
SPI : Import from arduino IDE (sketch -> Import library…..)
Ethernet : Import from arduino IDE ((sketch -> Import library…..)
Open an account with http://xively.com (formerly pachube.com and cosm.com)
Sign up for a free developer account at http://xively.com
- Choose a username, password, set your address
and time zone etc.
You will receive a confirmation email;
then click the activation link to activate your account. After successfully opening the account you will be diverted to Development devices page
- Click on +Add Device box
- Give a name to your device and description (e.g
ENERGY MONITORING)
- ·
- Choose private or public data (I choose private)
· - Click on Add Device
After adding the device you are diverted to a new
page where many important information are there
- Product ID,
Product Secret, Serial Number, Activation Code· - Feed ID, Feed
URL,API End Point (Feed ID is used in ARDUINO code) - Add Channels (I Choose ENERGY and POWER, but you can choose according to your choice)
Give unit and symbol for the parameter
· - Add your location
· - API keys (used in ARDUINO code ,avoid to share this number)
· - Triggers (ping a
web page when an event happened, like when energy consumption exceed a certain
limit)
Step 9: Xively and ARDUINO Code
Here I attached the complete code(beta version) for energy meter excluding SD card data logging which is attached separately in the next step.
/**
Energy monitoring data upload to xively **/ #include #include #include #include
#define API_KEY “xxxxxxxx” // Enter your Xively API key
#define FEED_ID xxxxxxxxx // Enter your Xively feed ID
// MAC address for your Ethernet shield
byte mac[] = {0xDE, 0xAD, 0xBE, 0xEF, 0xFE, 0xED};
// Analog pin which we’re monitoring (0 and 1 are used by the Ethernet shield) int sensorPin = 2;
unsigned long lastConnectionTime = 0; // last time we connected to Cosm
const unsigned long connectionInterval = 15000; // delay between connecting to Cosm in milliseconds
// Initialize the Cosm library
// Define the string for our datastream ID
char sensorId[] = “POWER”;
char sensorId2[] = “ENERGY”;
XivelyDatastream datastreams[] = {
XivelyDatastream(sensorId, strlen(sensorId), DATASTREAM_FLOAT),
XivelyDatastream(sensorId2, strlen(sensorId2), DATASTREAM_FLOAT),
DATASTREAM_FLOAT), };
// Wrap the datastream into a feed
XivelyFeed feed(FEED_ID, datastreams, 2 /* number of datastreams */);
EthernetClient client;
XivelyClient xivelyclient(client);
void setup()
{
Serial.begin(9600);
Serial.println(“Initializing network”);
while (Ethernet.begin(mac) != 1)
{
Serial.println(“Error getting IP address via DHCP, trying again…”);
delay(15000);
}
Serial.println(“Network initialized”);
Serial.println();
}
void loop()
{
if (millis() – lastConnectionTime > connectionInterval)
{
sendData(); // send data to xively
getData(); // read the datastream back from xively
lastConnectionTime = millis(); // update connection time so we wait before connecting again
}
}
void sendData()
{
int sensor1 = watt;
int sensor2 = energy;
datastreams[0].setFloat(sensor1); // power value
datastreams[1].setFloat(sensor2); // energy value
Serial.print(“Read power “);
Serial.println(datastreams[0].getFloat());
Serial.print(“Read energy “);
Serial.println(datastreams[1].getFloat());
Serial.println(“Uploading to Xively”);
int ret = xivelyclient.put(feed, API_KEY);
Serial.print(“PUT return code: “);
Serial.println(ret);
Serial.println();
}
// get the value of the datastream from xively, printing out the value we received
void getData()
{
Serial.println(“Reading data from Xively”);
int ret = xivelyclient.get(feed, API_KEY);
Serial.print(“GET return code: “);
Serial.println(ret);
if (ret > 0)
{
Serial.print(“Datastream is: “);
Serial.println(feed[0]);
Serial.print(“Power value is: “);
Serial.println(feed[0].getFloat());
Serial.print(“Datastream is: “);
Serial.println(feed[1]);
Serial.print(“Energy value is: “);
Serial.println(feed[1].getFloat());
}
Serial.println();
Step 10: Data Logging in a SD Card
For data storing in a SD card you have to import the SD library
For tutorial click here To know more about the SD library click here
The code for storing data in to a SD card is written separately as I don’t have sufficient memory in my ARDUINO UNO after writing code for LCD display and data uploading xively.com. But I am trying to improve the beta version code so that a single code can contain all the features(LCD display,Xively data uploading and data storing in a SD card).
The code for data logging is attached bellow.
If any one write a better code by modifying my code please share with me.
This is my first technical instructable ,If anyone find any mistake in it , feel free to comments.. so that I can improve myself.
If you find areas of improvement in this project please comments or message me,So the project will be more powerful.I think it will be helpful for others as well as for me.
Source: Arduino Energy meter

