Ready-made SD card logging shields for the Arduino typically cost in
the range of $15 – $25. This is quite reasonable, but we might save a
couple of bucks if we make our own. Not to mention all the fun in building it.
Forget about soldering wires to a bare SD card socket. It’s just too much
hassle, and for about the same price as a socket you can get a breakout
board. The cheapest SD card breakout board seems to be the notorious
LC Studio model. You can locate them for a bit more than $2 on eBay,
and this includes free shipping all the way from from China.
Do a search for “Arduino SD Card” and up pop quite a few of of these babies.
Step 1: Materials Needed
LC Studio SD card breakout board $2.00 – $3.00 (on eBay)
4050 non-inverting hex buffer $1.12 (Radio Shack cat. # 55050840)
16-pin IC socket $0.25
blank protoshield $4.00 – $6.00
set of stackable headers $1.50 [2×8 and 2×6]
1 x 8-pin stackable header $0.50
1 x 8-pin male header (non-stackable) $0.50
2 x 8-pin male headers $1.00
2 x 6-pin male header $1.00
1 mini LED $0.25
1 mini pushbutton switch $0.25
1 470 ohm resistor $0.25
hookup wire
solder
SD card (the older low-density 1 or 2 GB kind)
Looks like we’ve spent $14+ already, almost the cost of a ready-made SD
card shield. But, hopefully you can find or scavenge at least a couple
of the above components in your junk box, from a previous project,
or from a broken gadget or two. If you’re halfway serious about DIY
Arduino projects, then you already have a couple of protoshield boards
and header sets stockpiled.
Step 2: The breakout board pins
There are reports that a few of the LC Studio units are defective
(well, whaddya expect for $2?), so the first thing to do is check for shorts.
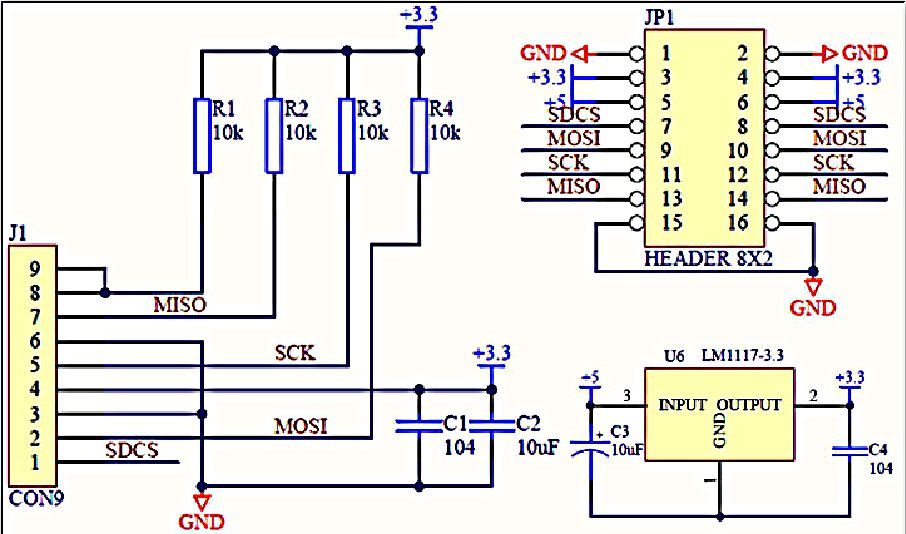
Use the ohms function of your multimeter to make sure that the MISO and
MOSI pins are not shorted to ground.
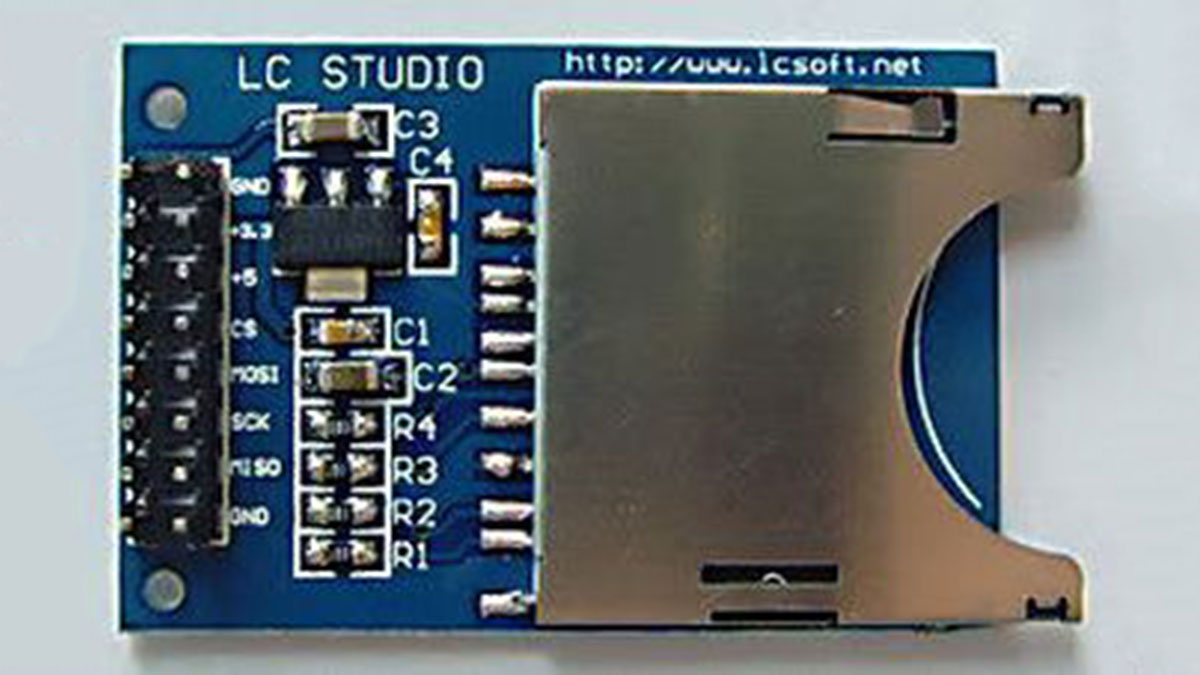
The male header pins on the LC Studio board are
clearly marked on the board (see illustrations).
Each pin in the top row connects across to the corresponding pin
in the bottom row, so you can use either pin in any given two-pin column.
These breakout boards are quite nice, especially at the price.
They include a 3.3v regulator chip on-board, so we can supply +5v
at the +5v input and leave the +3.3v input disconnected. Unfortunately,
+5v inputs are not dropped to +3.3v, so we’ll have to make some provision
for this ourselves if we don’t wish to damage the SD cards.
More on this in the next step.
Step 3: Using a level shifter
Constructing the project looks pretty simple at first glance.
Just connect power and ground, and the four signal pins.
It’s only a matter of figuring out which four (digital) Arduino pins
to connect to, right? Well, yes, but there’s a complication.
SD cards, like many recent electronic devices, operate on a 3.3 volt logic
level. But, most Arduinos output 5 volts on their digital logic outputs for ON.
A direct connection of 5v to an SD card could fry it. So, what do we do?
The best solution is something called a level shifter. Essentially, this means
putting 5v on the input of a non-inverting buffer and getting 3.3v from the output.
Shifting the voltage level, get it?
But just how is this magic accomplished?
One way is to use a CMOS hex buffer IC,
here a 4050, and power it (pin 1, Vdd) at 3.3v.
Put 5v on the input of one of the gates,
and you get 3.3v on the output of that particular
buffer. For example, with 3.3 v on pin 1 (Vdd) and
pin 8 connected to ground, a 5v logic level on
input pin 14 (gate 6) results in 3.3v on output pin 15.
Step 4: Populating the protoshield (1)
Now, let’s build the shield.
We’ll use a blank protoshield PC board. A number of vendors sell these,
with prices ranging from $4 and up.
Install the reset switch, LED(s), resistor(s), and male and female headers in
the appropriate places on the protoshield board. This is probably
not the first shield you’ve built, so I won’t go into too much detail.
The headers are next
4050 non-inverting hex buffer $1.12 (Radio Shack cat. # 55050840)
16-pin IC socket $0.25
blank protoshield $4.00 – $6.00
set of stackable headers $1.50 [2×8 and 2×6] 1 x 8-pin stackable header $0.50
1 x 8-pin male header (non-stackable) $0.50
2 x 8-pin male headers $1.00
2 x 6-pin male header $1.00
1 mini LED $0.25
1 mini pushbutton switch $0.25
1 470 ohm resistor $0.25
hookup wire
solder
SD card (the older low-density 1 or 2 GB kind)
For more detail: Arduino DIY SD Card Logging Shield