
Summary of Arduino Digital 7-Segment Thermometer
This guide details building a digital thermometer using an Arduino Uno and an LM335 temperature sensor. The project reads analog input, converts it to Kelvin, Celsius, or Fahrenheit, and displays the result on 7-segment displays. Users can customize the display units and update frequency by modifying the provided code. While designed for Arduino, the author notes potential compatibility with ATtiny84 and LM35 sensors.
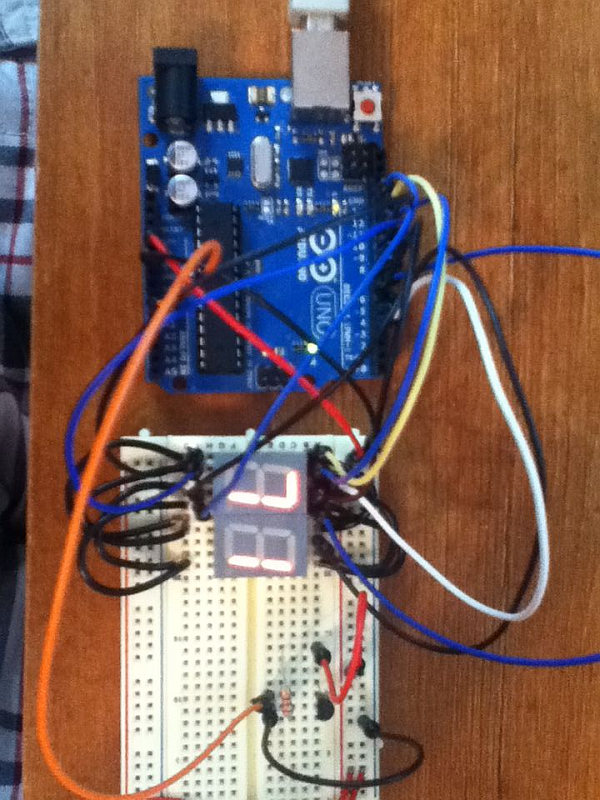
Parts used in the Arduino Digital 7-Segment Thermometer:
- Arduino Uno/Duemilanove/Diecimila (or equivalent)
- LM335 temperature sensor
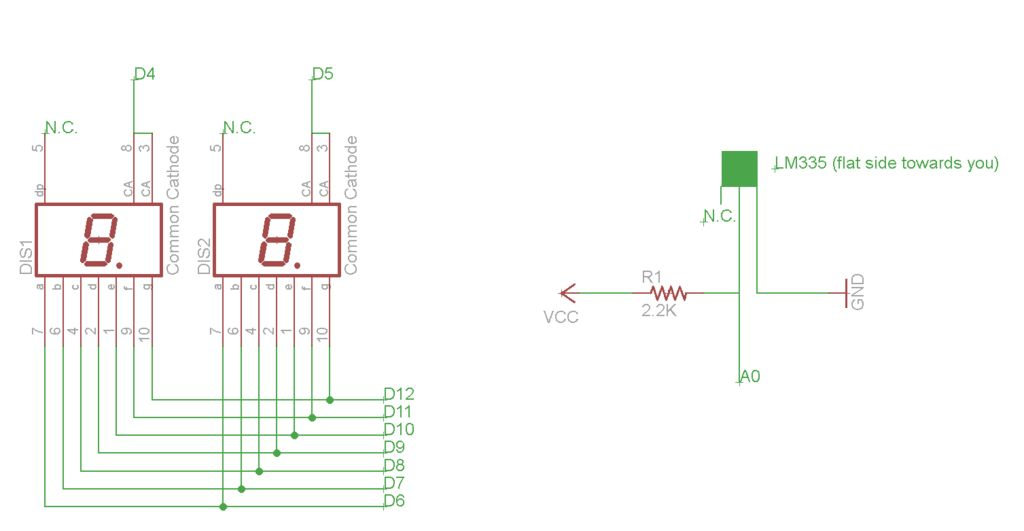
- Two single digit 7-segment displays (common cathode) or one two-digit display
- 2.2k ohm resistor
- Jumper wires
- USB A-B cable
- Breadboard
This a guide for an Arduino version, but I am working on a mini ATtiny84 version. Once I get that working, I will post another Instructable on how to make it.
I’m sure you could make this same thermometer with an LM35 also, if that’s what you have, and you probably won’t have to modify the code.
This is an entry in both the LED contest with Elemental LED and the Hurricane Lasers contest, so if you like it, vote for it! Thanks!
Also, I am considering starting an electronics kit business to sell kits for the Instructables that I make, so if you like the idea, drop a comment or PM me!
Step 1: Parts list
Here are the things you will need for this project. You can get all these parts from a wholesale supplier like Mouser or Digi-Key for around $10-$15 or less, except for the Arduino board. You can get this from Mouser for around $30.
Tools:
USB A-B cable
Breadboard
Step 2: Program the Arduino
The code I wrote requires you to have the Arduino Seven Segment library installed. To do this, go here and download all the files by going to “File>Download” at the top of the page.
Then locate you Arduino sketchbook folder (should be located in “Documents>Arduino” on Windows) and create a folder called “hardware” if there isn’t already one. Go in that folder, and paste the folder you downloaded before into the “hardware” folder.
It should not be in a .zip or .rar format, which it will most likely come as when you download it, you must extract the entire folder and place it in the hardware folder.
After you installed the library, upload the code below to the Arduino board, and proceed to the next step.
#include “SevSeg.h”
SevSeg sevseg;
int tempUnits = fahrenheit; //which unit of temperature do you prefer?
int refreshTime = 5000; //how many seconds should it wait before it checks and displays the temp again? 1000 = 1 second
unsigned long timer;
float celsius = 0, kelvin = 0, fahrenheit = 0;
void setup()
{
sevseg.Begin(0,2,3,4,5,6,7,8,9,10,11,12,13);
}
void loop()
{
sevseg.PrintOutput();
//Reads the input and converts it to Kelvin degrees
kelvin = analogRead(0) * 0.004882812 * 100;
//Converts Kelvin to Celsius minus 2.5 degrees error
celsius = kelvin – 2.5 – 273.15;
//Converts Celsius to Fahrenheit minus 2.5 degrees error
fahrenheit = ((kelvin – 2.5) * 9 / 5) – 459.67;
unsigned long mils=millis();
if (mils-timer>=refreshTime) {
timer=mils;
//Print teperature to the displays
sevseg.NewNum(tempUnits,(byte) 2);
}
}
Step 3: Modify the code to use a common anode display (optional)
Changing the code to work with a common anode display is simple. Change this line of code:
sevseg.Begin(0,2,3,4,5,6,7,8,9,10,11,12,13);
to:
sevseg.Begin(1,2,3,4,5,6,7,8,9,10,11,12,13);
Step 4: Change the units and refresh time (optional)
To change the units of the temperature displayed to Celsius or back to Fahrenheit, change the line of code at the top that says:
int tempUnits = fahrenheit;
to:
int tempUnits = celsius;
if you prefer Celsius.
To change the rate at which the display updates the temperature, change the line of code at the top that says:
int refreshTime = 5000;
to:
int refreshTime = <however many seconds you want it to wait before updating * 1000>;
The code is set to refresh every 5 seconds by default. If you put a number that is too low, it will update so fast that you won’t be able to read it.
1x LM335 temperature sensor (I’m sure you could make it work with a LM35 too)
2x Single digit 7-segment display, common cathode (or a single 2 digit one)
1x 2.2k ohm resistor (not sure if you need this if you are using an LM35)
Jumper wires
For more detail: Arduino Digital 7-Segment Thermometer
- Can I use an LM35 instead of an LM335?
The article states you could likely make the thermometer work with an LM35 without modifying the code. - How do I change the display units from Fahrenheit to Celsius?
Change the line int tempUnits = fahrenheit; to int tempUnits = celsius; in the code. - What is the default refresh time for the display?
The code is set to refresh every 5 seconds by default. - How can I modify the refresh rate?
Multiply your desired wait time in seconds by 1000 and assign it to the refreshTime variable. - Does the code support common anode displays?
Yes, you can enable it by changing the first number in the sevseg.Begin command from 0 to 1. - Where should I install the Seven Segment library?
Extract the downloaded folder into a new hardware folder inside your Arduino sketchbook directory. - What tools are required to build this project?
You need a USB A-B cable and a breadboard in addition to the electronic components.