
Summary of Arduino Controlled Catapult
This project builds a small Arduino-controlled electronic catapult using three servos for tension, angle, and trigger control, with potentiometers for tension and angle and buttons for triggering and reset. The frame is wooden with a shared pivot for the arm, H-piece stopper, springs for stored energy, and a custom servo shield plus a regulator for stable power. The author describes fabrication steps, mounting techniques, spring selection, and wiring tips to prevent servo overload and Arduino damage.
Parts used in the Arduino Controlled Catapult:
- Arduino
- 3x large servos
- 2x potentiometers
- 3x switches (trigger, manual reset, on/off)
- Voltage regulator LM7805 or LM7806
- Heat sink for regulator
- 10–1000 µF 16V electrolytic capacitor
- 0.1 µF ceramic capacitor
- 2x resistors (1–10 kΩ)
- Custom servo shield
- Springs for tension
- Wooden planks for arm and supports
- H-shaped stopper piece
- Bolts, nuts, and fasteners
- Acrylic mounting piece
- Headers and miscellaneous sockets
I recently had the idea to create a catapult, But not just any kind of catapult, an electronic catapult! I wanted something I could just sit it down hit some buttons and watch it do its thing without being to big.
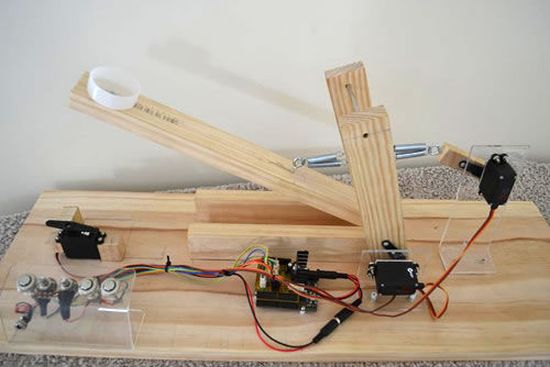
This is what I came up with:
It is a little bigger than what I would of hoped but maybe I will make a smaller desktop/ office version soon.
It uses the Arduino as the brains of the operation and do note I’m still quite new to Arduino.
It use 3 servos to control tension, angle and trigger.
Tension and angle are controlled but two potentiometers.
The trigger is controlled by a push of a button which also resets automatically!
There is a extra button for Manual Reset if needed, As well as the on and off button (blue)
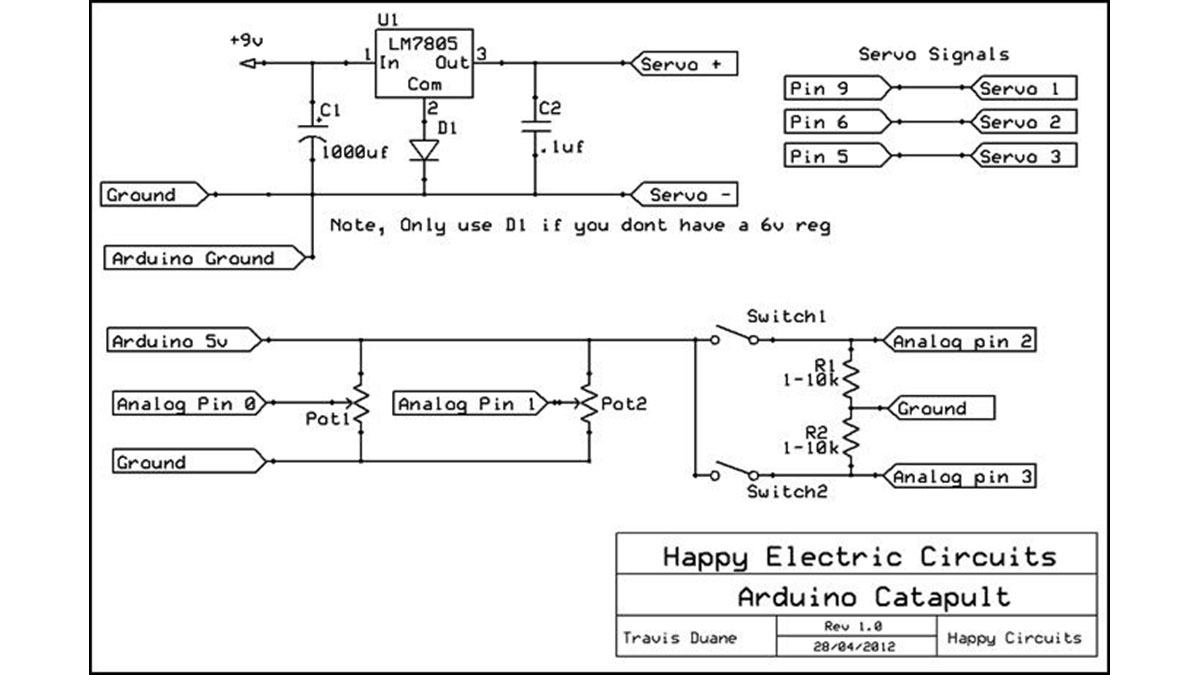
all powered by Arduino and a custom shield to run the servo without killing the Arduino
Let me show you how I build it so you can build your own!
Step 1: Materials and tools
First thing first, Sit down.
Grab some paper and draw what you want! This way you wont spend hours in the hardware store getting things you wont need.
My design is very basic, it uses a H shaped piece for the angle stopper and just a simple arm made out of a plank of wood that share the same pivot as the H piece.
Design yours how you want, even do a Google on some designs if you don’t like mine.
I have listed some pictures to look at for ideas.
When you have your design and idea your going to need to get the stuff to build it out of, Now it doesn’t have to be wood, I could be anything!
Try and keep it light to keep the work low on the servos.
I went down to my local hardware store and picked up a bunch of wood for around about $15 for this project.
Your also going to need basic tools, bolts and other junk depending on your own design.
Step 2: Its all about Angles!
The angler was the hardest thing to figure out how to mount,
I had to mount a servo, H piece and catapult arm all on the same pivot join, The way I managed do this was to use two bolts ether side penetrated into the catapult arm that are countersunk flush so the servo could mount over it on the outside, On the two inner wood support pieces a nut was pressed flush into the inside to keep the bolts from coming out and hold ever thing together.
Two holes were drilled into the top of the H piece and a metal bar was tightly push though to act as a stop.
The servo itself was then mounted to a piece of acrylic that holds it nicely in place.
After running the arm up and down I noticed I was getting just a little bit of movement in the mount due to being a little of center, I didn’t what this to stress the mounts too much so I added springs to each bolt holding the acrylic firmly down while letting that little bit of movement. (3rd image)
Step 3: Springs!
Springs are what gives you the power!
Try and find some good long and strong springs to use for the main tension source, Don’t go too far overboard or else your servo wont be able to handle the load! If you overload a servo it will start humming or screaming and you could stall the motor and risk burning out the motor inside the servo.
My springs are all I had at the time, I had to double the length and overall strength to get them to suit my needs, although I did happen to find some better springs later on that allowed me to get another meter of distance.
3x Big Servos
2x Potentiometers
3x switches
1x Lm7805 or Lm7806 Reg (Tip! if you cant find a 6v reg, get more out of a 5v reg and use a diode on the negative Pin to get around 5.7v out)
1x Heat-sink for regulator (might be a good idea)
1x 10-1000uf 16v cap
1x 0.1uf Ceramic cap
2x 1-10k Resistors
and miscellaneous socks and headers
For more detail: Arduino Controlled Catapult
- What controls tension and angle on the catapult?
Tension and angle are controlled by two potentiometers connected to servos. - How many servos are used and what do they do?
Three servos are used: one for tension, one for angle, and one for the trigger. - What prevents the Arduino from being overloaded by servos?
A custom servo shield is used to run the servos without killing the Arduino. - What is used as the power regulation for the project?
An LM7805 or LM7806 regulator is used, with a tip to use a diode on a 5V reg to get about 5.7V if a 6V reg is unavailable. - How is the arm, H piece, and servo mounted on the same pivot?
Two bolts are countersunk into the arm, a nut pressed flush into inner supports, and the servo mounted over the bolts with an acrylic mount; springs are added to the bolts to reduce stress from slight movement. - What role do springs play and how should they be selected?
Springs store the energy for launching; they should be long and strong but not so strong that servos stall or hum from overload. - Is there a manual reset option?
Yes, there is an extra button for Manual Reset in addition to the automatic reset triggered by the trigger button. - What materials did the author use for the structure?
The author used wood planks for the arm and supports and suggests keeping materials light to reduce servo load.
