Summary of Arduino-Controlled 12V Battery Charger
This article describes an Arduino-controlled automatic 12V battery charger for 7Ah batteries or higher. It features automatic current control based on battery status, displays voltage and charging status on a 16×2 LCD, and maintains float charging voltage when fully charged. The charger uses an LM338 adjustable regulator for charging voltage, a 7812 regulator for Arduino power, and BC547 transistors controlled by Arduino pins. The software is uploaded via Arduino IDE, and calibration involves adjusting VR1 and VR2. Proper polarity and heat-sinks are essential for safe operation.
Parts used in the Arduino-Controlled 12V Automatic Battery Charger:
- Arduino Uno (Board1)
- LM338 adjustable voltage regulator (IC1)
- 7812 voltage regulator (IC2)
- 16×2 LCD display (LCD1)
- BC547 transistors (T1 and T2)
- Step-down Transformer (X1)
- Test switch (S1)
- Variable Resistors (VR1, VR2)
- Shorting jumper (SJ1)
- Rectifier and filter components (diodes, capacitors)
- 12V, 7Ah or higher battery (BATT.1)
- Multimeter (for calibration)
- Heat sinks (for IC1 and IC2)
The circuit presented here can automatically charge a 12V, 7Ah battery, or above. Special features of the charger are as follows. It automatically controls the charging current as per the status of the battery. Battery voltage level as well as charging status are indicated on the LCD display. The charger maintains float voltage, if battery is fully charged. Arduino identifies status of the battery connection and voltage, and indicates the same on the LCD.
Circuit and working of 12V automatic battery charger
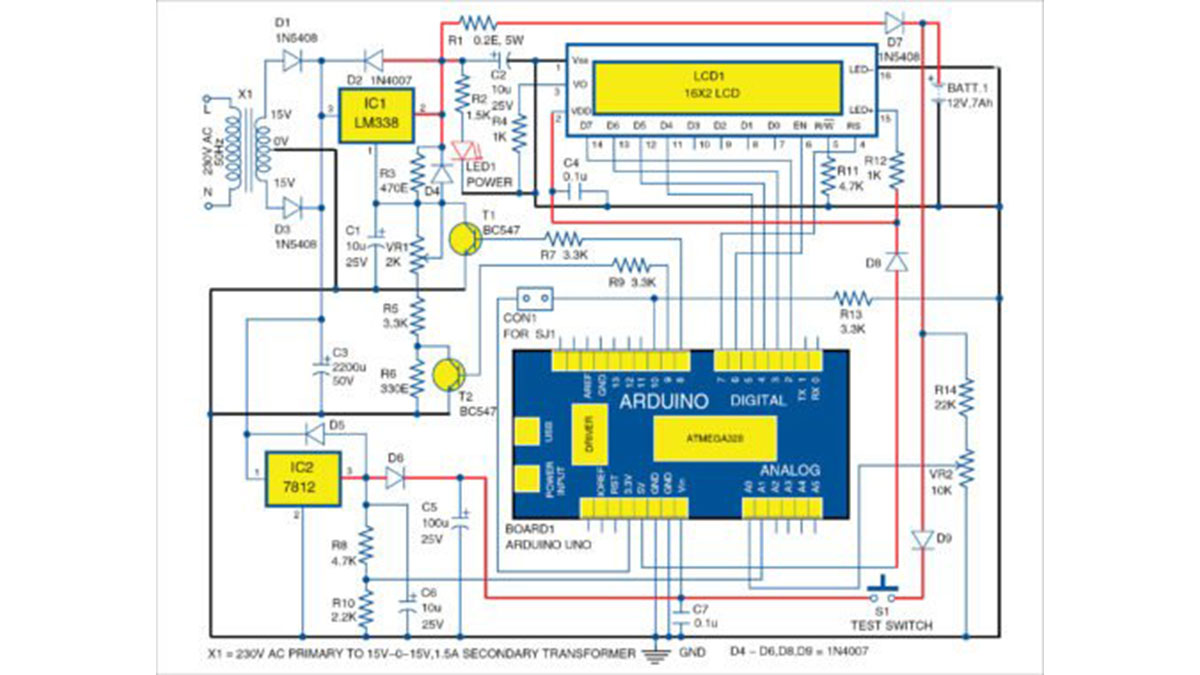
The circuit diagram of the Arduino-controlled 12V automatic battery charger is shown in Fig. 1. It is built around Arduino Uno (Board1), adjustable voltage regulator LM338 (IC1), 12V voltage regulator 7812 (IC2), 16×2 LCD (LCD1) and a few other components.

Circuit diagram of automatic battery charger
When AC mains power is on, step-down transformer X1 generates about 15V AC and converts it to above 18V DC after rectification and filtering. DC voltage thus available is split into two: one for charging the 12V battery (BATT.1) through IC1 and the other for power supply to Arduino (Board1) through IC2.
While charging the battery, its voltage is displayed on the left-top corner of LCD1. The charger/charging type and status is displayed on the second line on LCD1. LM338 supplies 14.2V to the battery till it is fully charged. Once it is fully charged (above 13V), LM338 supplies about 13.3V to the battery, and maintains the charge at this level. This is called float charging. Charging voltage is controlled by two BC547 transistors (T1 and T2), whose bases are connected to Arduino board pins 8 and 9.
To know the status of the battery when 230V AC mains power is off, press and hold test switch S1 for some time. Arduino gets power from the connected battery. It displays voltage and status of the battery (assuming that battery is not dead).
Software
The software program (batterycharger.ino) is written in Arduino programming language. Arduino IDE is used to compile and upload the program. ATmega328P on Arduino Uno board comes with a pre-programmed bootloader that allows you to upload a new code to it without using an external hardware programmer.
Connect Arduino to the PC and select the correct COM port in Arduino IDE. Compile the program/sketch. Select the correct board from ToolsBoard menu in Arduino IDE. Upload the sketch to the internal memory of the microcontroller.
Download source code
Construction and testing
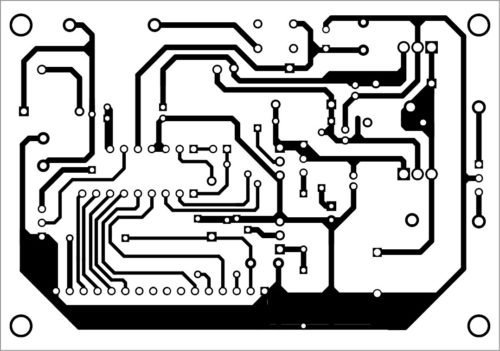
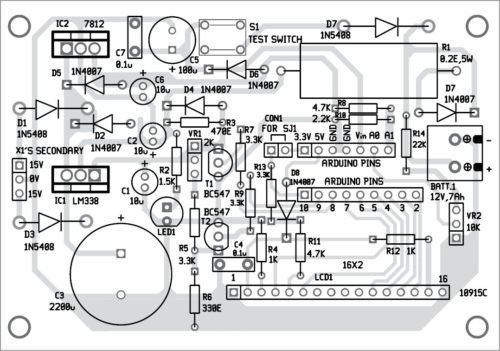
An actual-size PCB layout of the Arduino-controlled 12V automatic battery charger is shown in Fig. 2 and its components layout in Fig. 3.
PCB layout of battery charger
Components layout for the PCB
Assemble the circuit on the designed PCB. Once the circuit is ready and Arduino sketch is written to the board through USB port, connect shorting jumper SJ1 and a multimeter in place of the battery for calibration. Switch on AC mains power and adjust VR1 till the multimeter reads 14.2V DC. Adjust VR2 till LCD1 displays 14.2V. Remove shorting jumper SJ1 and the multimeter. The charger is ready to use. Connect a battery that needs to be charged (12V battery) at BATT.1, as shown in the circuit.
Precaution. Maintain proper polarity of the battery while connecting for charging. Reverse polarity of the battery may damage the circuit.
Charging voltage is set to 14.2V. This value is dependent on the lead-acid battery manufacturer. Hence, refer battery manual before charging.
Use suitable heat-sinks for IC1 and IC2.
Read More Detail:Arduino-Controlled 12V Battery Charger


