
Summary of Animatronic Stargate helmet using Arduino
This article details the construction of a moving, animatronic Horus guard helmet from Stargate using simple hand tools. The build combines paper-mâché techniques with cardboard and foam for a lightweight, durable shell, powered by an Arduino system to drive servos that mimic the movie helmet's movement. The project emphasizes accessibility, requiring only basic materials like cardstock, plywood, and craft foam, along with specific electronics like Hitec servos and LEDs for illumination.
Parts used in the Animatronic Stargate Helmet:
- Saw for cutting wood/metal
- Cordless drill w/ various drill bits
- X-Acto knife with #11 blades
- Scissors
- Glue gun
- Sandpaper (100 grit)
- Allen wrenches (Inch)
- Screwdrivers (phillips and flat head)
- Soldering iron
- Ballpoint pen
- Bench vise
- Multitool
- Cardstock (2pkgs)
- Newspaper
- Craft foam sheet (10ea 12" x 18")
- White glue
- Tacky glue
- Gorilla glue
- Spray foam
- Silver paint
- Copper paint
- Satin clear coat
- Pastels (dark blue, reddish brown, black)
- Spackling paste
- Plywood (3/32" thickness, 6" x 12")
- Minwax Polycrylic sealer
- Velcro
- Cotton swabs/soft brush
- Arduino servo board
- Small switch (2ea)
- JST female connector
- JST extension wire
- AA batteries (4ea)
- AA battery holder
- Hitec HS-81 Servos (3ea)
- Hitec HS-425BB Servos (2ea)
- Servo extension wire
- Gears (22T 32 pitch Hitec splined, 24T 32 pitch 1/4" shaft mount)
- 4-40 Swivel ball links
- 4-40 threaded rod
- Super Duty short control horns
- Servo shaft adapter 1/4"
- 10-32 Rod end
- 10-32 tap & drill bit
- 10-32 bolt
- 10-32 nuts
- 1" Aluminum angle
- Nylon spacers
- 1/4" OD brass tubing
- 3/8" Aluminum rod
- Aluminum mounting hubs
- 10mm super bright white LEDs
- 10mm LED holders
- Resistors (100 Ohm)
- Standoffs
- Female breakaway headers
- Miscellaneous wire/small wood screws
- Steel sheet scrap
- Magnet
I love the movie Stargate and when I first saw it I immediately knew I wanted to make one of the super cool Horus guard helmets. I had sketched multiple designs over the years and figured out several different methods for building it but rejected them all for one reason or another- usually due to cost or complexity of construction. Since I wanted this to be a costume helmet my requirements were that it be light weight, comfortable, have decent outward vision and be reasonably durable. I also wanted it to be buildable by anyone using simple hand tools. Most important of all I wanted it to move in a similar fashion to the movie helmets.
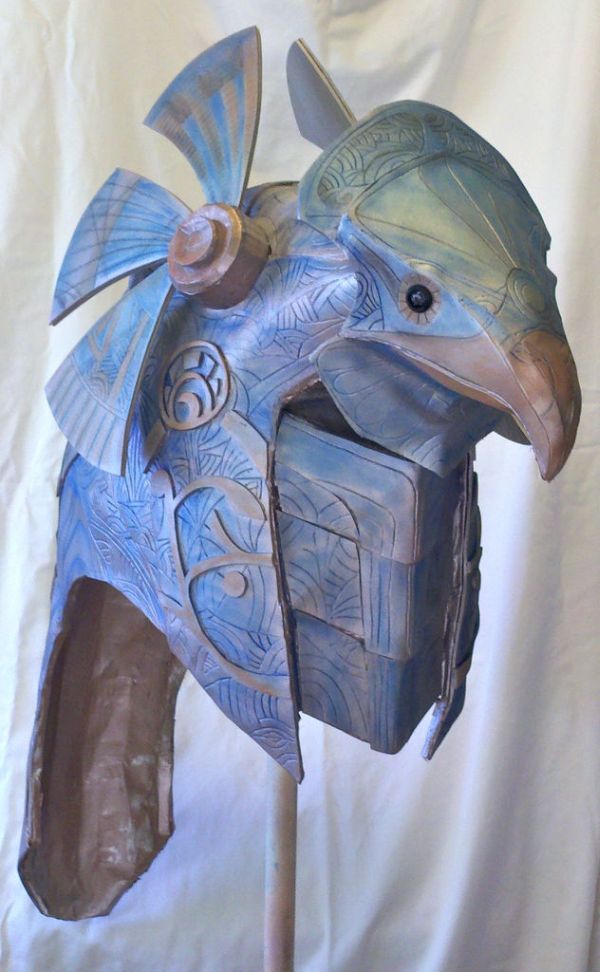
All of this proved to be a pretty tall order but eventually it all came together and now you can make a moving Stargate helmet of your own!
Step 1: Tools and materials
Tools-
Saw for cutting wood/metal- I use a Milwaukee hand saw that accepts reciprocating saw blades- super handy! http://www.homedepot.com/h_d1/N-5yc1v/R-202525764/h_d2/ProductDisplay?langId=-1&storeId=10051&catalogId=10053
Cordless drill w/ various drill bits
X-Acto knife with #11 blades
Scissors- small sharp scissors make cutting the patterns easier
Glue gun
Sandpaper- small piece of 100 grit to smooth wood edges and spackling
Allen wrenches- Inch
Screwdrivers- phillips and flat head
Soldering iron
Ballpoint pen
Bench vise or some other way of securing work while cutting metals
Trusty Instructables multitool- I never leave home without it!
Materials-
Cardstock (2pkgs)- http://shop.hobbylobby.com/store/item.aspx?ItemId=168038
Newspaper
Craft foam sheet (10ea 12″ x 18″)- http://shop.hobbylobby.com/store/item.aspx?ItemId=160137
White glue
Tacky glue- http://shop.hobbylobby.com/products/clear-gel-tacky-glue-163972/
Gorilla glue- http://www.homedepot.com/h_d1/N-5yc1v/R-100141832/h_d2/ProductDisplay?langId=-1&storeId=10051&catalogId=10053
Spray foam- http://www.homedepot.com/h_d1/N-5yc1v/R-100068117/h_d2/ProductDisplay?langId=-1&storeId=10051&catalogId=10053
Paint- 1 can silver
1 can copper
1 can satin clear coat
Pastels- dark blue, reddish brown, black
Spackling paste- http://www.homedepot.com/h_d1/N-5yc1v/R-202314762/h_d2/ProductDisplay?langId=-1&storeId=10051&catalogId=10053
Plywood- 3/32″ thickness, 6″ x 12″ (3ea)- http://www.micromark.com/Birch-Plywood-3and32-Inch-Thick-x-6-Inches-Wide-x-12-Inches-Long,6909.html
Minwax Polycrylic sealer- http://www.homedepot.com/h_d1/N-5yc1v/R-202061439/h_d2/ProductDisplay?langId=-1&storeId=10051&catalogId=10053
Velcro- http://www.homedepot.com/h_d1/N-5yc1v/R-202261913/h_d2/ProductDisplay?langId=-1&storeId=10051&catalogId=10053
Cotton swabs/ soft brush- for applying pastels
Electronics/Hardware-
Arduino- I used my own design Arduino servo board (you can use any variety Arduino you want- available at RadioShack, Sparkfun, Adafruit, etc.)- http://www.instructables.com/id/Arduino-animatronics-make-your-awesome-costumes-m/
Small switch (2ea)- http://www.sparkfun.com/products/8837
JST female connector- http://www.sparkfun.com/products/9749
JST extension wire http://www.sparkfun.com/products/8670
AA batteries (4ea)
AA battery holder- http://www.sparkfun.com/products/552
Servos- Hitec HS-81 (3ea)- http://www.servocity.com/html/hs-81_micro.html
Hitec HS- 425BB (2ea)- http://www.servocity.com/html/hs-425bb_super_sport_bb.html
Servo extension wire- http://www.servocity.com/html/12__servo_extensions.html
Gears- 22T 32 pitch Hitec splined (2ea)-http://www.servocity.com/html/32_pitch_hitec_servo_gears.html
24T 32 pitch 1/4″ shaft mount (4ea)-http://www.servocity.com/html/32_pitch_plain_bore_gears.html
4-40 Swivel ball links (4ea)- http://www.servocity.com/html/4-40x3_16__nylon.html
4-40 threaded rod- http://www.servocity.com/html/threaded_rod.html
Super Duty short control horns (2ea)- http://www.servocity.com/html/306sh_short_single_horn.html
Servo shaft adapter 1/4″- http://www.servocity.com/html/servo_shaft_attachment___250__.html
10-32 Rod end- http://www.markwilliams.com/detail.aspx?ID=1313
10-32 tap & drill bit
10-32 bolt
10-32 nuts (3ea)
1″ Aluminum angle- http://www.onlinemetals.com/merchant.cfm?pid=971&step=4&showunits=inches&id=62&top_cat=60
Nylon spacers- 1/4″ ID x 1/2″ OD- http://www.servocity.com/html/_4_nylon_spacer.html
1/4″ OD brass tubing- http://www.onlinemetals.com/merchant.cfm?pid=1539&step=4&showunits=inches&id=84&top_cat=0
3/8″ Aluminum rod http://www.onlinemetals.com/merchant.cfm?pid=1082&step=4&showunits=inches&id=195&top_cat=60
Aluminum mounting hubs w/bolts- 1/4″ and 3/8″ borehttp://www.servocity.com/html/set_screw_hubs.html
10mm super bright white LEDs- local supplier or http://www.cablesandconnectors.com/30000-30.HTM
10mm LED holders (2ea) I purchased these locally but I found some online here-http://shop.vetcosurplus.com/catalog/product_info.php?cPath=376&products_id=9026
Resistors- 100 Ohm (2ea) -local Radio Shack
Standoffs- I used standoffs I salvaged from electronics equipmentI found in dumpsters but lots of places sell them online in various sizes –http://www.servocity.com/html/standoffs___spacers.html
Female breakaway headers- http://www.sparkfun.com/products/115
Miscellaneous wire/small wood screws
Small piece of steel sheet- I used a scrap piece cut from old electronics chassis material
Magnet- http://www.kjmagnetics.com/proddetail.asp?prod=DA2
Step 2: Printing patterns
So here we go!
The base of this helmet uses a pepakura folded paper model. If you’re not familiar with pepakura it allows you to take a 3D model and essentially fold it out flat into a paper pattern. The pattern is printed on cardstock and cut out, folded and glued together. It’s a pretty easy way to get a general shape for a physical model. The complexity of the model can vary greatly and it’s always a trick to have the minimum number of folds to reduce complexity but still allows you to have good shape and model detail. I’m using using the pepakura model provided by nintendude and movieman on the RPF forum as a base (a HUGE thank you to you guys!)
So the first thing you want to do is download the provided patterns and open the Horus pattern using the free Pepakura Viewer, which can be downloaded here (sorry Windows only)-http://www.tamasoft.co.jp/pepakura-en/
There are additional files provided should you want to make the Anubis version or want the additional files for the neck collar, staff weapon or ZAT weapon to complete a costume. Note that I have not yet constructed these so I can’t say if the animatronics will fit the Anubis head -but I’m sure there’s a way to make it work. 🙂 An opening staff weapon and animatronic ZAT are on my project list…
After you have opened the Horus file you will see a wire model on one side of the screen and the patterns on the other side of the screen. The first thing you will notice is that if you click on a particular pattern page it will show you where that part goes in the finished model as well as what other pattern parts it mates to- this is great to back to and use as a reference when assembling the patterns.
At this point what you want to do is turn off the “Set Materials To Faces” button. If you don’t do that all of the pattern faces will print grey.
Next turn on the “Show Edge ID” button. This is a big one- when the patterns print they will have numbered edges that show what edges mate together. Without this it will be very difficult to assemble the patterns.
Now select Setting form the pull down menu and select Print Setting. I set the line thickness to 3, Print lines smoothly, transparency to 50% and Print page number.
Now select the printer icon, select your printer, select All and then OK. A window then appears asking if you if you want to adjust the scale- select NO. The reason for this is that Pepakura Viewer is set up to print on A4 paper and if you scale the model to fit on letter sized paper the patterns will be the wrong size. The down side to this is that if you are printing on letter sized paper some of the patterns can run just barely outside the borders, but it’s no big deal.
So print your patterns onto cardstock and get your scissors ready…
Small switch (2ea)
JST female connector
JST extension wire
AA batteries (4ea)
AA battery holder
Servos- Hitec HS-81 (3ea)
Hitec HS- 425BB (2ea)
Servo extension wire
For more detail: Animatronic Stargate helmet using Arduino
- What software is required to open the helmet patterns?
The free Pepakura Viewer software is required to open the provided Horus pattern files. - Can I print the patterns on letter-sized paper?
Yes, though some patterns may run slightly outside the borders because the viewer defaults to A4 scaling. - Why should I turn off the Set Materials To Faces button?
You must turn this off so that all pattern faces do not print grey. - What feature helps identify which edges mate together during assembly?
Turning on the Show Edge ID button displays numbered edges that indicate how parts connect. - Does the author recommend scaling the model when printing?
No, the author advises selecting NO when asked to adjust scale to ensure the patterns remain the correct size. - What type of servos are used for the main movement?
The project uses three Hitec HS-81 micro servos and two Hitec HS-425BB super sport servos. - How is the base shape of the helmet created?
The base uses a pepakura folded paper model printed on cardstock, cut out, folded, and glued together. - Are there additional patterns available for other costumes?
Yes, additional files exist for the Anubis version, neck collar, staff weapon, or ZAT weapon. - What lighting components are included in the design?
The design includes 10mm super bright white LEDs housed in 10mm LED holders.
