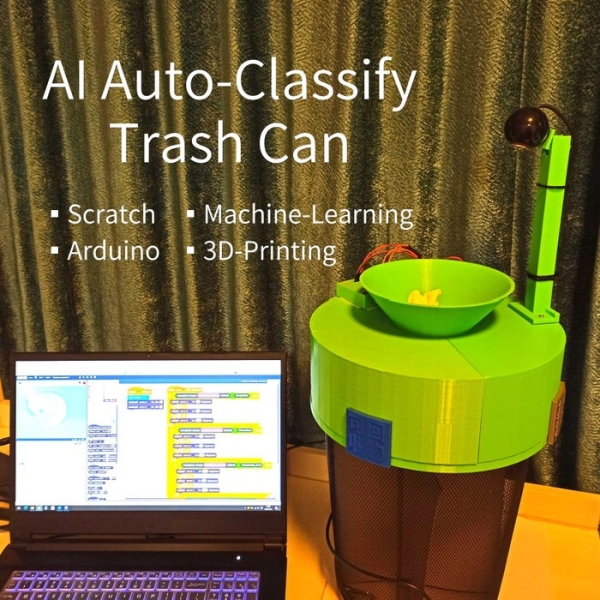
Summary of AI Auto-Classify Trash Can
This article describes an educational project for building an AI-powered trash can that automatically classifies garbage using a camera, machine learning, and Arduino. Designed for beginners and kids, the system captures images of waste, identifies them via a model trained on Machine Learning For Kids, and sorts them into different bins using servo motors controlled by Scratch code and 3D-printed components.
Parts used in the AI Auto-Classify Trash Can:
- Computer
- USB-Camera
- 3D-Printer
- Arduino UNO
- Servo motor (control angle 0-180°)
- Servo motor (control angle 0-270°)
This project is a trash can that recognizes and classifies garbage automatically.
Use Machine-Learning and Arduino in Scratch.
How it works
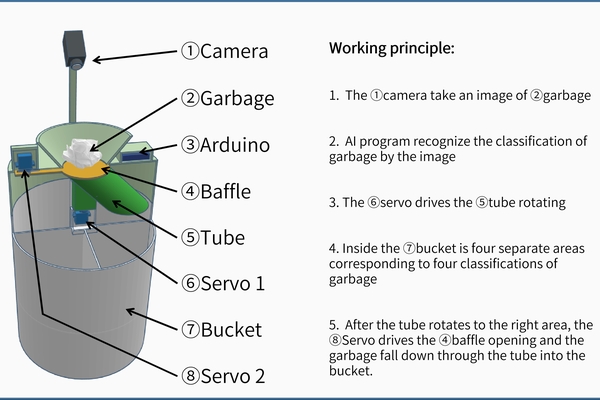
1. Camera takes an image of garbage.
2. Machine-Learning model recognizes the classification of garbage by the image.
3. Electrical and mechanical parts drive the garbage into diffrent palce by its classification.
Beginner-friendly
Machine-Learning, Block-coding and 3D-design platforms in this project are designed for kids, easy and free to use.
Supplies
Computer, USB-Camera, 3D-Printer
Arduino UNO
Servo motor (control angle 0-180°)
Servo motor (control angle 0-270°)
Step 1: Working Demo
Step 2: Teach Computer to Recocognize Garbage
Machine Learning is the core technology of Artificial Intelligence.
By it, computer can recognize image and text.
Machine Learning For Kids is an educational website to make machine-learning model and use it in Scratch.
1. Go to Machine Learning For Kids, sign up and log in
https://machinelearningforkids.co.uk/
It’s free to use, but a little bit complicated when signing up.
Because during signing up, you need to get free API Keys from IBM Cloud.
There’s step-by-step instructions on the sign up page, just follow it.
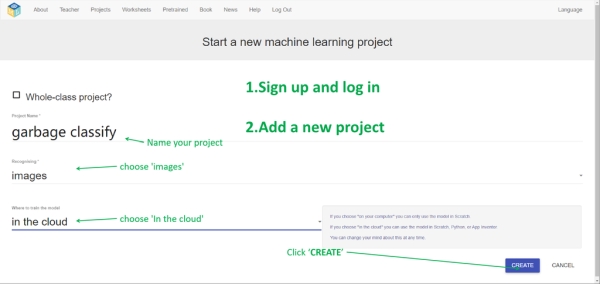
2. Add a new project
Name the project, choose ‘Recognizing images‘ , choose ‘In the cloud‘.
and click ‘CREATE‘.
Step 3: Take Images and Lable Them
3.Train
We can train a computer recognizing objects like training a human baby.
Imagine you’re teaching a baby to recognize apple.
You may hold an apple in front of the baby and tell him it’s ‘apple’.
By this way, the baby gets images of apple and gets the lable ‘apple’.
Then the baby associates the images and the lable.
After this training, when the baby sees an apple, he knows it’s ‘apple’.
In the same way, we give computer images of objects, and tell computer what are the objects by labling the images.
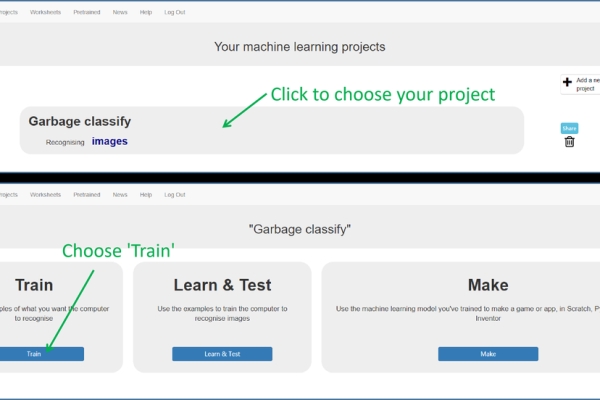
After clicking ‘CREATE‘, the page changes automatically.
Click your project name to choose your project and click ‘Train‘.
Click ‘Add New Lable‘, name the lable and input images that belong to the lable.
Now, we want to teach computer to recognize the images of garbage.
In my city, the policy devides garbage into four kinds — Recyclable, Hazardous, Household food, and Residual. So I add these four lables and input images of garbage by USB-Camera.
(In industry, professional people may make hundreds of lables, one lable for one object, and take thousands images for each object.
In this cost-free eduactional website, the maximum number of images you can input is 100 in total.
So In these simple project, I just add four lables by the classifaictions of garbage, and choose 2 examples to take images for each lable. For example, I find batteries and expired medicine as the examples for Hazardous garbage, and take 20 images of them with USB-Camera. )
Step 4: Learn and Test
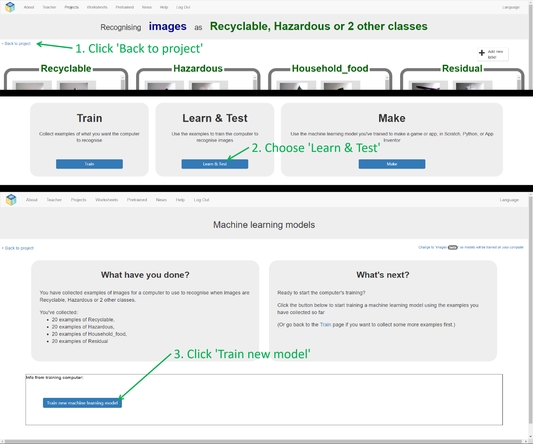
After adding lables and inputing images, click ‘Back to project‘, go to the previous page and click ‘Learn & Test‘.
Right now, computer has lables and images, but it has not learned yet.
In the learning process, computer tries to find the characteristics of object in those images.
The algorithm is complex and the system requirements is high.
But don’t worry, this process automatically runs on IBM cloud. (That’s why you need IBM API keys when signing up.)
Click ‘Train New Machine Learning Model‘ to get it started.
It will takes a few minutes.
When learning is over, you can input image to test your model.
If it does not work well, you may go back to Train page, input more images or replace old images and train a new model.
Step 5: Use Maching-Learning Model in Scratch
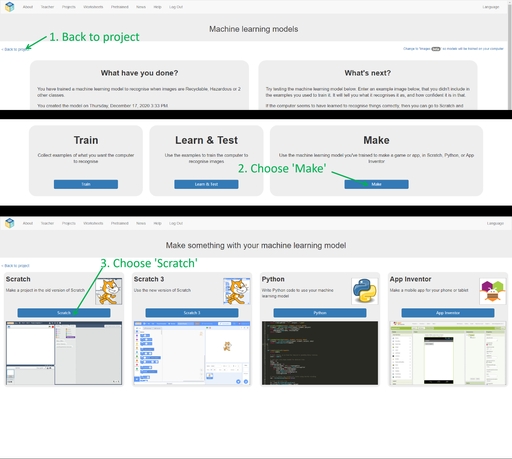
Click ‘Back to project‘, go to the previous page and choose ‘Make‘.
You can use your machine-learning model in different platforms.
In this project, I use Scratch, not Scratch3. Because in this old version of Scratch, we can load other un-official extensions such as extension for Arduino Uno.
Choose ‘Scratch‘, go to the coding page. Then you may see blocks of your machine-learning model. With them you can use machine-learning model to recognize images in Scratch.
Step 6: Load Extension for Arduino Uno
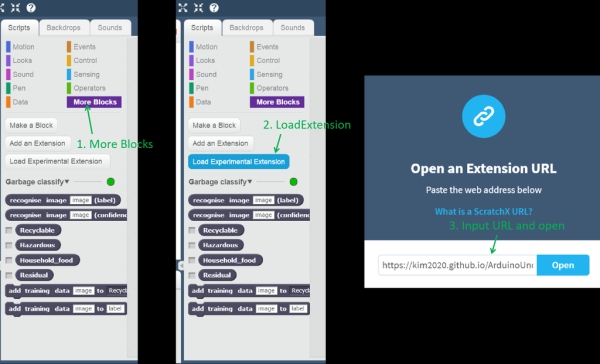
At the beginning I wanted to use micro:bit in this project, but the extension for micro:bit provides no blocks to drive servo motor. Instead I use Arduino Uno, and find an extension for it.
To use Arduino Uno in Scratch, you need to do some steps first.
Follow instuctuons in this page:
http://khanning.github.io/scratch-arduino-extension/gettingstarted.html
Then go back to scratch page of MachinelearningForKids, click ‘More blocks‘ – ‘Load Experimental Extension‘ and input this URL:
https://kim2020.github.io/ArduinoUno.js
(This extension is from ScratchX. But the original URL of it cannot be loaded in MachinelearningForKids. So I put the extension in this above URL.)
Input the URL and Click ‘Open‘. Then you may see blocks of Arduino Uno.
Step 7: 3D-Print and Code
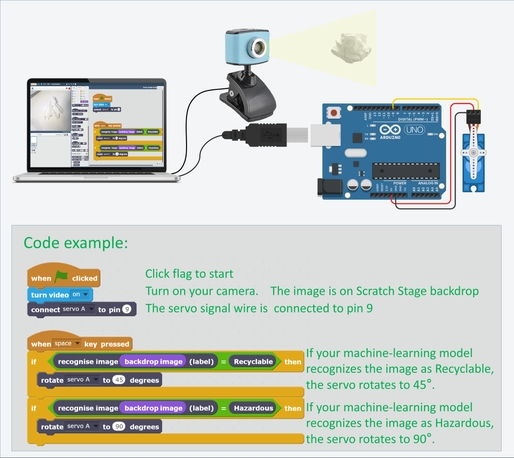
This trash can is designed in Tinkercad.
https://www.tinkercad.com/things/dAZJwfzUkyF
You can look inside the structure in this URL.
The example codes of how to use machine-learning model and arduino in Scratch are shown in the first picture.
The codes of my trash can are very easy, shown in the second piciture.
Step 8: Final Words
This project is an educational project in my STEM club.
It involves Machine-learning, Scratch, Arduino and 3D-Printing. The platforms to make it are free and easy to use.
I publish this Instructable not to help you make a same trash can.
But if you are a beginner who want to make something with machine-learning and arduino, you can use the same ways in this project. They are enough to make a prototype like my AI trash can.
Source: AI Auto-Classify Trash Can
- How does the trash can recognize garbage?
A camera takes an image which is processed by a Machine-Learning model to classify the garbage. - Can this project be made without paying for software?
Yes, the platforms including Machine Learning For Kids, Scratch, and Tinkercad are free to use. - Why was Arduino Uno chosen over micro:bit?
The author chose Arduino Uno because the micro:bit extension did not provide blocks to drive servo motors. - What is the maximum number of images allowed per label?
The website allows a maximum of 100 images in total for the entire project. - Where is the machine learning training process executed?
The learning process runs automatically on IBM cloud servers. - Which version of Scratch is recommended for this project?
The old version of Scratch is used because it supports loading unofficial extensions like the one for Arduino Uno. - What tool was used to design the physical structure of the trash can?
The trash can structure was designed using Tinkercad. - Does the system require professional industrial labeling?
No, for this educational project, only four general labels were created instead of hundreds of specific object labels.