Summary of Addressable Milk Bottles (LED Lighting + Arduino) using arduino
This project recycles PPE milk bottles into aesthetic LED lights controlled by an Arduino. The design emphasizes a human-friendly, analog feel using rotary controllers rather than mechanical flashing sequences. By utilizing the bottles as diffusers and mounting LEDs in acrylic discs within bottle caps, the creator achieves a bright, low-power lighting solution (under 3 watts) that is environmentally friendly and straightforward to build compared to custom housing fabrication.
Parts used in the Milk Bottle LED Lights:
- PPE milk bottles
- Sheet of 3mm clear acrylic
- 2 core electrical cable or speaker wire
- LEDs
- Resistors
- Solder
- Heat shrink tubing
- Old transformer (wall wart) with socket and plug
- Braided copper wire
- Solid core bell wire
- Zip ties
- Arduino mini
- Mini USB adapter or FTDL USB to header lead
- Pin header sockets
- Solderless breadboard
- LM317T voltage regulator
- BC337 NPN transistors
- White plastic moo card box
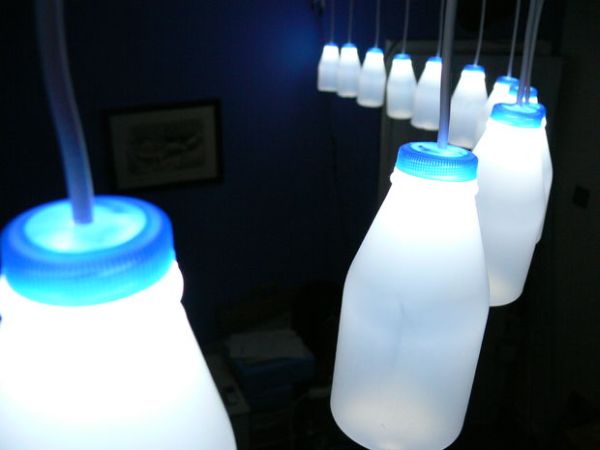
Make PPE milk bottles into good looking LED lights, and use an Arduino to control them. This recycles a number of things, mainly the milk bottles, and uses a very low amount of power: the LEDs apparently dissipate less than 3 watts but are bright enough to see by.
Among other things, I wanted to see if I could make an electronic light feel more human friendly than most, and found rotary controllers are a good way of doing this.
PPE milk bottles make for a cheap yet aesthetically pleasing way to diffuse LED lighting. Especially if you can find nice round ones 🙂
Modding an object with LED lighting is not only environmentally friendly, but also much more straightforward than building a housing from scratch. Because LEDs are tiny, you can put them almost anywhere, and they don’t produce much heat as long as they’re spread out and running at the correct voltage.
This instructable will deal mainly with physical design and production, and I’m going to assume you have a basic knowledge of creating electronic circuits and LED lighting. Since the exact LEDs and power supply you use will probably vary, I’ll only go into the basics of my circuit in terms of specs. I’ll also try to point you to useful resources, and explain more about the Arduino microcontroller and code that tells them to work in sequence.
The electronics of basic LED lighting are really simple, similar to elementary school electronics, so probably won’t take long for you to pick up at all.
Step 1: Tools and Materials
PPE milk bottles
Sheet of 3mm clear acrylic
2 core electrical cable (or speaker wire will do – it can be fairly light duty since it will only take about 12v and very little current, depending on how you design your circuit).
LEDs
Resistors
Solder
Heat shrink tubing
An old transformer (wall wart to Americans), plus socket+plug to go with it.
Braided copper wire
Solid core bell wire
Zip ties
Tools you will need:
Drill
Hole cutter (matched to the width of your milk bottle caps – see step 2)
Assorted tiny drill bits
Junior hacksaw (depending on what you use as a housing)
Screwdrivers
Wire strippers
Side cutters/Wire clippers
Soldering iron
Multimeter
Third hand (vital for soldering components together)
Desoldering wick (if you salvage any components from other devices)
Crocodile clip leads (for testing/prototyping).
You also might want to make some kind of housing for them. I’ve tried various ways of hanging them, and settled on a bent section of PVC pipe, hung from the ceiling with holes drilled for the cables. I also tried stapling them to the ceiling. You could also hang them through a piece of board mounted on the ceiling, from conduit, or even make holes in your ceiling itself to accommodate the wires and power them from a loft. Step 5 shows and talks about a few of these options.
The above is all you’ll need to make some lights that work with a basic on/off switch. To give them more advanced functions such as fading or sequencing, you’ll also need a load of components such as transitors and a microcontroller:
Arduino mini
Mini USB adapter for above, or FTDL USB to header lead.
Pin header sockets
Solderless breadboard
LM317T voltage regulator
BC337 NPN transistors
All shown below but more about them and how they work together in step 6.
There’s also an enclosure for switch box, which could be anything you like. I saw a lovely round sacrament box in the Japan room at the British Museum, but they wouldn’t let me have it. In the end I used a white plastic moo card box because it fits so well with the theme 🙂
With such a circuit in place, there are all kinds of things you can program an arduino to do with it. I like kinetic lighting, but I find flashing christmas lights, etc., gaudy and mechanical. Their regularity and consistency is cold and unwelcoming (it must take work to create the naturalistic twinkle of good christmas lights).
I don’t want anything flashy (literally). I want a single, analogue control for the lights that feels very human-operated, that simply sequences the way they turn on and off. Code for that, coupled with a nice feeling dial and an aesthetically pleasing aluminium knob makes this into a pleasing toy.
Step 2: Cut and Drill Perspex
First of all, we’re going to cut some perspex discs to go inside the caps on the milk bottles, then drill holes through which we can mount the LEDs and cable.
When using the hole cutter, drill into a piece of wood. Pressing your material against something like this while you cut will help to keep the back edge neat. Softwood also lets you know when you’ve gone all the way through, as you can really feel the way the drill bites changing as it reaches the wood.
Once your discs are ready, make hole in all your milk bottle tops to match the centre holes in the perspex.
You also need to drill holes ready for the wiring and LEDs. What exactly you do here depends on what kind of power supply you’ll be using and what kind of circuits you want to connect to it. Mine use three LEDs per light, which I arranged evenly around the disc.
You need a pair of holes to pass the legs of each LED through, and two holes big enough to pass the two strands of your cable through. (See the picture for explanatory notes).
I didn’t use a template or anything for this, I just did it by eye with a battery drill, some small bits, and patience. Occasionally, two holes would be a little bit too far apart or close together for the LED legs, but as long as you’re careful, a little bit of bending will allow them to fit. If this doesn’t make sense yet, don’t worry, the next step should make it clear.
Step 3: Mount LEDs
Now, pop the LEDs through the holes, being careful to observe polarity. We’re basically going to daisy chain them, with each negative leg on one LED connecting to the positive leg on the next.
How many you daisy chain like this, if at all, depends on the voltage of the power supply you use. Mine is 12v, and my LEDs have a forward voltage of 3.3, so the 9.9 volts of three LEDs is the maximum my supply can handle. They’ll also need a resistor to bring the circuit up to 12v. You should definitely have a resistor on each bottle, because if you don’t the LEDs will burn out or at least run hot (and brighter). I tried this with an early prototype, and they ran hot enough without a resistor to melt the PPE of the bottle cap.
You can use this handy LED calculator to work out what to do with your own circuit:
http://led.linear1.org/led.wiz
The screengrab from it in this step shows exactly the values I was working with and the resulting circuit (The resistors are added in the next step).
Once your LEDs are through the holes and you’re sure the polarity is correct, start twisting the leads together as shown in the sequence of images for this step. The leads nearest the cable holes are left untwisted, because they will be soldered to the cable rather than each other.
Keep doing this with all of them, making sure to only connect positive to negative rather than pos-pos or neg-neg. I also made sure to keep all of these lights consistent. Looking down on them, the current always goes in on the left, then clockwise around the LEDs, which are earthed through the left hole.
Step 4: Solder Components
Now we need to solder everything in place.
First of all, solder all your pairs of twisted leads together, then clip off the excess.
Next, strip lengths of electrical cable then thread them through the cable holes you drilled into each disc. Wrap the cables around the LED leads, with live (brown) going to the long (positive) lead of the LED string. Coil the copper around the leads, solder it in place, and again snip off any excess lead.
Double your cable back through the centre hole, then slide the bottle cap down the lead and over the disc. At the other end, solder a resistor of the correct value (in my case 120 ohms) to the positive cable.
The length of your cables depends on how you’re going to hang your lights. As you can see in the final picture of this step, I chose to use fairly short lengths of flex, because I knew I’d be joining them to longer lengths and making housings that would conceal the joints. It’s also easier to work with 12 shorter lengths, rather than 12 much longer ones.

Step 5: Switches and Housings
At this point you have a set of lights mounted in milk bottle caps and designed to run with a particular power supply. The PPE bottles, once you’ve delabeled and washed them, will just screw right back into the caps and act as nice looking diffusers.
You could now connect the lights up with a simple switch box, as I did at first, or choose to do something more complex, like drive them using the same power supply but also a microcontroller to make them do more interesting things.
Due to time constraints, I’ve had these lights around as a prototype in various stages of development for around 18 months, and in that time I’ve mounted them in two different ways with three different switch boxes. I also retrofitted them with some better LEDs, that gave a slightly bluer light and had diffused housings.
Rather than detail every step of each iteration, I’ve put a selection of pictures in this step with notes illustrating each of them.
The rest of this instructable will deal with the latest (and coolest) way I’ve chosen to use them: Mounted in plastic pipe and controlled individually.
For more detail: Addressable Milk Bottles (LED Lighting + Arduino)
- Why are PPE milk bottles suitable for this project?
PPE milk bottles provide a cheap yet aesthetically pleasing way to diffuse LED lighting. - How many LEDs can be daisy chained on a 12v supply?
Three LEDs can be daisy chained because their combined forward voltage of 9.9 volts fits within the 12v limit. - What happens if you do not use a resistor for each bottle?
The LEDs will burn out, run hot, or potentially melt the PPE of the bottle cap. - How should the LED leads be connected in a daisy chain?
You must connect the negative leg of one LED to the positive leg of the next, ensuring you never connect positive to positive or negative to negative. - What tool helps keep the back edge neat when cutting acrylic discs?
Drilling into a piece of softwood while cutting helps keep the back edge neat and signals when you have gone all the way through. - How does the author prefer to control the lights for a human feel?
The author uses a single analogue control like a dial with an aluminium knob to sequence the lights naturally rather than using flashy flashing patterns. - What is the recommended method for hanging the lights?
The author settled on a bent section of PVC pipe hung from the ceiling with holes drilled for the cables. - Why did the author choose a white plastic moo card box for the switch enclosure?
The box was chosen because it fits well with the theme of the project.