“Sensor Retouch” touch sensitive interactive instrument
which allows to play Water, Fruit, Plants and Conductive surfaces as a musical instrument by your touch.
All you need is Arduino and few upgraded touch sensitive sensors, i’ll teach you how to put together everything and let start playing with your new interactive instrument ! A project by Giuseppe Sicurella 2015 Check out the Project and my websites Dharma Makers / Fab Lab Mazara Creative Common Attribution – NonCommercial – No Derivates 4.0 Based on a work of www.dharmadigilab.com Giuseppe Sicurella 2015
How Does it Works
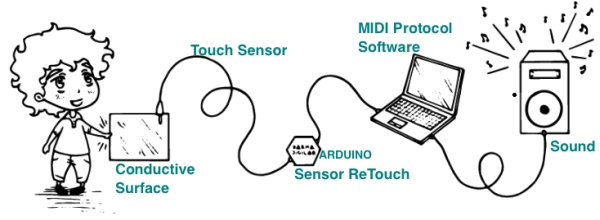
At the beginning of this project i’ve tried to figured out and image how a tactile sensor can be connect to any conductive surface at the same time sending MIDI NOTES thru Arduino USB connected to the software in order to be elaborated as sounds. I combined together very simple elements to create Sensor Retouch in order to allows you to play music touching fruits, water and conductive surfaces:
Things i’ve used for this project
- Arduino UNO R3
- Touch Sensitive Sensors upgraded
- MIDI Protocol –
- Laptop
These 4 elements combined together with the IDE CODE i’ve written allows to play sound from almost Everything around you like a Virtual Instrument by your touch.
Table of contents
- Assembly the Touch Sensor in 4 Moves
- Introduction
- Download software
- Software installation
- ReTouch configuration
- Technical specifications
- Troubleshooting
- How To Use Sensor ReTouch
- Sensor Retouch Water PIANO
- Sensor Retouch Veggie HARP
- Videos / Demo / Performance
Step 1: What Is a Touch Sensor
What is a Touch Sensor, is an electronic component that can detect touch, they operate as a switch when touched and are used in lamps, touch screens and other electronic supplies. At the beginning of this project i’ve tried to figured out and image how a tactile sensor can be connect to any conductive surface at the same time sending MIDI NOTES thru Arduino USB connected to the software in order to be elaborated as sounds. Unlike a button or other more manual control, touch sensors are more sensitive, and are often able to respond differently to different kinds of touch, that’s why i’ve upgraded the sensors in order to be more reactive. For this project you need to assembly 6 touch sensors i’ll teach you how.
Step 2: Things Required
For this project, you need few electronics, and a couple tools.
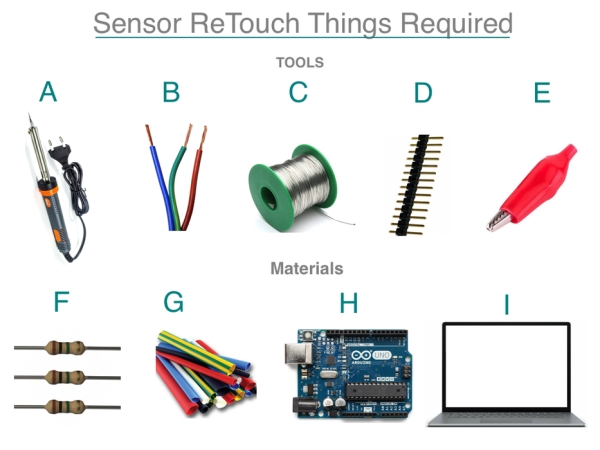
Tools
- A Tin welder
- B Copper wire (black&red type 3mm or 4 mm)
- C Tin Soldering Wire
- D Pin Strip
- E Alligator clips x6F 1 MΩ ohm Resistor x6
- G Heat shrink tube (5mm or 6mm)
Materials
- H Arduino UNO R3 or other models
- I Personal computer or Laptop / Software / IDE CODE
- Adicional USB Cable
Step 3: Assembly Touch Sensors in 4 Moves

Now weld together few components in order to assembly the Touch sensor using the tin welder
- first step weld together a single Black wire to the alligator clip.
- At the bottom of the Black wire weld together the Red wire and the 1M ohm resistor and pay attention to weld them together in a single point of the 1M ohm resistor as picture show.
- At the bottom of 1M ohm resistor weld a piece of Black wire.
- Once it’s done you need to soldering at the end of the red wire a tip of the pin strip and leave without any pin or soldering the black wire.
Basically the Black wire is the negative pole of the touch sensor and you have to connect it to the Ground PINof Arduino , the Red wire is the Positive Pole of the sensor and you have to connect it to the Analog INPUT PIN of Arduino .
Step 4: Your First Touch Sensor
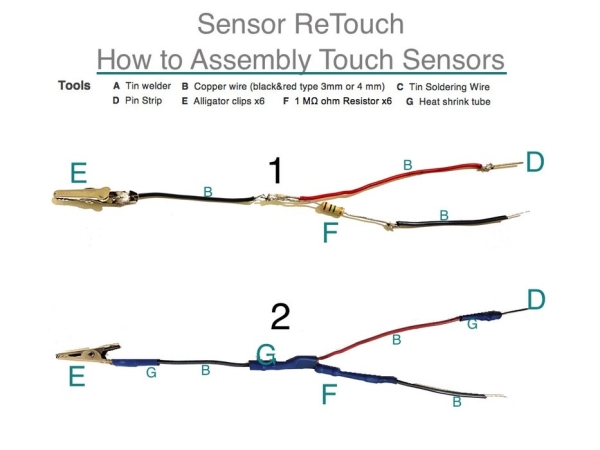
Now if you followed the instruction the Touch Sensor is ready and it should look like this as the Picture number 1. After you finish to weld together all components cover all the welded points with pieces of Heat shrink tube as the picture number 2 shows, in order to keep electrical contacts safe.
You can use different color wires for each sensor not to confuse you, pay attention to the size of each sensor I recommend you to use 2 meter long wire for each sensor in order to connect the sensor wherever you want far form the Arduino source. Remind about the wire size if is to short you can’t connect the sensor wherever you want, 2 meters is the ideal length .
Step 5: Before to Connect Touch Sensor to Sensor ReTouch 1
Last step before to connect all your touch sensors to Sensor Retouch Arduino is to weld together all the negative poles, to do that follow the passages below.
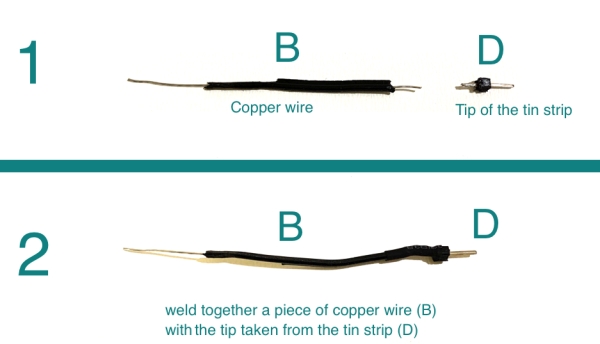
- First thing cut a piece of black wire (B) and get off a tip from the Tin Strip (D) as shows in figure 1,
- then weld together the piece of copper wire (B) with the tip taken from the Tin Strip (D) at the bottom as figure 2 shown
- then cover all the welded points with pieces of Heat shrink tube
Step 6: Before to Connect Touch Sensor to Sensor ReTouch 2
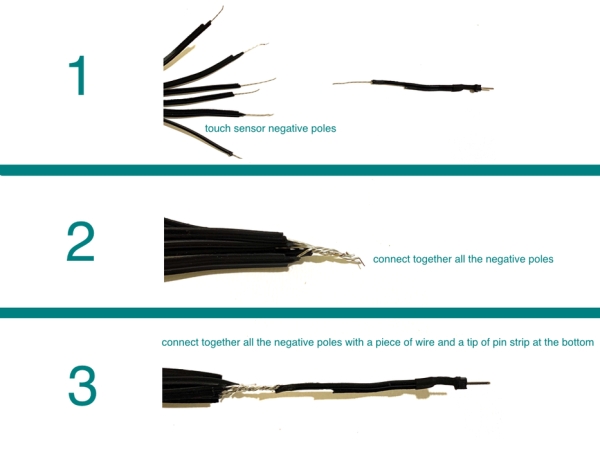
- Now you got all the touch sensor negative poles and the piece of black wire with the tip welded at the bottom previously done as figure 1 shown.
- Follow next passage shown in the picture number 2 and tangle all the negative poles together, once it’s done tangle and weld together all the negative pole with the piece of wire previously assembled as picture 3 show.
- Then cover all the welded points with pieces of Heat shrink tube, now Touch Sensors are ready to connect to “Sensor Retouch” Arduino Board.
Step 7: Connect to Arduino
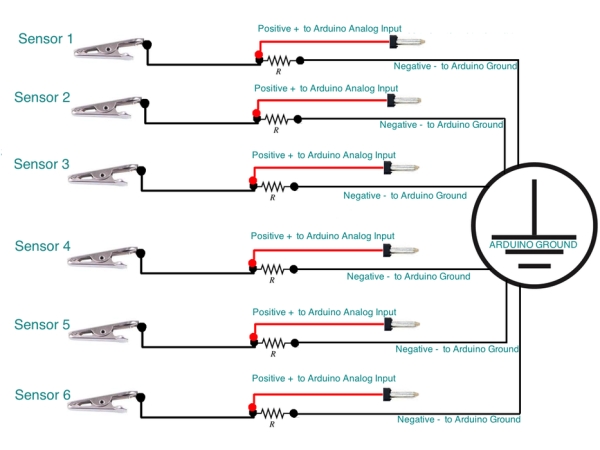
It’s time to connect Touch Sensors to Arduino, following the scheme here you got 6 touch sensor from 1 to 6, they have positive and negative poles as you seen in the picture, they actually have 6 independents +positive poles and a single one -negative result by welding up together all the negative poles previously, if you remind.
Step 8: Arduino I/O Connections Diagram
How to connect Touch Sensors to Arduino Board. It’s super easy
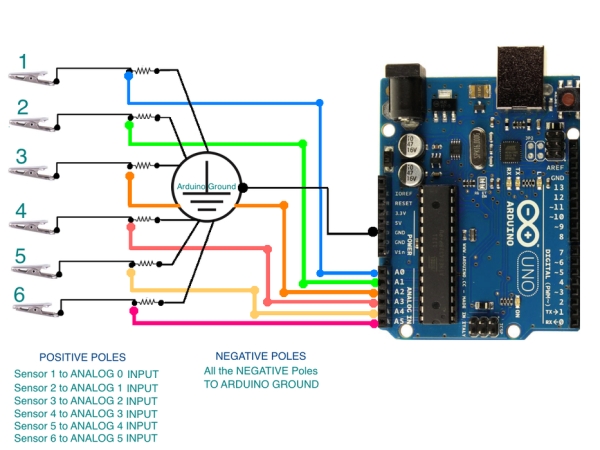
follow the instructions as the picture shown and connect like this:
POSITIVE POLES
- Sensor 1 To ARDUINO ANALOG INPUT 0
- Sensor 2 To ARDUINO ANALOG INPUT 1
- Sensor 3 To ARDUINO ANALOG INPUT 2
- Sensor 4 To ARDUINO ANALOG INPUT 3
- Sensor 5 To ARDUINO ANALOG INPUT 4
- Sensor 6 To ARDUINO ANALOG INPUT 5
NEGATIVE POLES
- Connect All the NEGATIVE POLES to the Arduino GROUND
Source: Touch Sensitive Interactive Music Instrument DIY / Windows Version