
Summary of HOMEBREW COIL WINDER MAKES TOROIDS A SNAP TO WIND
This article describes a DIY toroid coil winder built by [Sandeep] to automate the tedious process of hand-winding coils for ham radio chokes and transformers. The device uses an Arduino to control two stepper motors: one rotates the toroid form while another feeds wire from a spool through a slotted plywood ring, ensuring even winding distribution. Although tested with a plywood substitute instead of a ferrite core, the machine effectively solves manual winding challenges like uneven spacing and wire length miscalculations.
Parts used in the Toroid Coil Winder:
- Magnet wire
- Toroid core (or plywood ring as a stand-in)
- Plywood winding ring with a slit
- C-shaped fixture bracket
- Three rollers
- Two stepper motors
- Arduino controller
Anyone who has ever wound a toroidal coil by hand can tell you that it’s not exactly a fun job. Even with the kinds of coils used in chokes and transformers for ham radio, which generally have relatively few windings, passing all that wire through the toroid time after time is a pain. And woe unto anyone who guesses wrong on how much wire the job will take.
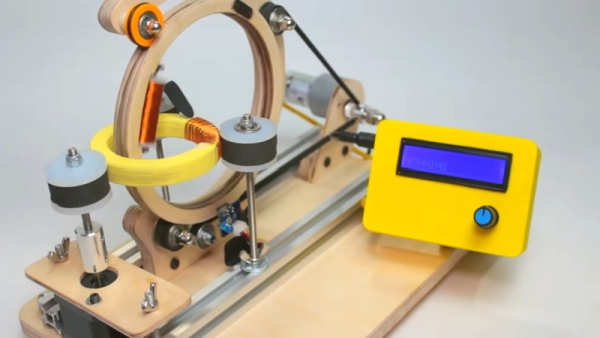
To solve those problems, [Sandeep] came up with this clever and effective toroid winder. The idea is to pass a small spool of magnet wire through the toroid’s core while simultaneously rotating the toroid to spread the windings out as evenly as possible. That obviously requires a winding ring that can be opened up to allow the toroid form to be inserted; [Sandeep] chose to make his winding ring out of plywood with a slit in it. Carrying the wire spool, the winding ring rotates on a C-shaped fixture that brackets the toroid, which itself rotates under stepper motor control on a trio of rollers. An Arduino controls the rotation of both motors, controlling the number of windings and their spread on the form. lacking a ferrite core for testing, [Sandeep] used a plywood ring as a stand-in, but the results are satisfying enough to make any manual coil-winder envious.
We love tools like this that make a boring job a snap. Whether it’s cutting wires for wiring harnesses or winding guitar pickups, tools like these are well worth the time spent to build them. But we suppose when it comes to toroid winding, one could always cheat.
Source: HOMEBREW COIL WINDER MAKES TOROIDS A SNAP TO WIND
-
How does the device ensure windings are spread evenly?
The machine simultaneously rotates the toroid form and passes a small spool of magnet wire through it. -
What material was used to construct the winding ring?
Sandeep chose to make the winding ring out of plywood with a slit in it. -
Which component controls the rotation of both motors?
An Arduino controls the rotation of both motors to manage the number of windings and their spread. -
Why is manually winding toroidal coils considered difficult?
It is not fun because passing wire through the toroid repeatedly is a pain and guessing the correct wire length is risky. -
What was used as a stand-in for testing since no ferrite core was available?
A plywood ring was used as a stand-in for the ferrite core during testing. -
How does the C-shaped fixture function in this build?
The C-shaped fixture brackets the toroid and allows the winding ring carrying the wire spool to rotate on it. -
What specific application were these coils originally intended for?
The coils described are generally used for chokes and transformers for ham radio.
