Summary of DIY Standalone Weather Station Powered by Arduino
This project describes a low-cost community weather station built with Arduino to gather local meteorological data. The team constructed a Stevenson screen, anemometer, and wind vane using plywood, PVC, and salvaged parts, and housed electronics in an SMPS enclosure. Sensors include temperature, pressure, humidity, IR rotation detection for the anemometer, and a magnetometer for wind direction. The design emphasizes simplicity, affordability, and deployability on a tripod for community-driven data collection.
Parts used in the Community Weather Station:
- Arduino Mega 2560 or Arduino Uno
- Arduino Ethernet Shield W5100
- DHT11 Temperature sensor
- BMP180 Pressure Sensor
- IR module (for anemometer rotation detection)
- HMC588L Magnetic Sensor (magnetometer)
- Ribbon Cable
- 9V DC adaptor (or equivalent power source)
- Wooden plank and plywood (for Stevenson screen)
- Iron tripod (for deployment)
- PVC pipe and fittings (1.5 m 2" PVC pipe, 2" T joint, 2" to 0.5" reducer, 0.5" PVC pipe, 0.5" L bend joints)
- Cups for anemometer
- Ball bearings and slip rings
- Old SMPS enclosure (for Arduino housing)
- Long Ethernet cable
- Fan (installed in enclosure)
- Various tools and miscellaneous electronics tools
Hello Makers out there
Again this is not a Step by step Instructable . Like always i forgot to take take snaps since the inception of this project.
The idea of Building a community weather station using Open hardware Kicked a long back. We people from a local DIY community build this weather station. In our country we don’t give importance to weather data apart from the days where we have heavy rain or cyclone. It’s always good to have weather data which could be accessed by local community.
We build this project with a desire to have more numbers of similar stations in and around our place. so that we will have huge amount of community owned data. We want to reduce the cost as much as possible and don’t want to include complex stuff in the project. We chose Arduino as our platform since we can make hardware that is cost effective as well as not much complex.
Step 1: Things You Need.
Electronics Stuff
- Arduino Mega 2560 or Arduino Uno
- Arduino Ethernet Shield W5100
- DHT11 Temperature sensor
- BMP180 Pressure Sensor
- IR module
- HMC588L Magnetic Sensor
- Ribbon Cable
- 9V DC adaptor( Any thing that can power your Arduino )
Other Hardware Stuff.
- Wooden plank and Plywood for Stevenson screen
- Iron Tripod( for deploying the station)
- PVC pipe and stuff
- Cups for Anemometer
- Ball bearings and slip rings
- Old SMPS enclosure
- long Ethernet cable. Very long 😛
Miscellaneous Stuff
- Have all the tools possible that you may use in your electonics project
Step 2: Hardware Part
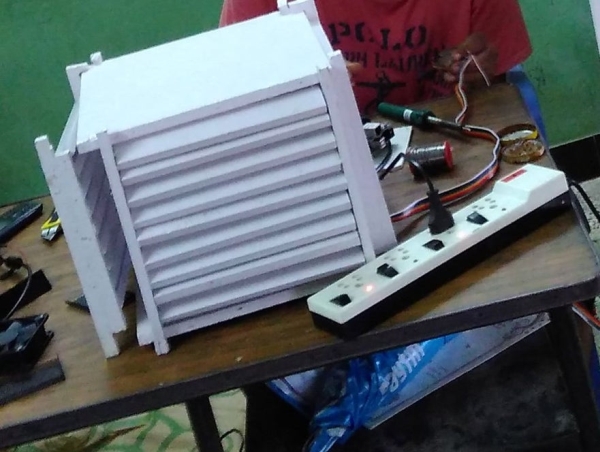
Stevenson Screen
We built the Stevenson screen. We used plywoods and wooden Planck. The dimension of our Steven Screen is and like most we painted it White.
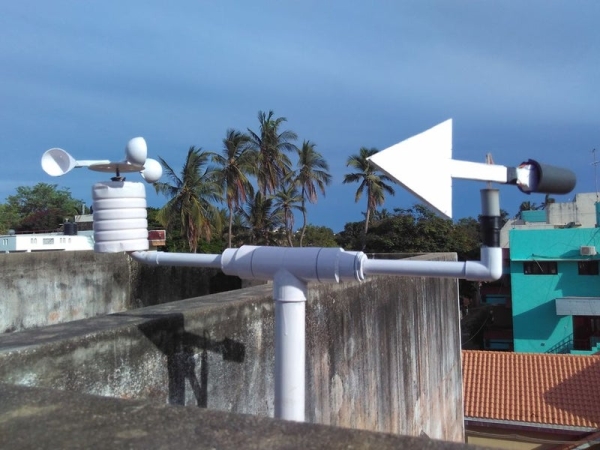
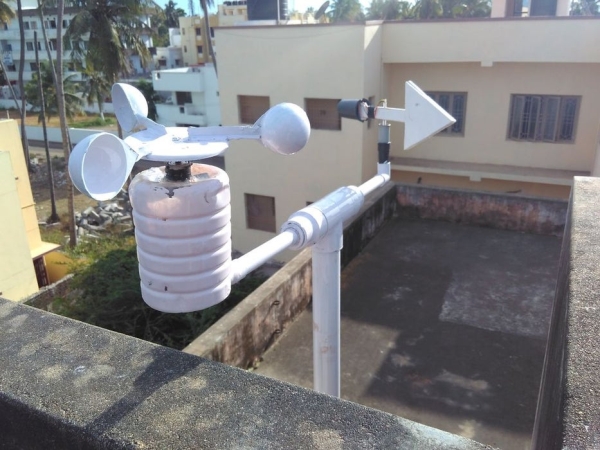
Anemometer and Wind-vane Mount
Our prototype used the following
- 1.5 M 2″ PVC pipe
- 2″ T joint
- 2″ to 0.5″ Reducer
- 0.5″ PVC pipe
- 0.5″ L bend Joint
- 0.5″ L bend small
For Mounting the PVC pipe we used a Old Tripod that we salvaged from an old Telescope. It was made of steel and i can apparently hold the station.
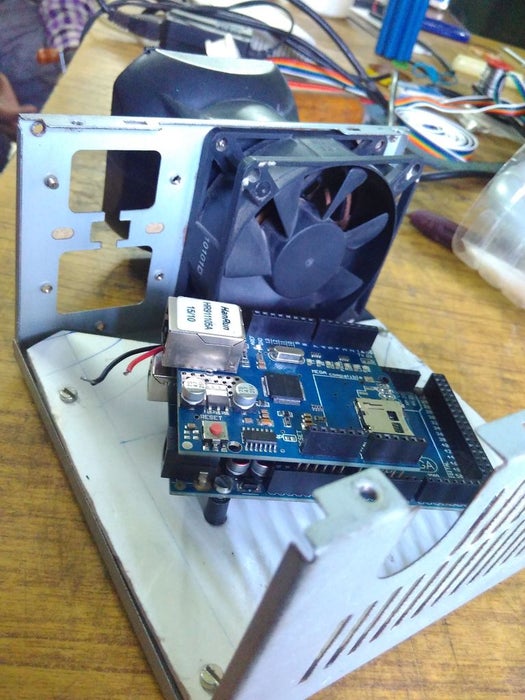
Metal Enclosure for Arduino
In order to place the Arduino with its W5100 Shield we used a SMPS enclosure. It has plenty of space inside it. We just added a Fan to make it look even cooler.
Step 3: Anemometer and Wind Vane
Anemometer
The anemometer was build using Plastic cups they are attached to a plastic pipe which inturn connected to a slip ring and a plastic ring. It is painted black and white to detect the rotation. An IR sensor is connected in place to detect each rotation. A simple Rotatory Encoder.
Wind vane
The designed vane is attached to a small plastic pipe which is also attached to a slip ring. the magnetometer sensor is attached at the tail and wires are inserted into the plastic pipe.
Both the module are placed into the L bend and wired through the PVC pipe to reach the Arduino Mega.
Read more: DIY Standalone Weather Station Powered by Arduino
- What microcontroller platform was used for the weather station?
The project used Arduino, either Arduino Mega 2560 or Arduino Uno. - How is network connectivity provided for data access?
An Arduino Ethernet Shield W5100 is used for network connectivity. - Which sensors measure temperature, humidity, and pressure?
The DHT11 measures temperature and humidity, and the BMP180 measures pressure. - How is wind speed detected in the anemometer?
An IR module detects rotations of cup assemblies acting as a rotary encoder to measure wind speed. - How is wind direction measured?
A HMC588L magnetometer sensor is used for wind vane direction sensing. - What materials were used to build the Stevenson screen?
The Stevenson screen was built from plywood and wooden planks and painted white. - How are the sensors and electronics housed?
Electronics including Arduino and W5100 shield are housed in an old SMPS enclosure with a fan added. - How is the station mounted for deployment?
The station is mounted on an iron tripod salvaged from an old telescope. - How are the anemometer and wind vane routed to the Arduino?
Both modules are placed in PVC L bends and wired through PVC pipe down to the Arduino. - What components were emphasized to keep the project low cost?
The design emphasizes use of Arduino, salvaged parts (tripod, SMPS enclosure), PVC, plywood, and simple sensors to reduce cost and complexity.