Summary of Arduino Stopwatch Code
This article details an Arduino project to build a digital stopwatch using a 16×2 LCD display and a push-button switch. The system measures elapsed time in minutes, seconds, and hundredths of a second, displaying the data on the screen while blinking an LED during operation. Users can start and stop the timer by pressing the button connected to pin 2.
Parts used in the Arduino Stopwatch:
- 1x 16×2 parallel LCD display (compatible with Hitachi HD44780 driver)
- 1x Arduino
- 1x 10kΩ potentiometer
- 1x 10kΩ resistor
- 1x switch
- Jumper wire
Arduino projects, running stopwatch on arduino.

Arduino projects, running stopwatch on arduino.
Parts List;
1) 1x 16×2 parallel LCD display (compatible with Hitachi HD44780 driver)
2) 1x Arduino
3) 1x 10kΩ potentiometer
4) 1x 10kΩ resistor
5) 1x switch
6) Jumper wire
Instruction;
1) Connect all jumper wire as shown in diagram.
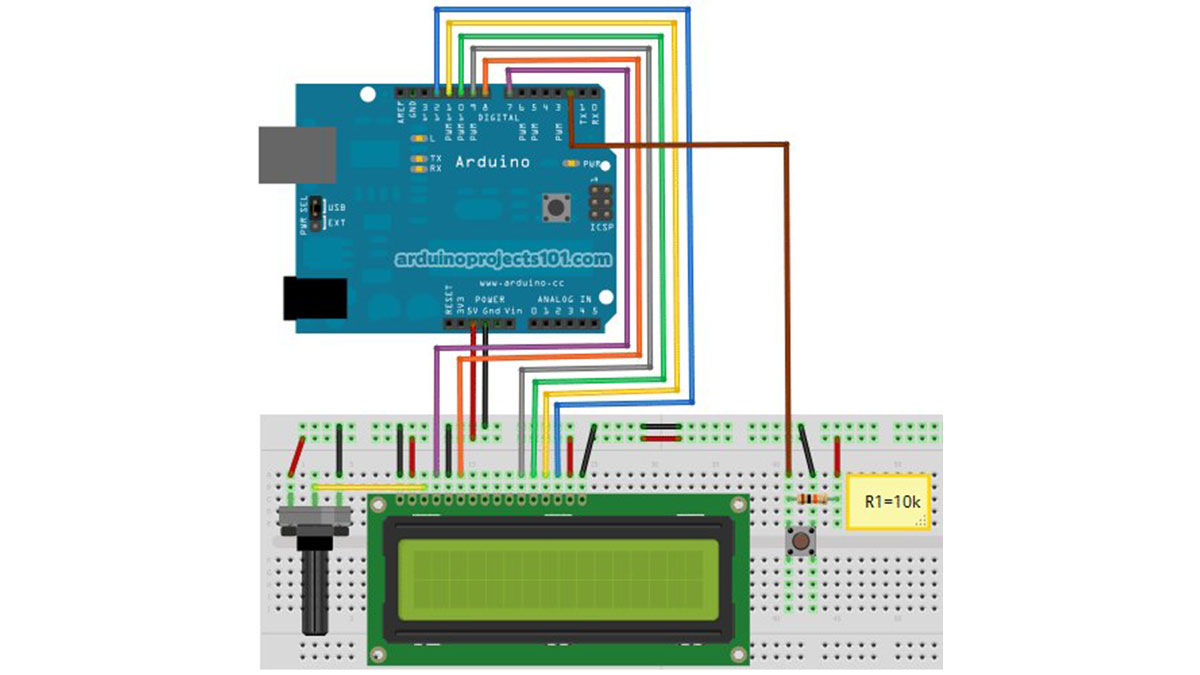
2) Connect digital input from switch to digital pin 2.
Upload this code to your arduino
/*
  Stopwatch
  Run stopwatch with arduino.

  Code based on: http://danthompsonsblog.blogspot.com/2008/11/timecode-based-stopwatch.html
  Coded by: arduinoprojects101.com
*/

// include the library code:
#include <LiquidCrystal.h>

// initialize the library with the numbers of the interface pins
LiquidCrystal lcd(7, 8, 9, 10, 11, 12);

int ledPin = 13;                    // LED connected to digital pin 13
int buttonPin = 2;                  // button on pin 2

int value = LOW;                    // previous value of the LED
int buttonState;                    // variable to store button state
int lastButtonState;                // variable to store last button state
int blinking;                       // condition for blinking - timer is timing
int frameRate = 100;                // the frame rate (frames per second) at which the stopwatch runs - Change to suit
long interval = (1000/frameRate);   // blink interval
long previousMillis = 0;            // variable to store last time LED was updated
long startTime ;                    // start time for stop watch
long elapsedTime ;                  // elapsed time for stop watch
int fractional;                     // variable used to store fractional part of Frames
int fractionalSecs;                 // variable used to store fractional part of Seconds
int fractionalMins;                 // variable used to store fractional part of Minutes
int elapsedFrames;                  // elapsed frames for stop watch
int elapsedSeconds;                 // elapsed seconds for stop watch
int elapsedMinutes;                 // elapsed Minutes for stop watch
char buf[10];                       // string buffer for itoa function

void setup()
{
  lcd.begin(16, 2);                // intialise the LCD.
  pinMode(ledPin, OUTPUT);         // sets the digital pin as output
  pinMode(buttonPin, INPUT);       // not really necessary, pins default to INPUT anyway
  digitalWrite(buttonPin, HIGH);   // turn on pullup resistors. Wire button so that press shorts pin to ground.
}

void loop(){
  digitalWrite(ledPin, LOW);            // Initiate LED and Step Pin States

  buttonState = digitalRead(buttonPin); // Check for button press, read the button state and store

// check for a high to low transition if true then found a new button press while clock is not running - start the clock
   if (buttonState == LOW && lastButtonState == HIGH  &&  blinking == false){
    startTime = millis();                               // store the start time
      blinking = true;                                  // turn on blinking while timing
      delay(10);                                         // short delay to debounce switch
      lastButtonState = buttonState;                    // store buttonState in lastButtonState, to compare next time
   }

// check for a high to low transition if true then found a new button press while clock is running - stop the clock and report
   else if (buttonState == LOW && lastButtonState == HIGH && blinking == true){
   blinking = false;                                    // turn off blinking, all done timing
   lastButtonState = buttonState;                       // store buttonState in lastButtonState, to compare next time

// Routine to report elapsed time
   elapsedTime =   millis() - startTime;                // store elapsed time
   elapsedMinutes = (elapsedTime / 60000L);
   elapsedSeconds = (elapsedTime / 1000L);              // divide by 1000 to convert to seconds - then cast to an int to print
   elapsedFrames = (elapsedTime / interval);            // divide by 100 to convert to 1/100 of a second - then cast to an int to print
   fractional = (int)(elapsedFrames % frameRate);       // use modulo operator to get fractional part of 100 Seconds
   fractionalSecs = (int)(elapsedSeconds % 60L);        // use modulo operator to get fractional part of 60 Seconds
   fractionalMins = (int)(elapsedMinutes % 60L);        // use modulo operator to get fractional part of 60 Minutes
   lcd.clear();                                         // clear the LDC

 if (fractionalMins < 10){                            // pad in leading zeros
      lcd.print("0");                                 // add a zero
      }

    lcd.print(itoa(fractionalMins, buf, 10));       // convert the int to a string and print a fractional part of 60 Minutes to the LCD
      lcd.print(":");                                 //print a colan.

 if (fractionalSecs < 10){                            // pad in leading zeros
      lcd.print("0");                                 // add a zero
      }

 lcd.print(itoa(fractionalSecs, buf, 10));          // convert the int to a string and print a fractional part of 60 Seconds to the LCD
   lcd.print(":");                                    //print a colan.

 if (fractional < 10){                                // pad in leading zeros
      lcd.print("0");                                 // add a zero
      }

 lcd.print(itoa(fractional, buf, 10));              // convert the int to a string and print a fractional part of 25 Frames to the LCD
   }

 else{
      lastButtonState = buttonState;                  // store buttonState in lastButtonState, to compare next time
   }

// run commands at the specified time interval
// blink routine - blink the LED while timing
// check to see if it's time to blink the LED; that is, the difference
// between the current time and last time we blinked the LED is larger than
// the interval at which we want to blink the LED.

 if ( (millis() - previousMillis > interval) ) {

    if (blinking == true){
       previousMillis = millis();                    // remember the last time we blinked the LED

       digitalWrite(ledPin, HIGH);                   // Pulse the LED for Visual Feedback

       elapsedTime =   millis() - startTime;         // store elapsed time
         elapsedMinutes = (elapsedTime / 60000L);      // divide by 60000 to convert to minutes - then cast to an int to print
         elapsedSeconds = (elapsedTime / 1000L);       // divide by 1000 to convert to seconds - then cast to an int to print
         elapsedFrames = (elapsedTime / interval);     // divide by 40 to convert to 1/25 of a second - then cast to an int to print
         fractional = (int)(elapsedFrames % frameRate);// use modulo operator to get fractional part of 25 Frames
         fractionalSecs = (int)(elapsedSeconds % 60L); // use modulo operator to get fractional part of 60 Seconds
         fractionalMins = (int)(elapsedMinutes % 60L); // use modulo operator to get fractional part of 60 Minutes
         lcd.clear();                                  // clear the LDC
Source : Arduino Stopwatch Code
- What components are required for this Arduino stopwatch project?
The project requires a 16×2 parallel LCD display compatible with Hitachi HD44780, an Arduino board, a 10kΩ potentiometer, a 10kΩ resistor, a switch, and jumper wires. - How do I connect the switch to the Arduino?
You must connect the digital input from the switch to digital pin 2 on the Arduino. - Can I change the frame rate of the stopwatch?
Yes, you can adjust the frameRate variable in the code to suit your needs, which defaults to 100 frames per second. - Does the LED blink while the stopwatch is running?
Yes, the LED connected to digital pin 13 blinks to provide visual feedback while the clock is timing. - How does the code calculate the elapsed time?
The code calculates elapsed time by subtracting the startTime from the current millis() value and converting the result into minutes, seconds, and frames. - What happens when I press the button to stop the timer?
Pressing the button stops the blinking, sets the blinking condition to false, and reports the final elapsed time on the LCD. - Which library is included to control the display?
The code includes the LiquidCrystal library to initialize and manage the LCD interface. - Why is a pullup resistor enabled for the button pin?
The code enables the internal pullup resistors so that pressing the button shorts the pin to ground to register a low signal.