
Summary of 3 wires interface for LCD display using Arduino
This project uses a shift register to drive a standard 4-bit LCD using only three Arduino pins, providing a low-cost alternative to serial LCD modules. It includes wiring guidance, breadboard photos, and references to drivers: an updated NewLiquidCrystal driver by Marc Merlin and original historical libraries (with IDE 1.0 compatibility notes). The design can be implemented on a single-sided PCB with a contrast potentiometer. Historical code and libraries are provided but may require modifications to work with newer Arduino IDEs.
Parts used in the 3-wire LCD project:
- Arduino (any compatible board)
- Character LCD module (HD44780-compatible)
- Shift register (for example 74HC595)
- Potentiometer (variable resistor for LCD contrast)
- Breadboard
- Jumper wires
- USB power source or USB-powered board
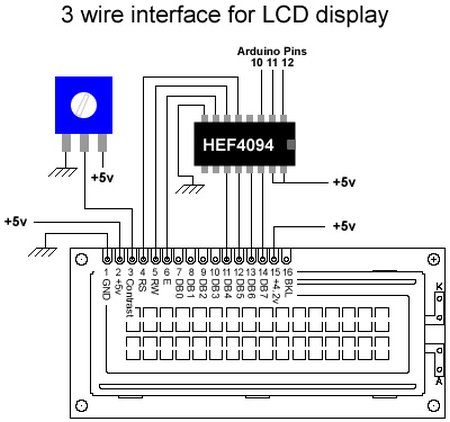
This post is based on the work made previously by tomek in wiring LCD displays using 4 bits. The basic idea is to group the 7 pins that are needed to drive the LCD in only 3 using a shift register. This is a cheap alternative to serial LCDs.
The schematic shows that wiring the LCD is a simple operation. It has been drawn in a way that makes it possible to develop this as part of a single sided PCB including a variable resistor to control the LCD’s contrast. Note that the pin-out of the LCD module may differ slightly from the pin-out depicted; some LCD modules have pins 15 and 16 on the left side, before pin 1.

In this picture we see the actual connections on a breadboard. Everything runs on the power from the USB powered board.
NewLiquidCrystal Code
As part of the Arduino Miniconf at linux.conf.au 2012, freetronics released the pebble v2 with identical Shift Register wiring than this page, and Attendee Marc MERLIN wrote a NewLiquidCrystal driver for this hardware: http://marc.merlins.org/perso/arduino/post_2012-01-23_LiquidCrystal-driver-support-LCD3Wire-hardware-_pebble-and-others_.html
This driver should work for all LCD3Wires based hardware, and was based on the excellent work from Francisco Malpartida who modified the original LiquidCrystal library to provide support for different hardware drivers. His work is available here: https://bitbucket.org/fmalpartida/new-liquidcrystal/wiki/Home . This is the work Marc based his driver on to provide full LiquidCrystal support to LCD3Wires hardware by writing LiquidCrystal_SR_LCD3.cpp.
Original (obsolete) code
Below is the original code originally written to talk to this hardware setup. It does not work out of the box with arduino 1.0, and the library is much less featureful than LiquidCrystal. It is left here for historical purposes.
The code below includes a couple of functions that will print integer numbers to the LCD, as well as single characters.
Also available is a library: Attach:LCD3WireLibrary.zip. To remain command-compatible with the LCD4BitLibrary, this library does not contain the number-formatting code which is included in the code below.
An updated version of the library (Attach:LCD3WireLibrary.0.2.zip) inherits from the Print class, giving an improved print() function.
Note: these libraries aren’t compatible with IDE 1.0 – you will get compiling errors.
To get the original version working on IDE 1.0 you have to copy/paste WConstants.h and wiring.h from IDE 0023 into arduino-1.0\hardware\arduino\cores\arduino
To get the 0.2 version working on IDE 1.0 do the same thing as above and then make the following changes in the LCD3WireLibrary.h and LCD3WireLibrary.cpp files:
In the header file change “virtual void write(uint8_t);” to “virtual size_t write(uint8_t);”
LCD
For more detail: 3 wires interface for LCD display using Arduino
- How does this project reduce the number of Arduino pins needed for an LCD?
By grouping the seven LCD control/data pins through a shift register, the LCD is driven using only three Arduino pins. - Can this design be implemented on a single-sided PCB?
Yes, the schematic is drawn to allow development as part of a single-sided PCB including a variable resistor for contrast. - Does the project provide driver software for Arduino IDE 1.0 and later?
An updated NewLiquidCrystal driver by Marc Merlin supports LCD3Wires hardware; original libraries are historical and require modifications to work with IDE 1.0. - What must be changed to get the original LCD3WireLibrary working in Arduino IDE 1.0?
Copy WConstants.h and wiring.h from IDE 0023 into arduino-1.0hardwarearduinocoresarduino. - How do I get the LCD3WireLibrary 0.2 version working on IDE 1.0?
Copy WConstants.h and wiring.h from IDE 0023 into the cores folder and change virtual void write(uint8_t); to virtual size_t write(uint8_t); in the header file. - What driver did Marc Merlin write for this hardware?
Marc Merlin wrote a NewLiquidCrystal driver file named LiquidCrystal_SR_LCD3.cpp to support LCD3Wires hardware. - Are the original libraries feature-complete compared to LiquidCrystal?
No, the original code and libraries are less featureful than LiquidCrystal; some versions omitted number-formatting to remain command-compatible. - What power source is shown in the breadboard example?
The breadboard example runs on power from a USB powered board.