
Summary of Ultrasonic Blind Walking Stick Using Arduino
This article describes an "Ultrasonic Blind Walking Stick" designed to assist blind individuals in navigating independently. The device uses an ultrasonic sensor to detect obstacles, emitting a buzzer alarm with a frequency inversely proportional to the distance of the obstruction. Powered by a 9-volt battery and controlled by an Arduino Nano, the system calculates object distance based on sound wave echo time.
Parts used in the Ultrasonic Blind Walking Stick:
- Arduno Nano
- Ultrasonic sensor
- Buzzer
- 9-volt battery
- DPDT switch
- Eagle (software for circuit design)
- Breadboard or zero PCB
Ultrasonic Blind Walking Stick
According to the WHO, about 30 million people are estimated to be permanently blind worldwide. These people are totally dependent on others. They even cannot walk on their own. We have created designed and built an “Ultrasonic Blind Walking Stick” device which will help blind people to walk with ease independently. As a simpler version, we have used only one ultrasonic sensor in this project. For better accuracy and assistance two or three sensors can be used.
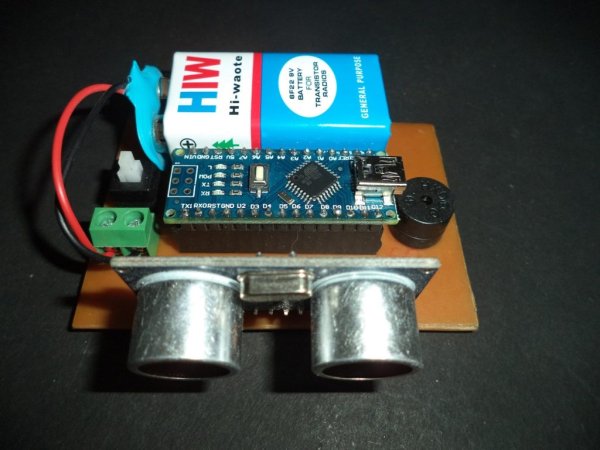
The main objective of this project is to help blind people to walk with ease and to be warned whenever their walking path is obstructed with other objects, people or other similar odds. As a warning signal, a buzzer is connected in the circuit, whose frequency of beep changes according to the distance of object. The closer the distance of obstruction, the more will be the buzzer beep frequency. We can say that the beep frequency is inversely proportional to the distance.
The main component used for this device is the ultrasonic sensor. The ultrasonic sensor transmits a high frequency sound pulse and then calculates the time to receive the signal of the sound echo to reflect back. The sensor has 2 circles. One of them acts as the transmitter and transmits the ultrasonic waves. The other one acts as a receiver (mostly a small microphone) and receives the echoed sound signal. The sensor is calibrated according to the speed of the sound in air. With this calibrated input, the time difference between the transmission and reception of sound pulse is determined to calculate the distance of the object. This circuit is powered by a 9-volt battery through a switch.
Circuit
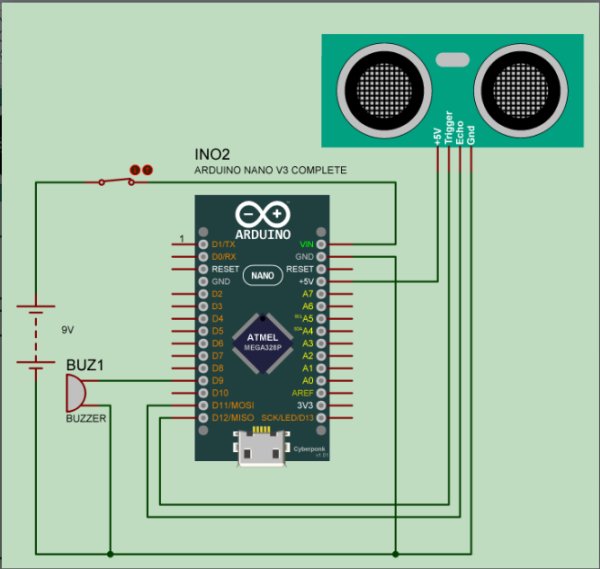
In the circuit an Arduino Nano is used as the platform. Ultrasonic sensor is connected to Arduino. The ultrasonic sensor has 4 pins –
- Vcc or 5 volt which is connected to 5 volt pin of Arduino
- Trigger which is connected to D12 pin of Arduino
- Echo pin is connected to D11 pin of Arduino
- Ground which is connected to GND pin of Arduino.
Positive terminal of 9-volt battery is connected to Vin pin of Arduino through a DPDT switch and the negative terminal is connected to GND pin of Arduino. A buzzer is connected between D9 pin of Arduino and GND pin.
The whole project has been designed on Eagle. The same circuit prototype can be made using a breadboard or zero PCB. The circuit diagram and PCB design are given below.
Working
As shown in diagrams there are two openings in Ultrasonic sensor first is transmitter (or Trigger) and second is receiver (or Echo).
Ultrasonic sensor sends high frequency pulses, these pulses reflects from object and takes as Echo, time between echo and Trig is measured by the microcontroller or Arduino which is directly proportional to distance.
The speed of sound is 341 meter per second in the air, and the distance between sensor and object is equal to time multiplied by speed of sound divided by two.
Read more: Ultrasonic Blind Walking Stick Using Arduino
- How does the device warn users of obstacles?
The device uses a buzzer whose beep frequency changes according to the distance of the object; closer objects result in a higher beep frequency. - What is the main objective of this project?
The main objective is to help blind people walk with ease and be warned whenever their walking path is obstructed by objects or people. - How does the ultrasonic sensor calculate distance?
The sensor transmits high-frequency sound pulses and measures the time difference between transmission and reception of the echo to calculate distance. - Can the accuracy of the device be improved?
Yes, while one sensor is used in this simpler version, two or three sensors can be used for better accuracy and assistance. - What power source is used for the circuit?
The circuit is powered by a 9-volt battery connected through a DPDT switch. - Which pins connect the ultrasonic sensor to the Arduino Nano?
Vcc connects to 5 volt, Trigger to D12, Echo to D11, and Ground to GND. - Does the buzzer frequency increase or decrease as the object gets closer?
The buzzer beep frequency increases as the distance of the obstruction decreases. - What software was used to design the circuit?
The whole project was designed using Eagle software.
