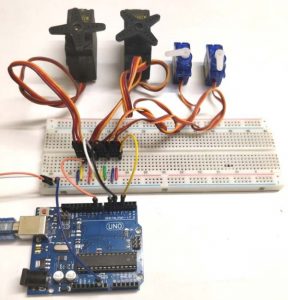
Using one or two Servo with Arduino is Easy but what if we want to use more than one Servo Motors?
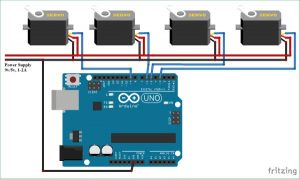
Here, we are going to show you that how to control Multiple Servo Motors with Arduino. Connecting multiple Servo Motors with Arduino seems to be easy and but if we connect all the Servos to Arduino supply pins then they won’t work correctly because of lack of enough current to drive all the motors. So you have to use separate power supply for the motors, either it be from some adapters (5v 2A) or from good quality 9v batteries.
Material Required
- Arduino UNO
- Servo Motor
- Power Supply
- Breadboard
- Connecting Wires
Circuit Diagram
What is a Servo Motor?
Before going into detail, first we should know about Servo Motors.
Servo motors are available at different shapes and sizes. A servo motor will have mainly there wires, one is for positive voltage another is for ground and last one is for position setting. The RED wire is connected to power, Black wire is connected to ground and YELLOW wire is connected to signal.
A servo motor is a combination of DC motor, position control system, gears. The position of the shaft of the DC motor is adjusted by the control electronics in the servo, based on the duty ratio of the PWM signal the SIGNAL pin.
Simply speaking the control electronics adjust shaft position by controlling DC motor. This data regarding position of shaft is sent through the SIGNAL pin. The position data to the control should be sent in the form of PWM signal through the Signal pin of servo motor.
The frequency of PWM (Pulse Width Modulated) signal can vary based on type of servo motor. The important thing here is the DUTY RATIO of the PWM signal. Based on this DUTY RATION the control electronics adjust the shaft.
As shown in figure below, for the shaft to be moved to 9o clock the TURN ON RATION must be 1/18.ie. 1ms of ON time and 17ms of OFF time in a 18ms signal.
Read more: Controlling Multiple Servo Motors with Arduino


