
Summary of Obstacle Detection Using 4Duino
This project builds a 4Duino-based robot car that moves in straight lines and avoids obstacles using four ultrasonic sensors. Upon detecting an obstacle, the car turns left or right; if blocked on both sides, it reverses. If objects surround all four directions, the car stops. The system is programmed via Workshop 4 and powered by a 5V supply connected through a µUSB cable.
Parts used in the Obstacle Detection Robot Car:
- 4Duino
- 2 Motors
- Motor Driver
- 4 Ultrasonic Sensors
- µUSB cable
- 5 Volts Power Supply
In this project, we will use several ultrasonic sensors to create a robot car with obstacle detection feature. The sensors will help us estimate the distance of the car from the nearby obstacles. Thus allowing us to create routines that we can execute when the car is about to hit the obstacle while moving. If you want to know more on how an ultrasonic sensor work, please refer to 4Duino Ultrasonic Sensor project documentation. This project makes a robot car move in a straight line unless it detects an obstacle. If an obstacle have been detected, the robot car will simply try to avoid it by turning left or right. In case, there are obstacle present in the left and right, the robot will instead move back. If it detects an object in all four directions, it will stop.
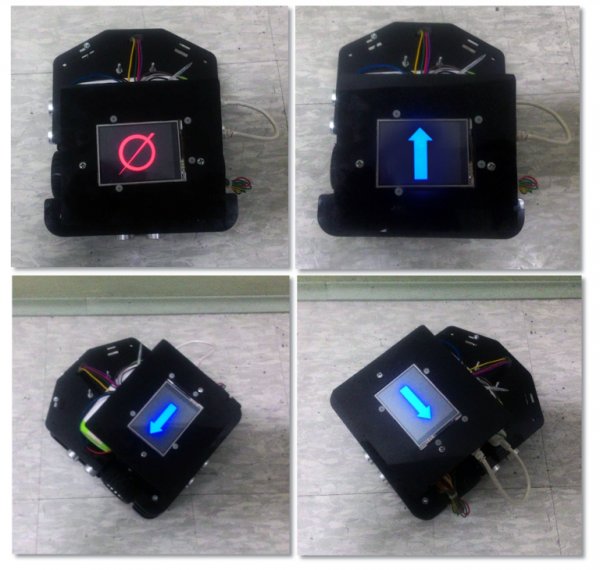
How it works
Components
- 4Duino
- 2 Motors
- Motor Driver
- 4 Ultrasonic Sensors
- µUSB cable
- 5 Volts Power Supply
Implementation
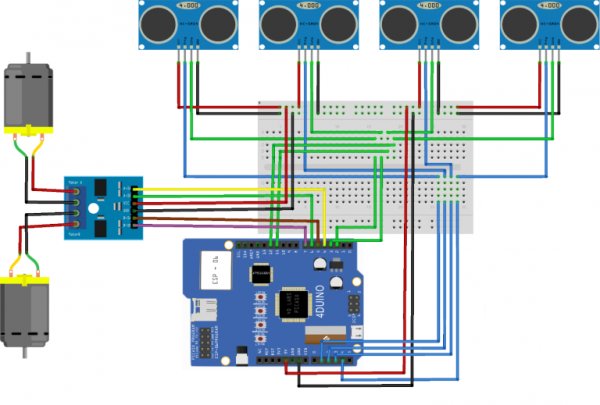
Step 1: Build
Build the circuit as shown in the following diagram and table.
Step 2: Program
Workshop 4 – 4Duino Basic Graphics environment is used to program this project.
This project requires the Arduino IDE to be installed as Workshop calls the Arduino IDE for compiling the Arduino sketches. The Arduino IDE however is not required to be opened or modified to program the 4Duino.
Open this file using Workshop 4.
Note: Download the code here.
Step 3: Comms Port
Connect the 4Duino to the PC using µUSB cable.
Then navigate to the Comms tab and select the Comms port to which the 4Duino connected.
Step 4: Compile and Upload
Go back to “Home” tab. This time, click on the “Comp’nLoad” button.
After uploading, 4Duino will start moving as soon as it detects a display touch.
Step 5: Connect Power Supply
Finally, connect a 5 Volts power supply via µUSB.
Read more: Obstacle Detection Using 4Duino
- How does the robot move when no obstacle is detected?
The robot car moves in a straight line. - What happens if an obstacle is detected on one side?
The robot car tries to avoid it by turning left or right. - Does the car stop if obstacles are present in all four directions?
Yes, it will stop if it detects an object in all four directions. - What action does the robot take if obstacles are on both the left and right?
The robot will instead move back. - Can I modify the Arduino IDE directly for this project?
No, the Arduino IDE is not required to be opened or modified to program the 4Duino. - Which software environment is used to program this project?
Workshop 4 – 4Duino Basic Graphics environment is used. - How do you connect the 4Duino to the PC?
Connect the 4Duino to the PC using a µUSB cable. - What voltage power supply is required for the final step?
A 5 Volts power supply is required. - When does the 4Duino start moving after uploading code?
It starts moving as soon as it detects a display touch. - Where can I learn more about how ultrasonic sensors work?
You can refer to the 4Duino Ultrasonic Sensor project documentation.
