
Summary of Weather Widget using ESP8266
This article details a DIY weather widget built with an ESP8266 module that fetches localized data from Weather Underground via Wi-Fi and displays it on a 128×64 OLED screen. The device shows current time, date, temperature, pressure, humidity, rainfall, and a three-day forecast.
Parts used in the Weather Widget:
- ESP8266 -01
- NodeMCU ESP8266-12 (Optional)
- OLED Display
- Voltage Regulator AMS1117
- Tactile Switch
- Slide Switch
- Resistors (10K and 330R)
- Female Double Row Straight Pin Header
- Male Double Row Right Angle Pin Header
- Jumper Wires
- Prototype Board
deba168‘s new instructable is a weather widget: “an application that can be downloaded on your PC, laptop or a mobile device and perform the job of providing easy access to weather information”
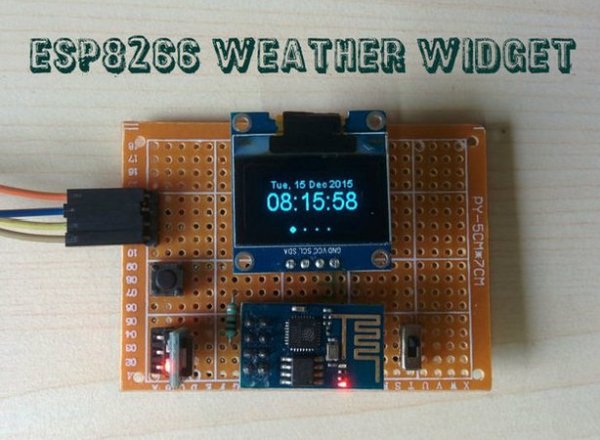
It’s an ESP8266 based weather display unit which retrieves localized weather information from http://www.wunderground.com by WLAN and displays it on a 128×64 OLED display. It displays the current time with date, some weather information like temperature, pressure, humidity and rainfall, and finally the forecasting for the next 3 days.
Check this demo video:
deba168‘s new instructable is a weather widget: “an application that can be downloaded on your PC, laptop or a mobile device and perform the job of providing easy access to weather information”
It’s an ESP8266 based weather display unit which retrieves localized weather information from http://www.wunderground.com by WLAN and displays it on a 128×64 OLED display. It displays the current time with date, some weather information like temperature, pressure, humidity and rainfall, and finally the forecasting for the next 3 days.
Check this demo video:
In order to build this project you need the following parts:
- ESP8266 -01 (eBay )
- Optional NodeMCU ESP8266-12 ( eBay )
- OLED Display (eBay )
- Voltage Regulator AMS1117 ( eBay )
- Tactile Switch (eBay )
- Slide Switch ( eBay )
- Resistors ( 10K and 330R )
- Female Double Row Straight Pin Header ( eBay )
- Male Double Row Right Angle Pin Header ( eBay )
- Jumper Wires ( eBay )
- Prototype Board ( eBay )
You can build the circuit as per the design below on a prototype board or a PCB:
For programming you have to use these files:
Arduino Code: ESP8266 Weather Station
Libraries : Json Streaming Parser, ESP8266 Oled Driver for SSD1306 display
The project’s maker advises you to follow his steps in the code inside this zip file to avoid any problems in compiling.
For obtaining data from the Weather Underground , you need to get an API key through signing up in the website and purchasing one. Once you clarify that you won’t use it for commercial use, you won’t be asked for any pay methods.
To make sure that the code will work correctly, you have to change the following things.
- Enter the Wunderground API Key
- Enter your Wifi credentials
- Adjust the location according to Wunderground API
- Adjust UTC offset
The final step will be programming the ESP8266 module using FTDI programmer.
Read more: Weather Widget using ESP8266
-
What does the weather widget display?
It displays current time with date, temperature, pressure, humidity, rainfall, and forecasting for the next 3 days. -
How does the device retrieve weather information?
It retrieves localized weather information from http://www.wunderground.com by WLAN. -
Which libraries are required for programming?
The project requires Json Streaming Parser and ESP8266 Oled Driver for SSD1306 display. -
Do I need to pay for the Weather Underground API key?
No payment method is asked if you clarify that you will not use the API for commercial use. -
What credentials must be changed in the code?
You must enter the Wunderground API Key, Wifi credentials, adjust the location according to the API, and adjust the UTC offset. -
How is the ESP8266 module programmed?
The final step involves programming the ESP8266 module using an FTDI programmer.
