
Summary of DIY USB power bank from laptop battery
The author repurposes an old Lenovo laptop battery into a DIY USB power bank. The project involves disassembling the battery to identify three packs of parallel 18650 cells, verifying their health, and connecting them in parallel. The build utilizes a T4056 charging circuit for safe charging and load protection, paired with a USB boost converter to output 5 Volts. An improved version includes a self-activating converter and an LED status indicator housed in a custom casing.
Parts used in the DIY USB Power Bank:
- Old Lenovo laptop battery
- Six 18650 Lithium 2200 mAh cells (three double packs)
- T4056 charging circuit board with power output control
- USB boost converter with power status LED
- Toggle switch
- Homemade housing
A situation many can relate to: an empty smartphone battery and no outlet around! That’s exactly why I recycled an old laptop battery into an USB power bank.
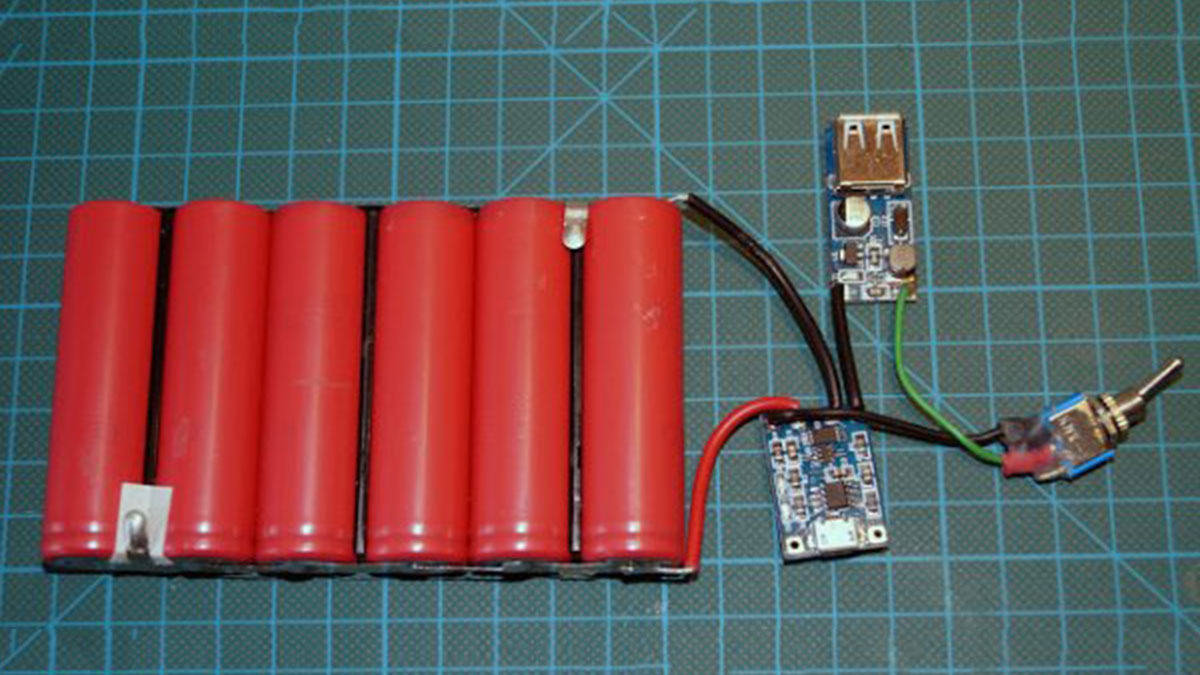
Follow the link for the full article with close ups of the electronics and insights into the building process.
This article will show you the basic powerbank circuit consisting of Lithium cell charging circuit, boost converter and toggle switch as well as my improved version with self activating boost converter and LED status indicator and homemade housing.
It all started with an old Lenovo laptop battery. I carefully pried it open to examine the cells. Three packs of two parallel 18650 Lithium 2200 mAh cells were connected in series.
According to some internet research about these cells, one should be able to use all three of these packs in parallel, as long as all the individual packs of two have intact cells.
Simply measuring their voltage, carefully charging them under controlled conditions and checking if they hold their charge for quite some time determined all cells were still fine.
That means I will solder the three double packs in parallel for my USB powerbank. One can also just use one double pack and have a smaller, lighter power bank.
The next crucial part for a USB powerbank is the charging circuit board. For this I chose a cheap allrounder board: T4056 with power output control. This means the circuit does not only charge your Lithium cells in a controlled matter, but also provides contacts for an electric load. It cuts off power to the load if the cells’ voltage drops beneath ~3.7 Volts thus protecting the battery pack from deep discharge damages.
Now since the cells are connected in parallel we need to find a circuit that boosts up the voltage from the batteries’ range to 5 Volts for USB power. Luckily this problem has been solved hundreds of times before: USB boost converter. This USB converter circuit even has a power status LED.
Read more: DIY USB power bank from laptop battery
- How was the battery prepared for reuse?
The author pried open an old Lenovo laptop battery to examine the cells and verified they were functional by measuring voltage and checking charge retention. - How were the lithium cells connected?
The three packs of two parallel 18650 cells were soldered together in parallel to create the power source. - What specific charging circuit was chosen?
A cheap allrounder T4056 board with power output control was selected for charging and protecting against deep discharge. - Why is the T4056 board suitable for this project?
It charges lithium cells safely and cuts off power to the load if voltage drops below approximately 3.7 Volts to prevent damage. - How is the voltage increased for USB devices?
A USB boost converter is used to step up the battery voltage range to the required 5 Volts for USB power. - Can the project be made smaller?
Yes, one could use just one double pack of cells instead of three to create a smaller and lighter power bank. - What features does the improved version include?
The improved version features a self-activating boost converter, an LED status indicator, and a homemade housing.
