
Summary of Star Jar Geiger counter triggered LED decoration using Arduino
This project upgrades a Geiger counter-triggered LED display by powering the counter directly from an Arduino connected to mains, eliminating battery replacements. The LEDs now feature a smooth fade-in and fade-out effect controlled by radiation pulses detected via the Geiger counter's pulse output.
Parts used in Star Jar Geiger Counter Triggered LED Decoration:
- Geiger counter with pulse output
- Strings of battery-operated LED decorations
- Arduino-based microcontroller (UNO)
- Female header (three sockets)
- Male header (8 pin run)
- 5V power supply for Arduino
- Connecting wires (multi-core, ribbon cable, solid core)
- Soldering equipment and wire tools
- Insulation tape or heat shrink
- Arduino IDE and USB cable
- Jar or receptacle
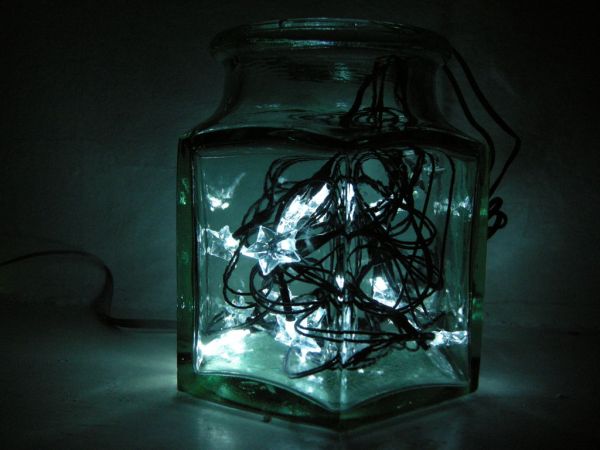
This instructable builds on top of the Geiger counter triggered LED decorations I made last year. This version powers the Geiger counter from the Arduino (itself now powered from a mains adaptor, so I no longer need to keep feeding them batteries) and the LEDs now fade in and out for a more gentle effect.
What you’ll need:
A Geiger counter with pulse output (I’m using the Gieger counter from MightyOhm)
A few strings of battery-operated LED decorations (I’m actually using USB-powered strings of stars from Poundland – you want something that’ll comfortably run off 5V)
Arduino-based microcontroller (I’m using an UNO)
Female header (three sockets’ worth)
Male header (I used an 8 pin run)
5V power supply for your Arduino (this will also power the Geiger counter)
Assortment of connecting wires (I used a combination of multi-core, ribbon cable and solid core)
Soldering equipment, wire cutters, wire strippers etc.
Insulation tape or heat shrink
Arduino IDE and an USB cable to connect to your microcontroller
A jar or other receptacle to put the LEDs in
I’m also assuming you’ve read the original instructable – if not, now might be a good time to do so!
Step 1: The circuit
The diagram shows the circuit we’re going to build.
First prep your LED strings by cutting off the battery pack, USB jack or whatever else they have attached to them.
This should leave you with 2 wires coming from your strings. Strip back the plastic insulation enough that you can insert the ends into the GND and 5V pins of the powered Arduino to check the polarity of the LEDs. Find which way around you need the wires to be so that the LEDs light up, and make a note of which wire must be connected to GND.
You’ll also need to prep various wires by cutting to length and stripping and tinning the ends… Insulate the exposed joints with tape or heatshrink as you go.
* I used a 4-strand length of ribbon cable to run between the LED strings and the Arduino – this gives me some extra length to play with so I can house the business end out of sight away from the pretty end.
* I used 2 lengths of multi-core wire to connect between the pulse output on the Geiger counter and the Arduino
* I used 1 length of solid core wire to connect between the pulse output and the 3.3V output on the Arduino.
Also tin the contacts on the male and female headers.
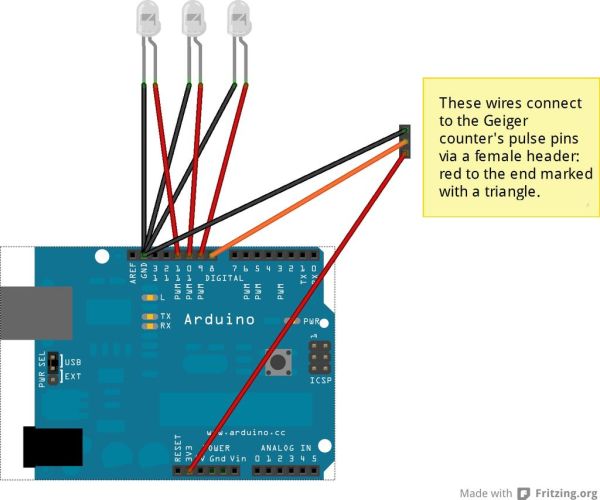
Solder the length of solid core wire (red in the diagram) to one of the outer positions of the female header, then solder the multi-core wire to the other two positions (the signal wire will be in the middle, with ground on the outside – orange and black on the diagram respectively).
Leave the remaining end of the solid core wire loose – this will plug straight into the arduino.
Solder the GND wires from the LED strings together. If you are using ribbon cable to extend your reach, then solder the connected GND wires to one strand and then independently solder the +ve wires to the remaining 3 strands.
Follow the GND strand to the other end of the ribbon cable and solder this and the GND wire from the pulse output to the male header at the GND position on on the Arduino.
Solder the remaining strands of the ribbon cable to the positions on the header for PWM pins 9, 10 and 11.
Finally solder the signal (middle wire) from the pulse output to position 8.
A few strings of battery-operated LED decorations
Arduino
For more detail: Star Jar Geiger counter triggered LED decoration using Arduino
- How is the Geiger counter powered in this version?
The Geiger counter is powered directly from the Arduino, which is itself powered from a mains adaptor. - What type of LED decorations are recommended?
You should use strings that can comfortably run off 5V, such as USB-powered star strings. - Which pins on the Arduino connect to the LED strings?
The positive wires connect to PWM pins 9, 10, and 11, while ground connects to GND. - How do you determine the correct polarity for the LEDs?
Strip the wires and insert them into the GND and 5V pins to check if they light up before noting the connections. - Does the signal wire from the Geiger counter connect to a specific pin?
Yes, the signal wire from the pulse output connects to position 8 on the male header. - Can I reuse the original battery pack from the LED strings?
No, you must cut off the battery pack, USB jack, or other attachments attached to the strings. - What materials are suggested for connecting wires between components?
The author used a combination of multi-core, ribbon cable, and solid core wires. - Why is a 4-strand length of ribbon cable used?
It provides extra length to house the electronic components out of sight away from the decorative end.
