Summary of Under $8 Arduino Serial Data Logger – Record to SD Card
This advanced DIY project creates a low-cost serial data logger using an ATmega328P-PU microcontroller to record incoming ASCII data onto an SD card. Operating at 9600 baud, the device buffers data and writes it upon receiving a Carriage Return or filling its buffer. The article warns that running the chip at 3.3V for 16MHz oscillation is outside official specifications but functional with quality components.
Parts used in the Under $8 Arduino Serial Data Logger:
- ATmel328P-PU blank chip
- SD Card holder (e.g., LC Studio)
- 16MHz crystal oscillator
- Two small load capacitors (18-22 pF)
- Bulk capacitor (10uF to 100uF, 10V+)
- Resistors (10K, 22K, 150 Ohm, 1/4W)
- Two 100pF ceramic bypass capacitors
- Tri-color LED or separate Red, Green, Blue LEDs
- Screw-down lead connector
- 28 pin IC socket
- Small prototype board
- Hook-up insulated 24G wire
- AVR programmer (USB-AVR, Arduino shield, or homemade interface)
Disclosure: This project operates the ATmega328-P-PU outside the published ATmel specifications: According to ATmel, the 328P requires slightly over 3.3V to reliably start the oscillator at 16MHz and to otherwise perform acceptably. Lab testing here at SofKinetics has shown that the ‘board-duino’ 328P-PU can withstand below freezing and above 130F temperatures and that the 16MHz crystal oscillator will start reliably at the 3.3V this project uses for the SD card and the microcontroller. However, your experience may be a miserable failure.
THIS IS AN ADVANCED PROJECT – NO HANDHOLDING
You will need access to an AVR programmer, either a dedicated one such as USB-AVR or an Arduino programming shield such as sold by AdaFruit or a home-made programming interface. This will be necessary for programming the naked 328P-PU which will be used in this project. The assumption is that you will be using the Arduino 1.0.1 or higher environment to program the uC. There are several decent Instructables on how to program the ATmel ATmega328P-PU. Please read and research.
Summary of operation:
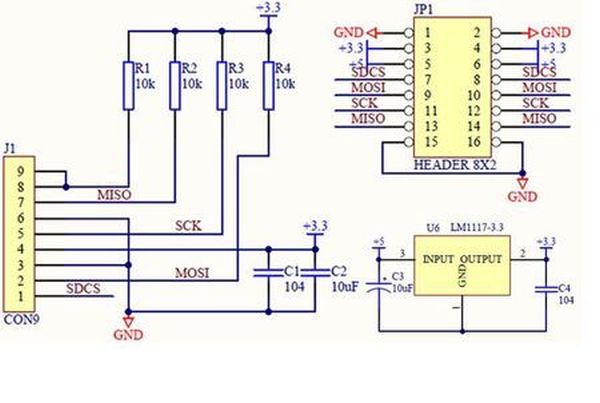
The sketch makes use of the SD Arduino library. There are 3 physical connections: Gnd, +5V, and RS232 ASCII signaling at 9600 BAUD. The 328P will buffer incoming characters until the buffer is full (512 characters) or until the datastream has a Carriage Return (CR) at which time the data in the buffer is written to the SD Card. I have tested 1G and 2G inexpensive cards formatted FAT with no issues noted. That is all this project does… just records serial data onto SD.
Parts you will likely need to purchase:
- ATmel328P-PU blank chip – approx $4
- SD Card holder such as LC Studio for approx $3.50 from eBay
- 16MHz (20ppm or 30ppm) crystal for approx $0.50 from any Internet seller
Parts you will likely have in your junk-box (or will have to purchase otherwise):
- Small load capacitors, 2x, of approx 18-22 pF to match crystal requirements
- 10uF to 100uF bulk capacitor rating 10V or greater
- 10K resistor / 22K resistor / 150 Ohm resistor all 1/4W
- 100pF, 2x, ceramic bypass capacitors for power lines
- Tri-color LED or separate Red, Green, Blue LEDs (Optional but useful)
- Screw-down lead connector (optional)
- 28 pin IC socket (optional, but highly recommended)
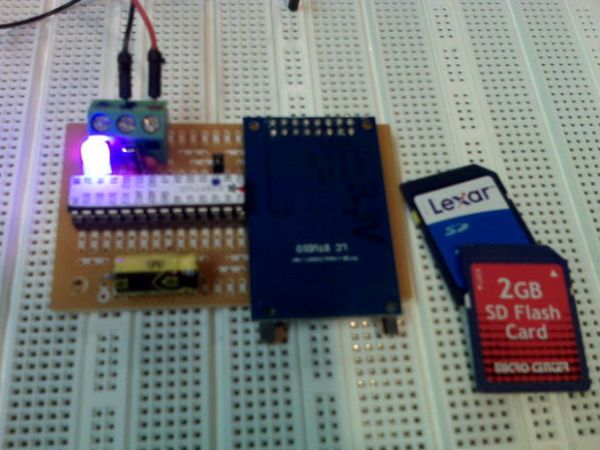
- Small prototype board – shown is from Radio Shack
- Misc. lengths of hook-up insulated 24G wire
- Soldering iron, solder, hand tools, and other things I forgot to list
Now, go back to the top and re-read the disclosure!
Why you may want to build this project:
Because this self-contained project will simply log anything that is thrown to it at 9600BAUD from a serial output of another device. In software, you can lower the serial speed to 4800 BAUD or lower if necessary. You may have success with serial rates above 9600 BAUD – but I have not tested this as my need is strictly selfish and centered around 9600.
Yes, this device can read and log PC terminal output.
Step 1: Overview: Off-loading serial data recording to a dedicated microcontroller
Before I get into specifics, a little background may be useful. You’ve already read the disclaimer that there is no guarantee that this will work, but let me explain why it will provided the ATmel chip you get is a prime chip (I order in 25 QTY from Newark, so I get the microcontrollers for about $2 each and I am assured of prime chips. I also order the 16MHz crystals from Newark.) Although there is no guarantee, there is a very high chance of success when you use quality components
- ATmel328P-PU blank chip
- SD Card holder
- 16MHz (20ppm or 30ppm) crystal
For more detail: Under $8 Arduino Serial Data Logger – Record to SD Card
- What voltage does this project use for the microcontroller and SD card?
The project operates the 328P-PU at 3.3V. - How can I program the naked 328P-PU chip used in this project?
You will need an AVR programmer such as a USB-AVR, an Arduino programming shield, or a home-made programming interface. - Does this device support recording data from a PC terminal?
Yes, the device can read and log PC terminal output. - What is the best way to trigger writing data to the SD card?
Data is written when the buffer is full with 512 characters or when a Carriage Return is detected in the datastream. - Can I lower the serial speed if necessary?
Yes, you can lower the serial speed to 4800 BAUD or lower via software. - What type of SD cards have been tested for this project?
Inexpensive 1G and 2G cards formatted with FAT have been tested with no issues. - Is an IC socket required for building this project?
An IC socket is optional but highly recommended. - What happens if the oscillator fails to start at 3.3V?
The article states that while lab testing showed reliability, your experience may be a miserable failure as this operation is outside published specifications.