Summary of Stepper Motor drive from Arduino
This tutorial demonstrates connecting a 4-wire bipolar stepper motor to an Arduino Uno using a Texas Instruments SN754410 Quad half H-Bridge chip to manage current requirements. The guide utilizes the built-in Arduino Stepper library and includes code examples for rotating the motor clockwise and counterclockwise via digital pins 8 through 11.
Parts used in the Stepper Motor drive from Arduino:
- Arduino Uno board
- Bipolar stepper motor (Sparkfun or 4-wire equivalent)
- Texas Instruments SN754410 Quad half H-Bridge chip
- Digital pins 8, 9, 10, and 11
Stepper Motor drive from Arduino
In this tutorial we will show you how to connect a bipolar stepper motor to an Arduino Uno board. The stepper motor we are using is the Sparkfun Stepper Motor but you can use any other 4-wire bipolar stepper motor.
Because a stepper motor draws a higher current than the Arduino processor can handle we are going to use a Quad half H-Bridge chip to control the stepper motor. The popular Texas Instruments SN754410 chip is ideal for this.
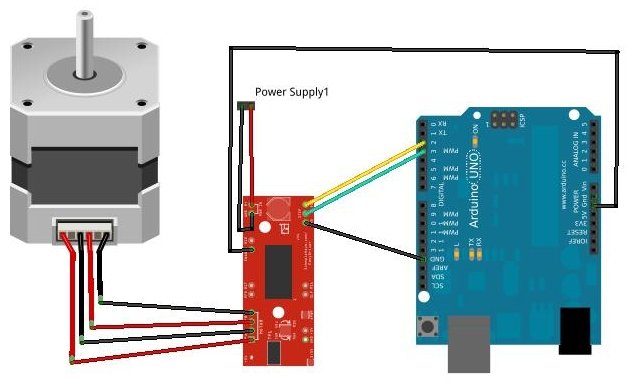
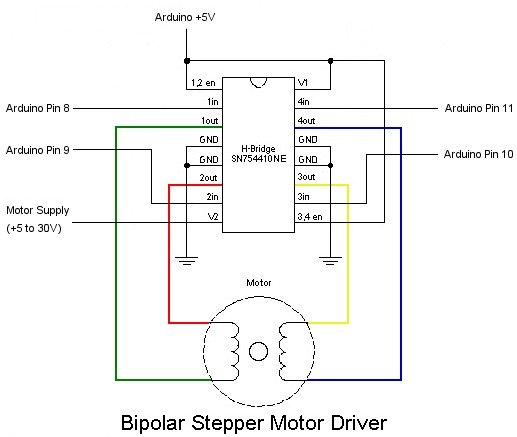
The Arduino Stepper library will work directly with this chip without any code modifications, so it is just a simple matter of wiring it up as per the diagram below.
Once all wired up, load one of the example stepper motor sketches. The One-Revolution sketch is shown below which turns the stepper motor one revolution in one direction, then one revolution in the other direction.
/*
 Stepper Motor Control - one revolution

 This program drives a unipolar or bipolar stepper motor.
 The motor is attached to digital pins 8 - 11 of the Arduino.

 The motor should revolve one revolution in one direction, then
 one revolution in the other direction.

 Created 11 Mar. 2007
 Modified 30 Nov. 2009
 by Tom Igoe
 */

#include <Stepper.h>

const int stepsPerRevolution = 200;  // change this to fit the number of steps per revolution
                                     // for your motor

// initialize the stepper library on pins 8 through 11:
Stepper myStepper(stepsPerRevolution, 8,9,10,11);

void setup() {  // set the speed at 60 rpm:  myStepper.setSpeed(60);  // initialize the serial port:
  Serial.begin(9600);}void loop() {  // step one revolution  in one direction:
   Serial.println("clockwise");
  myStepper.step(stepsPerRevolution);  delay(500);
   // step one revolution in the other direction:
  Serial.println("counterclockwise");  myStepper.step(-stepsPerRevolution);  delay(500); }
#include <Stepper.h>
const int stepsPerRevolution = 200; // change this to fit the number of steps per revolution
// for your motor
// initialize the stepper library on pins 8 through 11:
Stepper myStepper(stepsPerRevolution, 8,9,10,11);
void setup() { // set the speed at 60 rpm: myStepper.setSpeed(60); // initialize the serial port:
Serial.begin(9600);}void loop() { // step one revolution in one direction:
Serial.println("clockwise");
myStepper.step(stepsPerRevolution); delay(500);
// step one revolution in the other direction:
Serial.println("counterclockwise"); myStepper.step(-stepsPerRevolution); delay(500); }
For more detail: Stepper Motor drive from Arduino
- How do I connect a stepper motor to an Arduino Uno?
Connect a 4-wire bipolar stepper motor to the Arduino Uno using a Texas Instruments SN754410 chip. - Why is an external chip needed for the stepper motor?
A stepper motor draws higher current than the Arduino processor can handle directly. - Which chip is recommended for controlling the stepper motor?
The popular Texas Instruments SN754410 Quad half H-Bridge chip is ideal for this purpose. - Does the Arduino Stepper library require code modifications?
No, the library works directly with the SN754410 chip without any code modifications. - What happens when running the One-Revolution sketch?
The motor turns one revolution in one direction, then one revolution in the other direction. - Which digital pins are used for the motor connection?
The motor is attached to digital pins 8 through 11 of the Arduino. - How do you set the speed of the stepper motor?
You set the speed at 60 rpm using the myStepper.setSpeed function. - Can I use a unipolar motor with this setup?
Yes, the provided program drives both unipolar and bipolar stepper motors.