
Summary of Arduino Controlled Servo Robot (SERB) using arduino
This article guides users in building the SERB, an open-source Arduino-controlled servo robot. It details three methods for fabricating acrylic chassis parts: purchasing pre-cut pieces, using a laser cutter with digital files, or cutting manually with a scroll saw and drill. The project requires specific hardware, electronics, and tools to assemble a programmable robot that can be controlled via Skype or a Wii Nunchuk, featuring dual ball-bearing wheels and no soldering requirements.
Parts used in the SERB Robot:
- 3mm x 15mm bolt (x20)
- 3mm x 10mm bolt (x12)
- 3mm nut (x34)
- 3mm washer (x12)
- 8mm x 25mm bolt (x2)
- 8mm nut (x2)
- Skate Bearings (x2)
- Large O-ring (4.5" ID)
- Small O-ring (3/4" ID)
- Arduino Duemilanove
- Continuous Rotation Servo (x2)
- 400 Contact Breadboard
- Quad AA Battery Box
- 9V Battery Clip
- 2.1 mm Plug
- 3 pin header (x2)
- A-B USB Cable - Printer Style
- AA Batteries (x4)
- 9v Battery (x1)
- Purple wire (15 cm, x2)
- Black wire (15 cm, x1; 5 cm, x2)
- Red wire (5 cm, x2)
- Screwdriver (Philips)
- Needle-nose Pliers
What better way to start experimenting with open source micro-controllers ( Arduino ) then by building your very own open source robot ( CC (SA -BY) )?
What to do with your SERB?
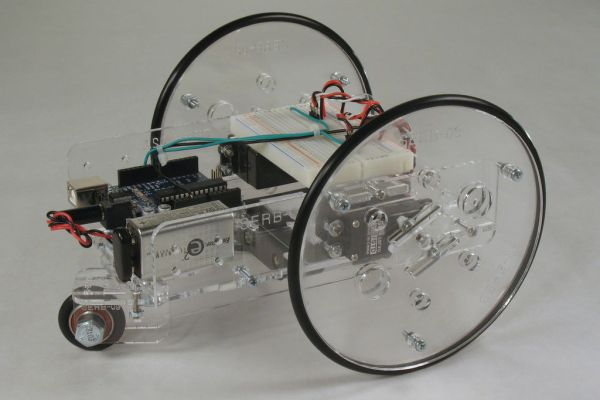
Features:
- Fully programmable using an Arduino Duemilanove micro-controller (or another micro-controller of your choosing).
- No need to solder.
- Choice of cutting options for acrylic pieces. (scroll saw, access to a laser cutter, purchasing pre-cut pieces)
- Easily expandable and modifiable with extra bolt holes and included breadboard.
- Dual ball bearing rear wheel.
- Up and running in 1-2 hours. (from kit)
- Open source design (build as many as you like)
(Shameless Plug)
In the UK and like Arduino stuff? check out our newly opened web store oomlout.co.uk
Note: Source files are available on a parallel Instructable (Source Files For) – How to Make an Arduino Controlled Servo Robot – (SERB)
Step 1: Parts & Tools
All bolts can be found at your local Home Depot. The other parts can be found online (I have included a link to my favorite source for each).
Parts List:
A bundle containing all hardware items can be purchased at oomlout.com’s store ( here ) ($120)
Nuts and Bolts:
- 3mm x 15mm bolt (x20)
- 3mm x 10mm bolt (x12)
- 3mm nut (x34)
- 3mm washer (x12)
- 8mm x 25mm bolt (x2)
- 8mm nut (x2)
- Skate Bearings (x2) ( VXB ) (these are standard skate bearings so they can be salvaged from a pair of roller-blades or a skateboard)
Tires
- Large O-ring (4.5″ ID 3/16″ Bead Dash #349) (x2) ( McMaster-Carr Product #9452K407 )
- Small O-ring (3/4″ ID 3/16″ Bead Dash #314) (x1) ( McMaster-Carr Product #9452K387 )
Electronics
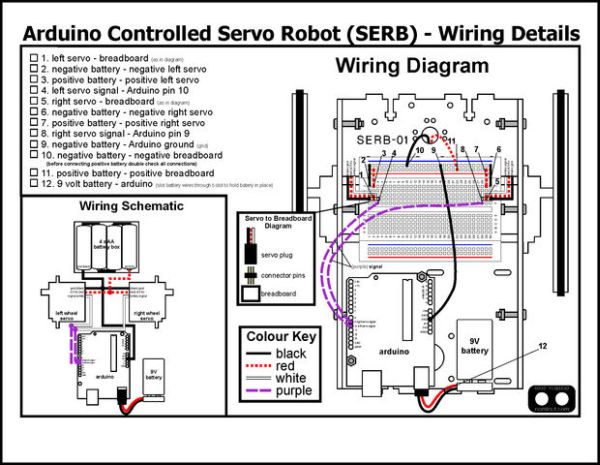
- Arduino Duemilanove (x1) ( Maker Shed )
- Continuous Rotation Servo (x2) ( Parallax )
- 400 Contact Breadboard (x1) ( All Electronics) )
- Quad AA Battery Box (x1) ( All Electronics )
- 9V Battery Clip (x1) ( All Electronics )
- 2.1 mm Plug (x1) ( All Electronics )
- 3 pin header (x2) ( All Electronics )
- A-B USB Cable – Printer Style (x1) ( All Electronics ) (not included in kit)
Batteries:
- AA Battery (x4) (not included in kit)
- 9v Battery (x1) (not included in kit)
Wire:
(all wire is 22 AWG solid I purchase mine through McMaster-Carr )
- 15 cm Purple (x2)
- 15 cm Black (x1)
- 5 cm Black (x2)
- 5 cm Red (x2)
Tools
- Screwdriver (x1) (Philips)
- Needle-nose Pliers (x1)
Step 2: Cutting Pieces
Please chose which steps to follow based on the cutting option you have chosen.
Option 1 (Purchasing Pre-cut Parts)
- Purchase a pre-cut chassis from oomlout.com’s store ( here ) ($60 including shipping to the USA and Canada)
Option 2 (Digital Manufacturing (ie. Ponoko ) / Access to a Laser Cutter)
- Download the laser cutter layout ( “03 SERB Ponoko Cutting Layout P2.eps” or “03-(SERB)-Ponoko Cutting Layout (P2).cdr” )
- Cut the files using Ponoko or on your own Laser Cutter (using 3mm, .118″ acrylic (sometimes sold as .125″)
Option 3 (Scroll saw and Drill)
- Download and print the PDF pattern (please choose the file corresponding to your paper size) 03-(SERB)-ScrollSaw Pattern (letter).pdf 03-(SERB)-ScrollSaw Pattern (A4).pdf(it is important to not scale the drawing while printing)
- Measure the ruler on the printout against a ruler you trust, if they do not match the pattern has been scaled and you need to look at your printer settings before reprinting. If they do match up, onwards.
- Glue the pattern to the acrylic sheet (3mm, .118″ (sometimes sold as .125″).
- Drill holes.
- Cutout pieces using a scroll saw
For more detail: Arduino Controlled Servo Robot (SERB)
- How can I connect my SERB to the internet?
You can connect your SERB to the internet to drive it over a Skype video call. - Can I control the SERB using a Wii nunchuck?
Yes, you can control the SERB using the accelerometers from a Wii nunchuck. - Does the SERB design require soldering?
No, the SERB design does not require soldering. - What are the options for cutting the acrylic pieces?
Options include purchasing pre-cut pieces, using a laser cutter with digital files, or using a scroll saw and drill. - How long does it take to get the robot up and running?
The robot is up and running in 1-2 hours from the kit. - Where can I purchase a bundle of all hardware items?
You can purchase a bundle containing all hardware items at oomlout.com's store. - What type of bearings are used for the rear wheels?
Dual ball bearing rear wheels use standard skate bearings salvaged from roller-blades or a skateboard. - Is the SERB design open source?
Yes, the design is open source, allowing you to build as many as you like.