Summary of Simple Animatronics with Servos and Arduino using arduino
Summary: This project uses an Arduino to drive five hobby servos to animate a vintage hard-plastic doll by controlling its limbs and neck. The doll is disassembled, the neck is filled with epoxy putty to form a servo footing, and a head-mounted servo is fitted with dowel linkages secured into the head to allow controlled head movement while keeping the torso closable.
Parts used in the Simple Animatronics with Servos and Arduino:
- Arduino ('duino)
- Five hobby servos
- Hard plastic doll (1967 Mattel / See 'n Say type)
- Mighty Putty (Epoxy Putty)
- Petroleum jelly
- Servo horn
- 3/8 inch wooden dowel (cut to length)
- Hot glue
- Screws (small, for fastening dowels to head)
- Coping saw
- Razor (for removing scalp)
- Drill (for pilot holes)
- Files/sandpaper (for shaping putty)
Simple Animatronics with Servos and Arduino using arduino
Servos are surprisingly easy to use. Even more so than simple DC motors and steppers when you have a microcontroller. In this instructable we’ll use a ‘duino to drive five servos which will control a doll’s limbs and neck.
I bought the servos at HobbyPartz for a couple bucks apiece and found the doll at a swap meet for a dollar. The doll says 1967 Mattel on the back and I later learned she is a See ‘n Say type doll. The hard plastic body was important for a successful installation.
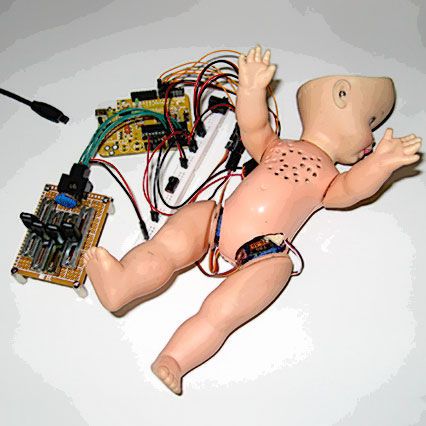
Step 1: Dismemberment
Pop off the arms and use a coping saw to split open one side. Then crack open the other side and remove the guts. Be careful along the way to ensure that everything can be put back together after. I also spent at least 20 minutes trying (and failing) to get the inner workings functional.
Step 2: Turning Heads
The Neck
First dry fit the server horn in the neck and trim it as needed. The servo needs a base to stand on so we’ll use some Mighty Putty (aka Epoxy Putty) to fill in the neck.
This stopper will serve as a base for the servo which turns the head. It must stick to one half of the body but not the other to allow the torso to be opened and closed freely. Use a little petroleum jelly on one half of the torso and the servo horn to prevent them from sticking.
Fill the neck with putty while focusing on how the torso comes apart. Allow the putty to cure for a minute or two to eliminate some of the tackiness. Then press the servo horn into the neck to create a firm footing for the servo.
Finally remove the servo and top half of the torso. Allow the putty to cure further while testing the fit a few times before it cures completely. The putty can be filed and sanded after it’s hard but it’s much easier to adjust it prior.
The Head
Now it’s time to mount the servo to the head. The first thing we want to do is remove the scalp. Follow just under the hairline with a razor and remove it completely.
Take a moment to orient the horn so that it has an even range of motion in either direction while it’s oriented perpendicularly to the face. Place the horn in it’s footing and run the wire down the side of the putty. Turn the servo in the direct opposite the wire and make sure it has enough slack to turn completely. Mark the wire and the putty when you’re happy with the positioning.
Make a groove in the putty with a saw so the servo wire can run down the neck and into the body while it’s closed. Next put the servo in the head and feed the wire down through the groove. Close the torso and put the head back on. You should now have head on the body with the motor in the head and the wire running down the neck into a closed torso.

Adjust the head and servo so that they’re lined up. Make sure there’s an even amount of spacing between the servo and either side of the head. Take a measurement of this space and cut a length of 3/8″ dowel. Dry fit the piece of dowel on either side of the head and re-cut if necessary. Cut another piece of dowel the same length once you’re happy with the fit.
Now wedge the pieces of dowel on either side of the servo. Drop a small amount of hot glue on each side where the dowel meets the servo and allow it to dry. Remove the servo with the dowels sticking to it. The dowels should hinge on the small drop of hot glue while maintaining an accurate placement. Take advantage of this hinging effect to apply more glue between the servo and dowels before clamping them together to create a secure, tight fit.
The dowels should now be attached to the servo but not the head. I initially tried gluing the dowels to the head but the glue didn’t stick. Drill a small pilot hole through either side of the dowel. Place the servo back into the head with the horn planted firmly in its footing and use two screws to fasten the dowels to the head. Remove the head from the body and disassemble the torso.
For more detail: Simple Animatronics with Servos and Arduino
- What is the main control board used for this animatronics project?
An Arduino ('duino) is used to drive the servos. - How many servos does the project use?
The project uses five servos to control the doll's limbs and neck. - How is the servo mounted in the neck?
Mighty Putty (epoxy putty) is used to form a footing in the neck and the servo horn is pressed into it to create a base. - How do you prevent the putty from sticking to both halves of the torso?
Apply a little petroleum jelly to one half of the torso and the servo horn so the putty sticks to only one half. - How is the head servo linked to the head for motion?
3/8 inch dowels are glued to the servo, hinged with hot glue, then screwed through into the head to create a secure linkage. - How do you route the servo wire from the head into the torso?
Create a groove in the putty so the servo wire can run down the neck and into the closed torso. - Do you need to remove the doll scalp for head servo installation?
Yes, the scalp is removed by cutting just under the hairline with a razor before mounting the servo in the head. - Can the putty be adjusted after it cures?
The putty can be filed and sanded after it hardens, but it is easier to adjust it before it fully cures.