
Summary of Laser Tag Stuffed Animals
These Laser Tag Stuffed Animals transform a stuffed toy into a cuddly night light and a child-safe infrared laser-tag gun, firing and receiving IR beams up to 50 feet. Eyes and a molded heart use RGB LEDs to indicate modes, shooting, hits, and health; tail button switches between warmth and war modes. The project uses Arduino-driven 38 kHz IR signaling, molded plastic light diffusers for eyes and heart, and simple transistor driving circuitry. CAD files and Arduino code are provided to adapt the design to other plush animals with tails.
Parts used in the Laser Tag Stuffed Animals:
- Stuffed animal (meerkat used)
- Sewing kit
- Velcro
- Moldable polyurethane plastic
- Aluminum foil
- Small springs
- Arduino
- Arduino ProtoShield
- IR LED
- IR receiver (38 kHz)
- NPN transistor
- 3 RGB LEDs
- Buttons (tail switch)
- 9 volt battery
- Resistors (higher and lower resistance as described)
- 3D printed molds / CAD files for heart and eyes
- Glue gun
- Soldering iron and solder
- Insulated wire
Ever feel like there aren’t enough toys at the intersection of cuddly and terrifying? Wish your stuffed animals could double as weapons? Then I’ve got the toy for you.
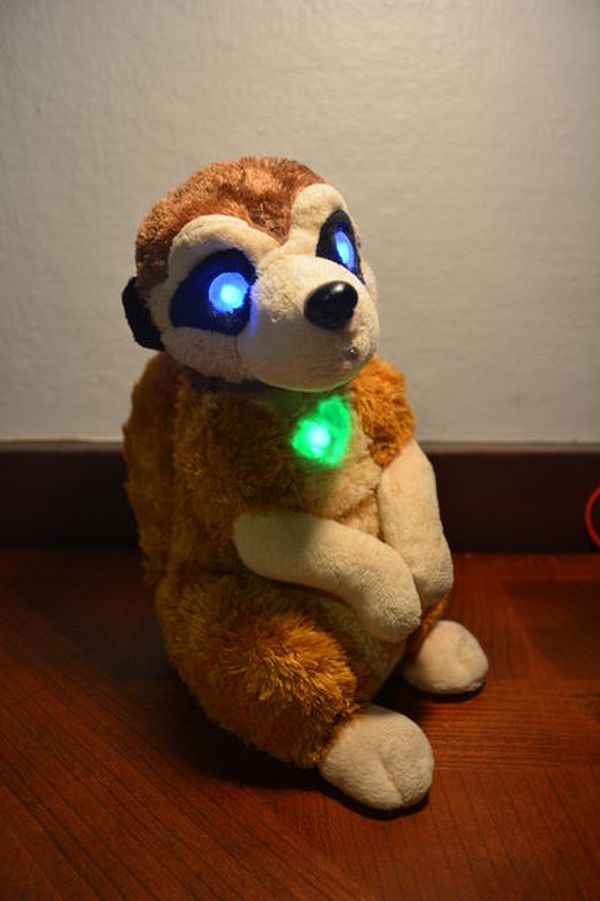
These Laser Tag Stuffed Animals easily transform from being a cuddly night light to the world’s softest laser tag weapon.
Check out my laser tag plushie in action!
These deadly plushies, when in “war mode,” can be used as laser tag guns. They fire and receive 100% child-safe infrared beams from up to 50 feet away. The plushie’s eyes light up different colors when it is shooting or being shot; the plushie’s heart fades as it gets shot, acting as a health meter to show how many times the stuffed animal has been successfully fired at. And when you want the toy to turn back into a cuddly night light (entering “warmth mode”), simply push the tail down.
Though these particular laser plushies are meerkats, the CAD models and electronics can be adapted for any stuffed animal with a tail.
Step 1: Preparation
Materials:
Stuffed animal
Sewing kit, velcro
Moldable polyurethane plastic
Aluminum foil
Small springs
Electronics:
Arduino
Arduino ProtoShield
IR LED
IR Receiver
NPN Transistor
3 RGB LED’s
Buttons
9 volt battery
Tools:
3D printer
Glue gun
Solering iron, solder
A complete version of my Arduino code can be found here.
Now choose your victim stuffed animal, and get cracking.
Step 2: IR Laser System
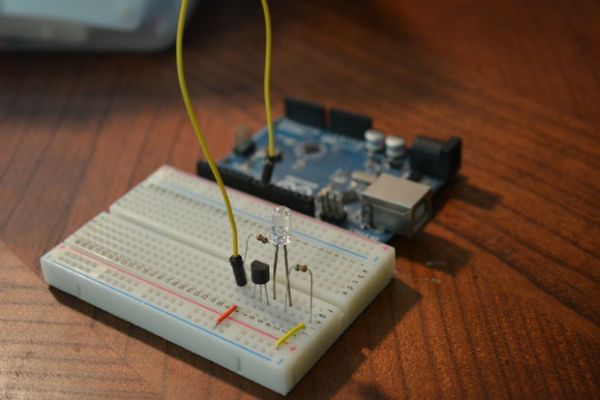
IR is the backbone of the laser tag system. The infrared receiver is an IR diode plus some circuitry which makes the receiver sensitive only to infrared pulses of 38 kHz. This blocks out any background infrared from the environment. The IR receiver has three pins: 5v, sensor, and ground. When it detects an 38 kHz infrared signal, the sense pins goes to ground. Otherwise, the sense pin is at 5v.
Now let’s drive an infrared LED at 38 kHz so it can interact with our receiver. The simple driver circuit pictured consists of an IR LED, a higher resistance resistor, a lower resistance resistor, and an PNP transistor. Input goes to the collector of the transistor. The base and emitter short when the collector is at a high voltage, allowing current to run through the IR LED. Running the LED with this circuit allows for more current (and thus a stronger IR signal and farther shooting range) than simply connecting the LED from an Arduino output to ground. The circuit diagram and breadboard set up are pictured below. Make sure to connect the transistor’s input to the Arduino pin 9! Otherwise the software here will not pulse your LED at 38 kHz.
This code uses direct pin manipulation to oscillate the output pin at precisely 38 kHz.
Once you’re comfortable with the circuitry setup, it’s time for some stuffed animal surgery. Cut a slit down the back of your plushie, and remove the stuffing (this will make attaching the circuitry easier). Cut two very small slits in the head of our plushie: one for the IR LED, one for the receiver. Before you hot glue the elements to their respective slits, solder several inches of insulated wires onto each pin of the receiver and each leg of the LED. Having longer wires will make it easier to organize/attach to the Arduino. Once you’ve hot glued the elements to the plushie, you’re ready to start adding some RGB LED’s!
Step 3: Molding Heart + Eyes
LED’s don’t shine very well through fabric. A bright but diffused glow can be created by putting an RGB LED behind a molded plastic part. We need three molded pieces: two eyes and one heart.
Use a glue gun to attach an RGB LED into the holes in the back of both molds.
You can print the heart with these files: first half of mold, second half of mold.
You can print the eyes with these files: eye CAD
After gluing the LED’s to the molds, solder several inches of wire to each LED lead. Now glue each eye into the eye socket area of your plushie.
Step 4: Controlling the Flashing
Wiring up the heart and the eyes is more patience than thought. The two eye LED’s can be soldered together in parallel and controlled by the same output pins.
Here’s a diagram of how to solder your various wires to the Arduino.
Here’s how this stuffed animal responds to different stimulus:
Warmth Mode:
– Eyes glow blue
– Heart beats green
War Mode:
– Eyes glow red: the meerkat is neither shooting nor being shot at
– Eyes glow blue: the meerkat has just been shot
– Eyes glow green: the meerkat is shooting
– Eyes flash red, green, blue for two seconds: meerkat has been drained of health and is respawning.
Download this code to control your glowing stuffed animal!
For more detail: Laser Tag Stuffed Animals
- How far can the infrared beams reach?
The plushies fire and receive infrared beams from up to 50 feet away as stated in the article. - Can the plushie both shoot and detect hits?
Yes, the plushie can fire and receive infrared pulses and its electronics register when it is shot. - What indicates the plushies health or hits?
The molded heart fades as it gets shot, acting as a health meter to show successful hits. - How do you switch the toy between night light and weapon modes?
Push the tail down to turn the toy back into a cuddly night light (enter warmth mode). - What frequency does the IR system use?
The IR system uses 38 kHz pulses so the IR receiver is sensitive only to that frequency. - Do the eyes and heart use raw LEDs or molded diffusers?
The project uses RGB LEDs placed behind molded plastic parts (eyes and heart) to create a bright, diffused glow through fabric. - What happens to the LEDs when the meerkat is respawning?
The eyes flash red, green, blue for two seconds while the meerkat is respawning. - Are CAD files and code available to adapt the design?
Yes, CAD files and a complete version of the Arduino code are provided and can be adapted for other stuffed animals with a tail.
